|
| Testing Plane Irons |
|
| Finest abrasives. | ||
| Microbevels front and back. | ||
| Use a jig. | ||
| Copyright (c) 2002-17, Brent Beach |
If you have been here before and just want to see what is new, check the reverse chronological order list.
 Starting in May 2007, I am running a series of initial sharpness tests on 13 blades. These tests measure the pressure required to push a blade through a specific type of thread. This test measures the blade before use in a way that a photomicrograph cannot. Extremely small variations in edge geometry can affect the sharpness test - and thus plane performance - but still not be visible even at 200X. This test found no significant difference in initial sharpness among a wide variety of blades (the same range of tool steels as tested here). You can ignore claims that some steels can be sharpened to keener edges than others.
So, all blades start at the same sharpness. This page considers what happens to blades as they dull. You will sew that while all blades start at the same sharpness, they get dull at very different rates.
Abrasive quality
Getting the same surface quality is not the same as getting very good surface quality. Blades prepared with lower grit abrasives would still produce results that allow blade-to-blade comparisons.
However, since using the best abrasives is as easy as using average abrasives, I use 3M microfinishing abrasive paper on plate glass with baby oil as a cutting fluid.
Bevel Angles
The standard sharpening begins with a 25 degree primary bevel (1" belt sander, 120 grit Alumina Oxide) then
Back Bevels
The cutting edge is the junction of the front and back faces of the plane blade. If the angle and surface quality of the back face is not controlled, then the results are not reproducible.
Planing always hones a wear bevel onto the upward facing blade surface. Unless sharpening restores both faces of the iron, then the test is not reproducible. Merely honing the back face with the blade flat on the abrasive does not remove the back wear bevel. Honing back bevels while honing the front bevel does.
Jig Designs
If you are still looking for a simple yet consistent sharpening system, this page shows the jig I use in much more detail.
|
The Wood
I have a large stash of Douglas-fir recovered from a tree felled by lightening several years ago. Part of this tree was sawn into 4 foot 1 by 8s. I use those boards in the tests. All of the boards used in this test over the years came from the same part of this tree. Jointing In order to make sure that I can take full width shavings most of the time, I use a smoothing plane and joint the board rather than face plane it. I walk down the board planing a full width shaving. I pull the shaving from the plane and drop it into a garbage pail, then walk back to the start of the board, sliding my hand along the planed surface as I go to check for defects. I use my left hand as a fence, to control the part of the blade that takes the cut - all cuts use the middle of the blade. My left thumb is on the toe in front of the knob, my fingers are under the plane with the second knuckle rubbing against the side of the wood and keeping the plane centred on the plank. Test Statistics It takes about 6 seconds per pass, with a few taking a little more. The first shaving is around 0.0015" thick. Blade wear with use requires that the blade be advanced when the shavings get too thin. With faster wearing blades, the blade will be advanced several times during the test. A test of 150 passes along the board removes about 1/4" of wood from the board. I have gone through many boards during these tests. On one test I allowed the shavings to pile up beside the board. This pile represents about 100 shavings. |

|
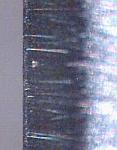
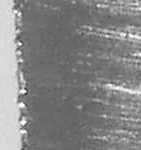
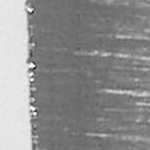
For most plane irons I take a picture at 200 times magnification after each set of 50 passes, usually to a total of 150 passes. It is perhaps a little surprising that this amount of usage consistently dulls almost all blades. The wear rate might result in part from the speed and duration of the test. While not planing quickly, I do work steadily for 10 minutes for each set of 50 passes.
I have been testing blades now for over 5 years. During that time my testing techniques changed slightly. The main changes were with the way the blade was held at the microscope and how the blade was illuminated. All test descriptions include testing date.
In November 2002 I retested 14 irons in an attempt to standardize the test. I resharpened all 14 irons on the same day, then tested the irons over the next week on the same piece of wood, doing 100 passes in a single run. I used two planes for almost all the irons - the wooden plane iron had to be tested in its plane, the thicker Holtey had to be tested in a plane with a wider mouth. The results of that test.
Since the initial testing period I have bought several new blades and tested them as well.
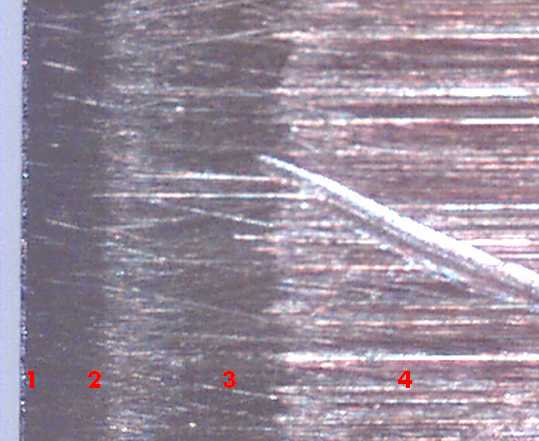
The key measurement of wear is the width of the wear bevel. I have quite a long discussion of bevels of all kinds for those interested. In short, during use a plane iron is ground down by contact with the wood. This grinding produces a narrow WEAR BEVEL on both the upper and lower surface at the edge. It is the rate at which this wear bevel appears that determines the durability of the iron. It is the appearance of the wear bevel that determines the quality of the surface.
I measure the width of the wear bevel in a graphics routine by zooming (digitally magnifying) the image and counting the pixels across the wear bevel. A pixel corresponds to about 0.00007" with this microscope.
A plane iron with an 8 pixel wide wear bevel is ready for a resharpening. Some thicker irons will still plane well with thicker wear bevels.
The test description for the Mujingfang HSS iron is the most complete explanation of the testing technique. It was during the testing of this blade that I started to develop these web pages.
If you have been here before and just want to see what is new, check the reverse chronological order list.
| Steel type | Iron (click to see test details) | Passes for pic |
Wear bevel width (in pixels) | Worn blade thumbnail |
| High carbon steel | Berg Ekelstuna | 200 | 8 |

|
| Hock O1 | 150 | 9 |
| |
| Lie-Nielsen W1 | 100 | 10 |

| |
| Knight O1 Cryogenic | 150 | 6 |

| |
| LN O1 steel blade in an LN #62 low angle plane | 150 | 18 |

| |
| Clifton hand forged | 200 | 10 |

| |
| Tsunesaburo Blue Steel | 200 | 9 |

| |
| Chrome/Chromium alloy steel | E.C.E. | 100 | 10 |

|
| A2 | Lee Valley block plane | 150 | 12 |

|
| Lee Valley A2 | 150 | 6 |

| |
| Lie-Nielsen A2 | 150 | 6 |

| |
| Shepherd A2 | 100 | 6 |

| |
| Hock A2 Cryo | 200 | 7 |

| |
| D2 | Gramercy D2 2" | 200 | 6 |
|
| Gramercy D2 2-3/8" | 200 | 5 |
| |
| HSS | Mujingfang HSS | 200 | 4 |

|
| Mujingfang HSS (Hong Kong style) | 200 | 5 |

| |
| Academy Saw Works 2002 | 200 | 4 |

| |
| Academy Saw Works 2005 | 400 | 6 |

| |
| Stanley High Speed Steel | 200 | 3 |

| |
| Holtey S53 | 150 | 4 |

| |
| Steve Elliott CPM 3V | 250 | 5 |
|
I have included a Rating column, the number of passes divided by the width of the wear bevel. The larger the result the more durable the blade. Some caution in using the rating is required -- sometimes the wear bevels are hard to measure exactly and a single pixel change in the wear bevel width could affect the rating quite a lot.
| Date | Blade | Passes | Wear bevel width | Rating |
| May '06 | Steve Elliott CPM 3V | 250 | 5 | 50 |
| March '05 | Academy Saw Works M2 | 400 | 5 to 6 | 73 |
| March '05 | Tsunesaburo Blue Steel | 200 | 9 | 22 |
| February '05 | Stanley HSS M2 | 200 | 3 | 67 |
| February '05 | Mujingfang M2 | 200 | 5, 4 | 45 |
| February '05 | Gramercy D2 2-3/8" | 200 | 6 | 33 |
| February '05 | Gramercy D2 2" | 200 | 5 | 40 |
| September '04 | Lie Nielsen #62 O1 | 150 | 18 | 8 |
| August '04 | Clifton Hand Forged | 200 | 10 | 20 |
| August '04 | Hock A2 | 200 | 7 | 29 |
| August '03 | Shepard A2 | 100 | 6 | 17 |
| November '02 | Mujingfang M2 | 200 | 4 | 50 |
| May '02 | Lie Nielsen A2 | 150 | 6 | 25 |
| May '02 | Lie Nielsen W1 | 100 | 10 | 10 |
| April '02 | E.C.E. | 100 | 10 | 10 |
| April '02 | Hock O1 | 150 | 9 | 17 |
| April '02 | Holtey S53 | 150 | 4 | 38 |
| April '02 | Knight O1 | 150 | 6 | 25 |
| April '02 | Lee Valley block plane A2 | 150 | 12 | 13 |
| April '02 | Lee Valley A2 | 150 | 6 | 25 |
| March '02 | Ekilstuna | 200 | 8 | 25 |
| March '02 | Academy Saw Works M2 | 200 | 5 | 40 |

Their wear resistance ratings correlate well with my ratings in the above table.
The crucible website has lots of interesting information if you want to learn a bit more about modern steel making. Their page on Selection of Tool & Die Steels is quite readable. They have charts there comparing the various types of steel on the basis of hardness (resistance to deforming), toughness (resistance to breakage), and wear resistance (resistance to abrasion).
This page lists a steel they call CMP 15V that they show as having 10 times the wear resistance of the M2 high speed steel found in three blades I have tested (and others I have tested and not reported here). Can a CPM 15V blade be sharpened by the 3M abrasives? If so, how long would it take. How long would such a blade remain sharp? Where can I get one to test? Then again, taking 4,000 passes along a 4 foot board to wear out the blade may be too much, even for me.
| I assume the bars in this chart are derived from real numbers. In order to make this visual comparison a bit more factual, I measured the bars in a graphics program. The numbers for a few of the steels are: |
|