|
| Initial Sharpness |
|
| Finest abrasives. | ||
| Microbevels front and back. | ||
| Use a jig. | ||
| Copyright (c) 2002-15, Brent Beach |
I have made a new thread holding device that provides a consistent slackness in the thread - removing problems with variable thread tension in the first thread holding jig.
This page considers the problem of measuring blade sharpness. While we are really interested in the ability of a plane blade to cut through wood, what we test is the ability of the blade to cut through thread. While you may not cut a lot of thread with your planes, the thread cutting test is a little better for estimating initial sharpness than the "forearm hair" test, especially if you want to test a lot of blades.
My position going into the test was that initial sharpness is a function of blade shape alone. It seemed obvious to me that if sharpening produced the same shape on two different plane blades - no matter what their steel composition - then the blades would be equally sharp.
I was also convinced that I could produce exactly the same edge shape using the 3M abrasives on glass, no matter what the steel in the blade. (Since I have been sharpening M2 High Speed Steel using 3M abrasives for years, this was pretty clear to me.)
However, this is not obvious to everyone. This video by a reputed plane iron supplier contains a section in which he claims that different steels have different grain sizes, and that these affect initial sharpness. This in not the only such claim. The claim "There are materials that will hold an edge longer [than A2], but diamond abrasives are needed to sharpen them ...." appears on another prominent tool dealers web site. Both of these claims are wrong.
| So, I rounded up 13 blades with a wide variety of steels - from the old High Carbon tool steels used by Stanley and Sargent 100 years ago to modern tool steels. The test set: |
|
All of these blades are covered in my blade testing pages. Look there for more detail on the steel types involved and the results of my durability testing.
This list covers the range of blades available to most woodworkers - blades made from steels used by the major plane companies 100 years ago to the most current steel types. If you have a blade made of a steel not in this list you want to have tested, send me an email (contact information at the bottom of the page).
I did not invent the idea of cutting thread to measure sharpness. I did work out the simple measurement system below. I learned about it from Steve Elliott who has been using thread testing for both initial sharpness and sharpness during use for some time. Steve got the thread cutting idea from Cliff Stamp who primarily tests knives. There is a picture on the latter site of a thread cutting setup using a digital scale - that I did not see until well after I had built and used my simple setup for several months.
I sharpened all the blades the same way at the same time. All were ground by hand on a bench stone to a 25 degree primary bevel. All were then honed using my jig and the usual 3M abrasives on glass. After the first sharpening, I tested the full set of blades twice. Then I sharpened all of the blades again, and again tested the full set of blades twice.
The thread cutting setup here is pretty simple - you can do this at home if you have a digital scale, some thread, and some blades to test. You will need to make a small block of wood around which you wrap the thread, with a slot down which the blade falls after the thread splits.

There is a slight delay between the time a weight is added to the scale and when the scale displays the new reading. I suspect this is related to the desire to make the batteries last as long as possible - the controller senses for the new weight once a second, or perhaps less often.
As a result, if you increase the blade pressure on the thread too quickly you won't see the pressure when the thread is cut - you will see the pressure some time before. This can lead to inconsistent low readings.
 The simple wooden block has a small problem with it - the thread is stretched across the gap. Small differences in thread tension can result in large differences in cutting force. This problem can be greatly reduced by putting a known amount of slack in the thread. Version II of the thread holding jig does that.
The jig has two parts: one part used just during thread clamping that determines the amount of slack in the thread. In this picture, the holding jig is sitting on top of the setting jig. The setting jig has three nails: the front two register the front of the jig with respect to the third nail, the third nail determines the slack. You can get more or less slack by moving the third nail relative to the other two.
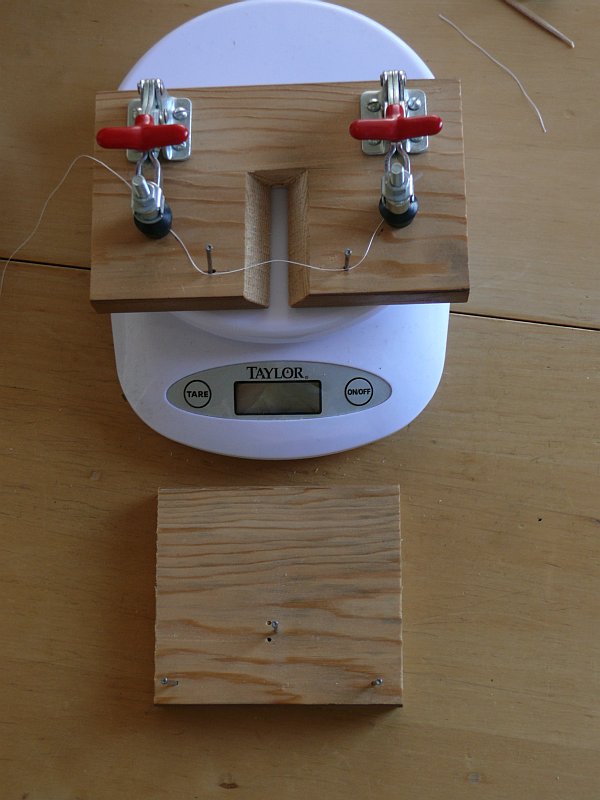 Here is a shot with the two parts of the jig separated, ready to do a test cut.
You can use any thread you can find that looks to be uniform - you will soon discover if it is uniform or not. If the cutting force varies a great deal from test to test with a single blade, you should try a different thread. If you find a thread that produces consistent test results, let me know (contact information at the bottom).

You will have to do a few practice runs to get a method of pushing the blade down through the thread that produces consistent results for you.
I hold the blade in both hands above the thread, my forearms resting on the table edge, then slowly lower the blade on the thread. With the edge horizontal, I tilt the blade back a little, about 15 degrees (half the included angle), so that the edge is going straight down on the thread (the bisector of the edge angle is vertical). I am not sure this makes a difference, but it seems right to me.
I check that the middle of the blade is above the thread, then look only at the readout. I want to see the readout gradually increase until the thread is cut. I usually see a couple of readings under 10g, then a couple under 20g, then a few under 30g until the thread is cut. On some tests the reading goes up into the mid 30s.
You can see that when this picture was taken the scale was reading 14 grams. Once the blade is dull from use, I expect the readings to go much higher.
I have been doing 10 cuts with each blade. Cliff Stamp is helping with a statistical analysis of the resulting readouts. So far it looks like the experimental error I am getting is reasonable - while there is some variation in the final readout, the results appear to be pretty consistent.
I sharpened all the blades and tested them first with the blue thread, and then with the white thread.
I sharpened all the blades again and tested them first with the white thread, and then with the blue thread. The results shown here for Sharp are for the second sharpening, blue thread testing.
I used each blade in a very short planing test - 5 passes down 4 foot a Douglas-fir board, or 20 linear feet, then did the thread cutting test with the blue thread, getting the results shown here for 20 feet.
While there is some variation in these results, it turns out that there is no statistical significance to the differences. The variation within the results for each blade are at least as large as the differences between blades.
| Blade | Sharp | 20 feet | ||
|---|---|---|---|---|
| Average force | Variance | Average force | Variance | |
| Stanley T logo | 26.8 | 3.02 | 31.3 | 1.90 |
| Sargent | 30.1 | 1.22 | 33.9 | 2.29 |
| Stanley V logo | 27.2 | 1.88 | 33.5 | 1.49 |
| LeeValley | 29.8 | 1.45 | 31.8 | 1.22 |
| Lie Nielsen | 24.1 | 1.11 | 24.7 | 1.40 |
| Holtey | 27.7 | 1.67 | 35.6 | 1.15 |
| Clifton | 26.5 | 1.77 | 39.0 | 1.69 |
| Mujingfang | 28.6 | 1.71 | 26.5 | 2.23 |
| Academy Saw Works | 33.5 | 1.67 | 35.9 | 1.50 |
| Tsunesaburo | 27.1 | 1.21 | 36.1 | 2.24 |
| Gramercy | 30.2 | 2.11 | 32.3 | 2.60 |
| Anon | 26.5 | 1.31 | 29.3 | 1.10 |
| Steve Elliott | 25.1 | 1.17 | 26.8 | 1.55 |
First, the between blade variation. In fact, the averages are very similar and well within the experimental error (the test does not, within the margin of error, find any blade to be sharper than any other). However, contrary to expectations, the average for the high carbon steel Stanley T logo blade is a little higher than the rest. The commonly held belief is that these simple high carbon steels get the keenest edges. This slightly higher average force may be the result of a sharpening problem, not a steel problem. Were I to go back and resharpen this blade I would expect a result closer to the average of all the blades. As it was I sharpened all 13 blades in rapid succession, spending only two or three minutes per blade (from setup in the jig through the 0.5 micron grit). A slightly more careful sharpening might have produced more uniform between blades results.
Second, the variation within the readings for any given blade. The variation is reasonable for all blades - which suggests a fairly consistent experimental setup. Still there is some variation. What are the sources of this variation?
It could be that there is variation across the edge of any given blade. The idea that parts of the blade are sharper than others arises naturally in knife sharpening. There, because you usually drag the blade past the sharpening wheel or steel, it is almost impossible to have the entire edge in contact with the abrasive at all times. Any variation in pressure or honing time would produce different geometries and sharpness at different points along the blade. With plane blades sharpened with jigs on flat abrasives, the entire edge is in contact with the abrasive at all times with more or less equal pressure. I believe that the edge is uniform and that edge variations are not a significant source of measurement variation.
The variation could arise from variation within the thread. As surprising as this appears, given that the thread is the product of modern manufacturing processes, I suspect this is the main source of variation. It is not just the thread itself, but my handling of the thread in wrapping it around the wooden block that may cause the problems. Any handling that unwinds the thread a bit may present a different resistance to the cutting edge. There are unexpected series of higher than average and lower than average readings in all the test results. I tested each blade 10 times in succession. Perhaps if I had gone through the blades, doing 1 test on each blade, then repeating 10 times, I could have isolated thread variation effects.
My cutting numbers are significantly lower than Steve Elliott's - he typically gets cutting force of just over 50 grams for a sharp blade. Steve uses a loop of thread, where the thread forms a 20 degree angle when the blade first touches - a 20 degree thread angle at contact or TAC. In my setup, the TAC is 180 degrees.
To determine the effect of different TACs I loosened the thread in my jig to change the TAC from 180 degrees to 120 degrees (more or less) and the cutting force rose from 28 grams to 42 grams (limited testing, just getting a feeling for the effect). This makes it clear that TAC affects cutting force and must be closely watched.
With my experimental setup, it would be quite easy to vary the tension of the thread across the top of the block while winding the thread around the block before the cut. With a variation of 5 grams in initial tension, a variation that I would not notice during the cutting, the results could be skewed by 5 grams. This error is large compared to the variation in the cutting pressures.
Even without a noticeable variation in TAC, variation in initial tension could account for some of the variation from cut to cut that I was attributing to variable thread toughness. It might even explain why there were occasional runs of higher than average and lower than average readings.
A new experimental setup is required to ensure that there is no variation in initial thread tension. This is the first problem mentioned above. While I expect the errors associated with initial tension to be random - not favouring any particular blade - it is worth removing this source of experimental error.
I believe the scale is accurate to within 1 gram. After each cut, when the pressure of the blade had gone, the scale readout returned to zero. So, in 4 test sets of 13 blades with 10 cuts per blade, or 520 cuts, the scale always returned to zero. Pretty consistent. I don't think the scale introduces very much error.
The scale readout rate - how often the scale measures and displays the current weight - can introduce error. I am not sure what the readout rate is, but it is not continuous. I suspect it is around 2 or 3 times a second. If I press down too quickly, the scale may not have registered the current force before the thread is cut. It is also possible that rapid lowering may show a higher weight - the thread has not had time to split.
The manner of lowering the blade could certainly introduce variation. If I move the blade across the thread while lowering it, rather than directly down, the slicing action may result in a lower reading at thread failure.
There may well be other sources of variation. Given the number of possible problems, the measurements are surprisingly consistent.
If you are finding that some blade seem duller than others, you should look at your sharpening methods and tools, not at the blades.
This set of 13 blades was also involved in the testing of the Norton 3X abrasive. Using that paper I managed to produce edge defects in all the blades. Subsequent grinding and honing had not removed all the edge defects! I will resharpen all the blades, checking each under the microscope to ensure that all the edge defects have been removed, then repeat the testing.