|
| The geometry of Honing |
|
| Finest abrasives. | ||
| Microbevels front and back. | ||
| Use a jig. | ||
| Copyright (c) 2002-15, Brent Beach |
The durability of an edge is determined by the geometry of the tool - the included angle at the edge. The larger the included angle, the more durable the edge.
The included angle we use balances sharpness with durability. Having selected an included angle, your sharpening system should use the best abrasives and hold the tool at exactly the angle you selected during honing. In my view this means you must use a jig.
 To use a jig, or not to use a jig?
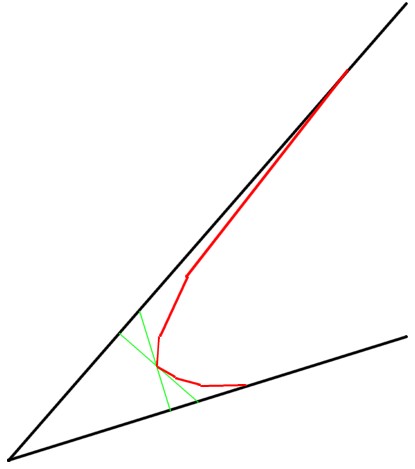
This drawing is a profile view of a dull plane blade in working position. It shows the last 0.01" of the blade. If you sharpen using my system, the third microbevel, and all blade wear, are in this very small region of the blade. This drawing is explained fully here.
The outer black line is an ideal cutting edge profile - perfectly flat bevels front and back with the desired included angle. The inner red line is the profile of a worn blade - showing the upper and lower wear bevels. The dimensions are based on micrographs of a plane blade in its just sharpened state before use, and its dull state after testing.
You cannot start with a better profile than the black profile. It represents the ideal cutting edge shape given the included angle you have chosen. As you work, the profile of your tool gradually morphs from the ideal sharp profile to the usual dull profile. During this time you are getting good results, but it is requiring a little more effort. However, you can use a blade with almost any intermediate state.
If you use a jig, use microbevels, and hone front and back, then you will always stand a very good chance of turning your dull blade into an ideal sharp blade.
If you use a jig, use microbevels, but do not hone the back, you will get a usable edge, combining a flat front bevel with a rounded back wear bevel. It will work, but will not be nearly as good.
If you do not use a jig, you will get some intermediate result (one hopes it won't be worse than the dull blade profile, but you are depending on luck so worse could happen). This is why using a jig makes sense - you cannot get a better result, you will almost certainly get a worse result.
Unfortunately, almost any profile between the ideal and the dull will still cut wood. So, all those woodworkers who don't need jigs, who just touch up the edge now and then, are working all the time with blade profiles closer to the dull end of the range than the sharp end. As a result, they regularly have to take time out from woodworking and touch up their edges. Touch up in reality means go from a noticeably dull blade to a not quite as noticeably dull blade. They spend more time "touching up the edge" than I do sharpening. It is my view that a freehand sharpener decides that freehand sharpening works when they have sufficiently mastered their tools that they are able to produce acceptable work with dull tools. They don't learn to freehand sharpen, they learn to use dull tools.
GrindingSo, using the hollow grind as a jig has been around for over 100 years. Notice though, the author makes two very important points."The time to stop grinding a tool is just before the old bevel is ground off."
Honing
"Let the iron lay perfectly flat upon the stone, with a tendency only to bear harder upon the edge of the bevel than upon the heel. Move the iron back and forth on the stone as fast as your skill will allow, taking care that the heel of the bevel is not lifted from the stone. As you become proficient in whetting an iron, the heel may be lifted from the stone about the thickness of a sheet of paper, or just enough to prevent it from touching. The reason why many carpenters cannot set an edge is because they raise their hand too much, and perhaps rock the tool, thus forming a rounding bevel, the sure mark of a poor edge setter."
"The proper way to oil-stone a tool is to continue the grinding by rubbing on the oil-stone until the bevel left by the grindstone is entirely [re]moved and the edge keen and sharp. If this be properly done the tool need not be touched upon its face to the stone, but among a dozen good edge-setters not more than one can do it. It is a delicate operation, and can only be acquired by long practice. Nine times out of ten the average workman is obliged to turn the plane-iron over and wet the face thereof, and here is where many men fail who have done the other things well. By raising the back of the tool only a very little the edge is "dubbed off," and regrinding of the face becomes an immediate necessity. A good stone should "set" an edge on a tool which will shave off the hair on a person's wrist without cutting the skin or missing a single hair."
I recommend this based on the discoveries of Metallographers. We know now that larger grits cause deep subsurface damage that weakens the steel at the edge. Not grinding through the edge means you don't damage the steel during grinding.
The expert sharpeners in 1900 did not have these results. They must have simply discovered that leaving a bit of the old bevel gave them a better edge. They passed on this observations without knowing the underlying cause.
This advice is more interesting and perhaps harder to interpret. Notice the level of skill required - among a dozen good edge-setters, not more than one can get to the keen edge and not require whetting the face. You need to whet the face if you have produced a burr.
It is interesting that the goal of honing is to set the edge without requiring any whetting of the back. That is, without raising a burr. Again, this was the target they set for themselves. Today, we know that a burr is a sign of a badly sharpened blade and we know why. Back then they also knew it was a sign of a less than expertly honed blade, but they could not have known why.
Our knowledge of why this is important is quite recent [look to the bullet First, leave ... just above]. They did not know why this was a good idea, but experience showed them it was important.
There is one variable we don't know - the amount of the old bevel left in the grinding step. We can only speculate. I am able to grind to within 0.01" of the old edge reliably using either my belt sander or my coarse silicon carbide stone. I suspect the reason this such a small remnant is possible because of the difference in appearance between the two parts of the bevel - the old bevel at the edge and the newly ground bevel back from the edge.
Grinding discussed in the above reference was done using a large human-powered grinding wheel, not a small electric motor powered wheel. The grinding wheel would have been two to three feet in diameter, not the 6 to 8 inches of our current grinding wheels. Assuming a 0.1" thick plane iron and a 30 degree grind, we have 0.2" wide bevel. The hollow left by a 3 foot diameter wheel is less than 0.001 inches deep. That left by a 6 inch wheel 0.006 inches deep.
 Honing until the front hollow is gone.
In this model, a blade that is 0.1" thick with a 30 degree bevel has been ground to within 0.01" of the edge on a 36" diameter wheel. The lower dotted line is where we would start honing. The upper dotted line where we would finish, if we honed until the hollow was gone. [Right click to see a larger image.]
The effect of requiring removal of the hollow in the old days then would be the removal a depth of metal at the edge of 0.001". Imagine that simple rule allowing people to do work to 0.001" accuracy.
This style of honing removes enough metal (0.001" with a 3 foot diameter wheel), working only on the bevel side, to remove some of the back wear bevel. I suspect that the best honers knew they were doing this. The rule of thumb allowed any honer to remove some of the back wear bevel even if they did not know there was a back wear bevel.
While recommending freehand honing, the method actually allows no freedom. While honing the front, they recommend keeping both the front and back of the hollow on the stone. They recommend against whetting the back.
Pretty good system, given the times. Now, with smaller wheels, we would have to remove 6 times as much metal if we removed the entire hollow.
In 1900 almost all abrasives used in sharpening were natural. This system worked well within the limitations of those natural stones.
Now we have synthetic abrasives that are finer and more uniform. We have the results from Metallography, that explain what happens to steel during abrasion. We can therefore get a better edge by using those synthetic abrasives, jigs and microbevels.
Those oil stones were from 15 to 30 micron (700 to 350 grit). With stones that coarse, you could remove enough metal to achieve this goal relatively quickly. They did not have any finer abrasives, so this was all they could do.
If you do have access to finer abrasives, should you continue to use this system?
As finer and finer water stones became available, the futility of honing the entire primary could no longer be ignored. Having the finest grit is of course important - from a sales perspective. Knowing how to use it effectively not so important, it would appear. You must use microbevels with these very fine (very slow) abrasives. You need a jig to use microbevels. Most jigs available then rolled on the abrasive surface. Jigs rolling on these soft water stones ruins the stone surface. Had I invented my jig and stone vice earlier, there would have been no problem. Absent my jigs, promoters of these stones made a virtue out of a necessity. They used the hollow grind as a jig.
Rather than using different grind and hone angles, they grind at the honing angle using a wheel. This produces a hollow grind. When you rest the blade on the stone with both the front and back of the hollow making contact, the hollow becomes the honing jig.
Problem solved!
Not solved!
Consider what happens when you are using the finest abrasive. You are honing the full bevel (on both sides of the hollow) left by the previous abrasive. Quick honing time on this abrasive depends on having both of those surfaces a narrow as possible. Using microbevels, when you start with the finest abrasive you begin with a bevel of zero width and stop when the microbevel is about 0.005" wide. In the hollow ground case, each bevel begins at over 5 times this wide (remember, we are dealing with the last honing step, after the coarser abrasives have widened the bevels off the grinder). To remove as much metal you would have to hone 10 times as long. (In fact, you have to work far longer, since microbevels remove most of the metal right at the edge and honing a hollow grind removes the same depth over the all of both bevels.)
You could partially solve this problem by using a bunch more water stones with intermediate grits. By the time you got to the final very fine grit the bevels would be so wide you would be wasting your time.
People try to make the honed bevels as narrow as possible during the grinding step. This means removing all of the wear bevel at the edge (what I call grinding through the edge). This is not a good idea - grinding through the edge deforms the metal at the edge.
Because grinding is an extra step and takes time, people try to get several honings from a single grind. The honed bevels are too wide on the first honing - on subsequent honings you may as well omit your finest (and most expensive stone) for all the good it does. Or you could hone on that ultra fine water-stone for 5 or 10 minutes.
And then, when you are all finished, you have no back bevel, so your blade is only half sharp.
After 9 years of sharpening and testing plane irons, followed by reading many books on Metallography and Metallurgy, I have a reached a number of conclusions. While these conclusions apply to sharpening of any edge tool, most of my experience is with plane irons.
 This diagram, from Metallographic Polishing by Mechanical Methods, shows how abrasive affects steel. Samuels uses different terminology for the various phases - he separates honing into abrasion and polishing. Abrasion uses larger grits with hard abrasive backing. Polishing uses smaller grits with soft abrasive backing.
For each grit size, the diagram shows the relative depths of the two kinds of deformation - shear and deformation. The diagram also shows the relative rate of metal removal.
While the depth of the shear deformation layer is about the same as the scratch depth, the depth of the layer of significant deformation is several times that of the scratch depth. This means that a single large grit that causes a deep scratch produces a layer of significant deformation well down into the tool.
Notice that both the depth of deformation and the metal removal rate (during grinding, abrasion, polishing) depend on grit size.
Deformation is the term Samuels uses for metal in which the crystal structure has been disrupted in some way. Deformation makes metal less wear resistant. In use, the deformed metal would wear away first, followed by slower wear of the underlying metal.
We could shape our tool with very coars abrasives - comparable to the Samuels grinding phase abrasives. Rapid wear of the deformed softer steel would result in a dull edge before all the deformed steel was gone.
If we do final shaping with, for example, 25 micron abrasives, again wear during use may well involve only the deformed steel. Again, we would have rapid wear and a quickly dull tool.
If we do final shaping with very fine abrasives, in the 1 micron range, and sequence the honing angles so that only the very slight deformation caused by the 1 micron abrasive is left, we get the durability associated with the fully hardened steel for the life of the edge.
 Metallography, the scientific study of the structure of metals, dates from around 1860 when Henry Sorby did his pioneering work on the structure of steel and iron. He developed a multi-stage abrasion technique followed by acid etching that revealed the true nature of steel. Sorby actually used abrasives on glass - he originated Scary Sharp for use with metals.
Sorby developed these sample preparation techniques while studying the structure of rocks and minerals. He used the same techniques on metals but no one was interested so he went back to studying minerals, including meteorites. Serious work on metals did not actually really get going until the 1930s.
The depth of the deformation layer was not known by Sorby. It was not completely understood until the 1950s. What Sorby did know was that if he used a series of grits, each finer than the previous, and polished long enough, he was able to get a surface free of scratches. Sorby used only naturally occurring abrasives, learning from the Jewellery trade which abrasives produced the smoothest surface.
Sorby did not understand enough about his technique to describe it well enough that others could duplicate his results. In fact, it was not until the whole process was redeveloped in the 1930s that people were able to reliably remove the deformed layers.
The grinding step for them involves cutting a bit of the metal object to be examined from the larger piece - perhaps a casting. They use typical metal cutting machines - band saws, cut off wheels. The abrasives here are quite coarse - comparable in fact to grinding wheels and coarse grinding belts.
Having cut off a representative piece, they usually embed the sample in a suitable casting - epoxy or other suitable material - before starting the abrasion phase.
For the abrasion phase, they mount the casting in a machine which holds it above a rotating abrasive disk while applying the desired pressure. Because they are starting with a very deep deformation layer they work through three abrasives ending up where I start - at about 15 microns.
The polishing phase uses the same machine but different abrasives. It usually involves two abrasives, but may involve a third extremely fine abrasive for some samples. These two polishing steps correspond to the 5 micron and 0.5 micron steps I use.
In all steps the abrasive is continually lubricated with a wetting agent which keeps the filings from collecting on the abrasive under the sample.
Metallographers finish with an etching step, using a weak acid, which increases the contract between the various surface components when viewed with a light microscope.
| Grinding Tips |
|---|
|
Some of the time, in exceptional cases, you will have to grind the edge. If you knock a chip out of the edge for example. Or if you want to change the edge profile. See shaping the edge.
Most of the time, when you are sharpening a dull blade to the same profile, you should grind the primary up to the edge, but leave a very narrow bit of the old honed/wear bevels. These pages contain several examples of this technique - see this discussion of grinding and honing a new plane iron for pictures of the primary bevel as I grind up to the old edge. |
Given this quick overview of metal deformation, what are the consequences for sharpening? How does this knowledge allow us to compare two sharpening systems?
The first consequence relates to very coarse abrasives and the tool edge. A tool which has been ground through the edge (grinding wheel, belt sander, coarse oil stone) will have a deep deformation layer at the edge. Unless this entire deep layer is removed the tool will be less durable.
My testing uncovered another interesting fact - all of the wear on a plane iron during use occurs within 0.01" of the edge. This means that grinding farther than 0.01" from the edge has no effect on edge durability.
This idea of leaving a bit of the worn edge is not new with me. As early as 1870, writers were saying "unless the iron be notched, it is advisable to avoid grinding it to an absolute edge". (Handbook for the Artisan, 1870).
| Woodturners |
|---|
|
One group of people who sharpen a lot and use their tools directly from the grinder are wood turners. In order to skip the honing step most turners have moved from high carbon steel tools to high speed steel tools.
This practice avoids two of the problems with grinding through the edge. First, high speed steels do not lose their temper during grinding unless they are severely abused. Second, with wood turning the exact shape of the edge is not crucial - the turner can adjust for small shape errors. This practice does not avoid the third problem with grinding through the edge - the deformed metal at the edge. Turners would greatly increase the time between sharpenings if they left the absolute edge and added a honing process involving a series of abrasives and microbevels. |
If you leave the wear bevel and a bit of the last honed bevel, the metal at the edge will have the wrong shape (side profile) but will have no deformed layer.
Why the wrong shape? Because the wear bevel has a rounded side profile.
Why no deformed layer? While you use the tool, the wood is slowly abrading the tool producing the rounded edge. As an abrasive, wood acts like a sub-micron abrasive, producing almost no deformed metal.
Retain edge shape
Aside from leaving undeformed metal at the edge, leaving a bit of the old edge has a second advantage. Think about preparing a piece of wood for a project. You draw a line on the wood and cut to the line. You plane to the line. You chisel to the line. Once you go past the line you have no guide.
If you grind through the absolute edge you no longer have any visual guide to a correct edge shape. You will quickly get a convex, concave, or slanted edge (or all three across a wide blade) edge. You are then forced to buy elaborate grinding jigs that try to retain the correct edge shape.
Retain steel temper at the edge
The third advantage of retaining the absolute edge is it reduces the chances of over heating the metal at the edge. Powered grinders (wheel or belt) can overheat the tool. Water cooled powered grinders won't. Hand grinding on a coarse silicon carbide bench stone won't. [Even up to the 1940s in London, England, most edge tools were hand ground. Back then they used mostly natural abrasive oil stones.]
The closer you grind to the edge, the thinner the metal in contact with the wheel or belt. The thinner the metal, the less the ability of the metal to carry away the grinding heat and the higher the chance of drawing the temper.
It seems like a small thing - retaining the old wear bevel and a bit of the old honed bevel - but it makes a big difference in edge durability for these three reasons.
A sharpening system in which the grinding step retains the absolute edge is better than a sharpening system in which the grinding step removes the absolute edge.
|
Looking at the chart by Samuels again, and having learned from the depth of deformed metal resulting from the use of coarse abrasives that we should not grind through the edge, we now turn to the finer abrasives.
Our goal is to produce and edge with as little deformed metal as possible. It is clear from this diagram that:
We would like to use only the 0.5 micron abrasive, but it would take too long. So, we begin with the 15 micron abrasive knowing that we will be introducing a deformed layer. Then we move to the 5 micron abrasive, removing most of the deformed layer left by the 15 micron, but leaving behind a much thinner deformed layer. Finally, we use the 0.5 micron abrasive.
If you want to achieve these results, you cannot use natural oil or water stones. No natural stones are less than about 9 microns with any uniformity. Yes, they may have some particles less than 9 microns, but they also have many more particles that are more than 9 microns. The deformed layer is produced whenever there are large abrasive particles present.
Further, you cannot use any synthetic oil or water stone, or stropping compound which contains large particles. This means, for example, that stropping using the Lee Valley green abrasive crayon will not produce the desired final result. There are pure Chromium Oxide powders available that have a uniform composition. You could use those. If you do, then you must use also microbevels. A pure Chromium oxide abrasive will cut too slowly to be useful if you use them on anything other than a very small area at the edge (see next part).
If you use only micron-graded abrasives (as opposed to a proprietary grading system which allows a much wider range of grit sizes) you can avoid misunderstandings about what grits are present in your abrasive.
| A sharpening system that uses a series of micron-graded abrasives, beginning with 15 micron, then around 5 micron, then around 1 micron, can produce an edge with little or no deformation in the steel. |
Ah, the Samuels chart again.
We know to avoid coarse grits at the edge, we know to use a series of successively finer abrasives, what can we still learn from this chart?
This time we concentrate on material removal rate. The removal rates shown in this chart are relative rates, intended to show how much more slowly the finer abrasives remove metal. The chart is based on actual experiments conducted in Samuels' laboratory and in other laboratories. They are not made up numbers like those commonly found in vendor ads.
The most important thing you can learn about material removal is that this chart does not lie. If someone sells you an aluminum oxide abrasive that they grade at 1 micron which removes metal at a 20 micron pace, then the abrasive is a 20 micron abrasive. There is no magic. Samuels tested all know abrasives on many different materials. Other researchers have replicated his results. Bottom line - a 30,000 grit stone that cuts like a 1,000 grit stone is a 1,000 grit stone. A 0.5 micron honing compound that cuts like a 5 micron honing compound is a 5 micron honing compound.
Given this reality - finer abrasives remove metal slowly - the importance of microbevels is clear. With microbevels, achieved by slightly increasing the honing angle at each step, we begin the 5 micron and 0.5 micron honing steps with the tool resting on the edge left by the previous abrasive. Even though the 5 micron abrasive removes metal slowly, because the contact area between the tool and the abrasive is so small (initially nearly 0), we quickly produce a narrow microbevel. Further, we produce that microbevel at the edge where it counts. At the edge the depth of metal removal is quite deep while back from the edge where metal deformation does not matter, depth of metal removal is quite shallow. The microbevel achieves quick results because it concentrates metal remove in the area where metal removal is necessary.
Again, when we increase the angle slightly and switch to the 0.5 micron abrasive, we begin with a contact area that is nearly 0. For this reason, we much begin with a pull action - a push action would cut the abrasive. Even with this extremely fine abrasive, the extremely small contact area means that we quickly produce a microbevel that is over 0.01" wide - the full width of the contact area between the tool and the wood. Again, the deepest metal removal is at the edge, the shallowest is away from the edge.
| A sharpening system that increases the honing angle slightly for each finer abrasive, will produce a better edge than a sharpening system which uses each abrasive at the same angle. |
| A sharpening system that hones both faces at the edge is better than a sharpening system that hones only one face. |
|
There is no question that my simple wooden jig is the best jig for honing plane irons.
|

|
I found this company on the net that sells the T-nuts and machine screws at pretty good prices (less than I have paid for them!). If you cannot source them at a local hardware store, or special order from a local store, this might be a good bet. I have not used them - just found them when answering a question. If you use them, let me know how it worked out.
|
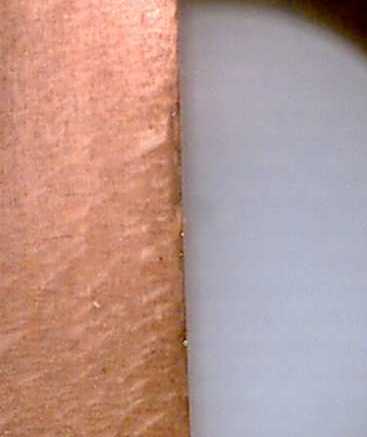
They wear very slowly. This is a picture of the edge of my jig (about 3 years old) at 10X using the microscope. The jig slides on glass, no lubricant, wood on glass. The worn side is on the right.
The jig is hard eastern maple - a wood that is very good for making jigs that you use a lot. It is hard enough that it wears slowly, yet not brittle. I made a few jigs out of tropical hardwoods. The wood splits much too easily. Having trouble seeing any "wear bevel"? Well its there, just hard to see. |
|
The table of blade extensions has different extensions depending on the thickness of the iron. Why does iron thickness matter?
Think of the triangle formed during sharpening. Two of the points are the plane iron edge, where the back face of the plane iron meets the front bevel, and the front edge of the jig. The third point in the triangle is where the back face of the plane iron meets the jig. So, the length of this side of the triangle is the sum of the height of the jig and the thickness of the blade.
At your peril. Any jig with a roller has a geometry that changes with the angle you are putting on the plane iron. My jig slides - its roller has diameter near zero. The larger the roller the greater the change in the lengths of the other two sides of the triangle.
The weakest link in the jig is the short jaw. If you make the jig a lot wider than the iron and tighten the bolts too much, the short jaw bends. This can change the geometry (not that big a deal) or break the jig.
A second problem is the thickness of some irons. I have irons that vary from 0.07" (blade for Parplus planes) to Steve Knight's 1/4" irons. The t-nuts that capture the bolts cannot handle this variation in thickness.
A third problem is short irons. I like to be able to use as much of the abrasive as possible. This means gripping the iron well up the blade and using a tall jig. However, many back plane irons are so short that a tall jig is not possible. The Mujingfang (an exceptional plane which uses a short High Speed Steel blade) plane has a very short iron.
I have also had to build special purpose jigs for Japanese irons - to compensate for shortness and for the tapered iron.
The slips increase the honing angle just enough to ensure that the microbevel removes all the scratches left by the previous abrasive.
My standard slips are 0.06" and 0.10" thick. I made these slips for use with my first jig. That jig had a 1.5" large jaw. If you make jigs with larger jaws you should resize the slips as well. Experiment using the extension calculator to determine appropriate size.
For example, if you make a jig with a 2" jaw (rather than 1.5") then you should use slips 0.08" and 0.13" thick.
I make the slips by ripping a piece about 12" long and 1/8" thick and planing it down to the desired thickness. I plane with the slip resting against a stop that is about half the final slip thickness above the bench top. This stop fits in a slot in the bench that is about 1/4" deep. Start with a stop that is about 3/8" thick, screwed into the slot in countersunk holes, then plane it to the desired height above the bench.
With a sharp plane you can get down to close to the desired thickness. Small errors, less than 0.01" are not a problem. Given that you should be taking shavings that are 0.002" or less, you should be able to get closer than this.
People with very accurate table saws might be able to rip the slips to thickness.
Throughout these pages I say that you should not, indeed, you cannot, turn yourself into a human jig the equal of the simple jigs I make.
However, with a lot of effort you actually can come pretty close.
I met a human jig this spring (2009) at the Lee Valley store in town. Lee Valley was sponsoring a workshop by Konrad Sauer. Konrad makes infill planes in the classic style of the British makers like Norris of London. Konrad hand makes his planes (he personally does almost all of the work using files, sheet abrasives, along with a little rough work done using a band saw or a scroll saw).
Konrad makes many planes a year - 50 or so. Each plane requires many hours of work - much of it shaping the plane on sheet abrasives by hand. Konrad has trained himself, though many hours of effort, to be able to perform the very accurate sanding operations required to finish these planes.
He also freehand hones the blades. I have looked at his plane irons and they look good. I could not detect multiple microbevels and did see that he does not use back bevels, so they are not as good as they could be. However, they are better than I thought anyone could do freehand.
Very few people spend 20 hours a week freehand with abrasives. For Konrad, much of this time is spent finishing the plane, not honing the blade. However, the skill level he has acquired over the years he has built these planes has enabled him to get away without using jigs for honing.
Should you aspire to this skill level? If your main goal is finishing infill planes by hand, or similar occupations, then go for it. If your main goal is woodworking, then spending this amount of time to acquire - and maintain - the skill makes little sense. It is time you could spend working wood. If you want to try your hand at making infill planes check out Konrad's site. Heck, check out his site anyway - the planes he makes are works of art.
 It is important to pause while honing and check that everything is going as you expect. Even the best honing jig possible cannot make up for a badly ground primary bevel.
This is a scan of a scrub plane blade I was sharpening. The blade was last sharpened by the former owner - this was my first sharpening of this blade. I ground the primary at 25 degrees almost to the edge then started to hone the 29 degree bevel on 15 micron abrasive as usual. This is what it looked like on my first visual check.
There are three areas of the blade, from the top, the old honed bevel, the new 29 degree bevel, the new 25 degree primary bevel.
If the old honed bevel were at 29 degrees, the new 29 degree bevel would be at the edge, not well back of the edge. This means the old final bevel was well over 29 degrees, perhaps even over 35 degrees. I suspect the previous owner sharpened this blade by hand - it is not easy to sharpen such a blade with commercial jigs. The result was a blade with too high a final bevel. A blade with this final bevel will not cut because the clearance angle is too small. That might be why I got this Stanley scrub plane for a very good price.
It is good honing practice to stop early and look at what is happening. In this case I could never hone on 15 micron abrasive enough to reach the edge. I have to go back to the bench stone and bring the 25 degree bevel almost up to the edge.
Previous page of the FAQ - Sharpening - grinding then honing.
Next page of the FAQ - Grinding and honing angles
Return to the Sharpening page.
Return to the Sharpening and testing home page.
Lost? Try looking around the site map. You can also reach the site map from the little map at the top of each page.
Questions? Comments? You can email me here.