|
| Brent's Pages - Site Map |
|
| Finest abrasives. | ||
| Microbevels front and back. | ||
| Use a jig. | ||
| Copyright (c) 2002-15, Brent Beach |
While free and relatively simple (for a 3D drawing program), Sketchup models are accurate in scale and let you view the model from every angle.
By accurate in scale, I mean that if you specify that a rectangle (for example) has a specific size, then it has exactly that size (within the accuracy of single precision floating point numbers). If the modeller gets it right, the model is accurate.
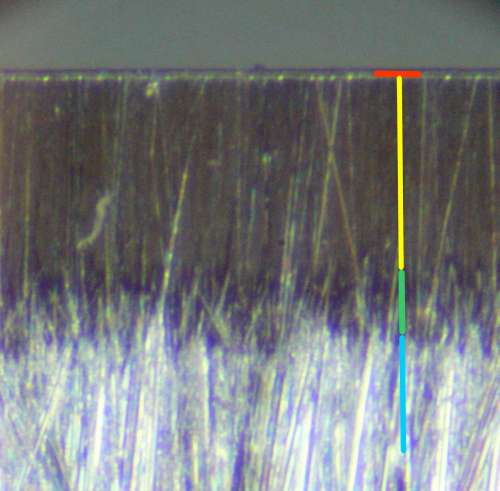 In this QX3 micrograph:
The total width of the wear bevel and the three microbevels is just under 0.02", or about one-tenth of the width of the primary bevel. The wear bevel is about 0.0006" wide.
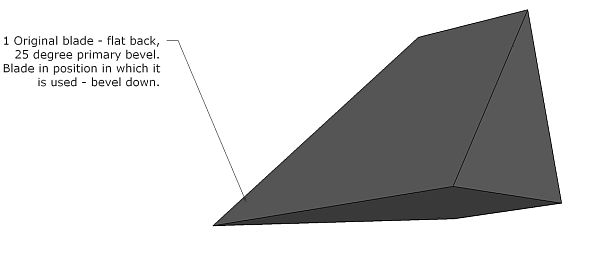 That means starting with the iron before honing and use - with the primary bevels.
The plane iron could be in any orientation, so I chose to put it at the angle at which it would be use in a standard bench plane. So, the iron is bedded at 45 degrees. The back, the upper face, is at 45 degrees. The front primary bevel, the lower face, is at 45 - 25 = 20 degrees.
In order to see both faces, we are a bit under the blade looking up.
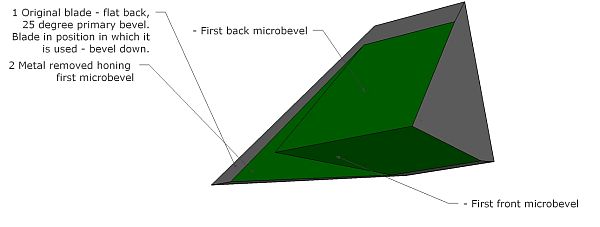 This is what happens during honing of the first microbevel on the front and back of the iron. By using the first slip, it is possible to increase the honing angle very slightly and very precisely.
Rather than draw a model with the metal removed for the full width of the blade, I left a bit of the primary shape on the left of the image. The rest shows the shape after the first honing step.
The honing angle of the back is much smaller than the honing angle on the front.
The front and back microbevel are about the same width. You spend most of the time honing the front, just a little honing the back since the front wear bevel you are removing is much steeper on the front than on the back.
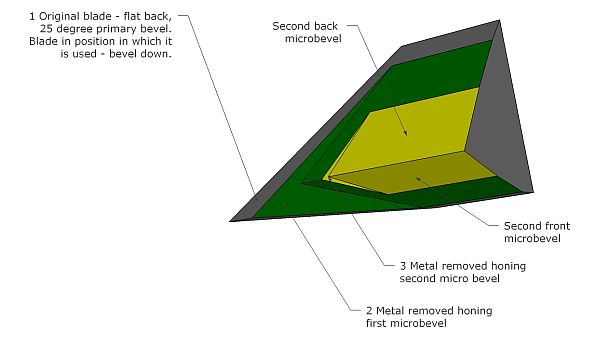 Again I have retained the shape of the primary and the first microbevel to the left of this drawing. The second microbevel is in yellow.
Notice that far less metal is removed in this step.
Even though the second microbevel removes almost half the first microbevel, measuring from the edge, it removes very little metal compared to the amount removed during honing of the first microbevel.
The 5 micron abrasive removes metal much more slowly than the 15 micron abrasive. It is important that you use a jig so that the metal you are able to remove is at the edge.
 By increasing the honing angle slightly using the second slip, you are again able to hone at a very precise angle. The third abrasive is so fine that it can remove very little metal. By honing at the edge, it is possible to remove enough metal even with this very fine abrasive.
Again, the new microbevel is about half as wide, measured from the edge, as the previous microbevel.
The plane iron is ready to use.
The third microbevel is about 0.005" wide. Seems pretty narrow but all contact between the wood and the plane iron takes place in this very narrow band on either side of the blade. Even though you probably spend less than 30 seconds honing the third microbevel, you have fully prepared the entire contact area between the tool and the work! Amazing.
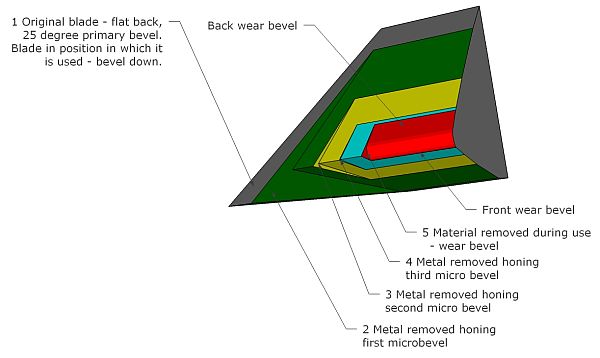 In this final model I have added the shape of the wear bevel.
This amount of wear corresponds to a pretty dull blade.
 The last model in this sequence has the primary bevel, three honed microbevels and the wear bevel for a total of five surfaces.
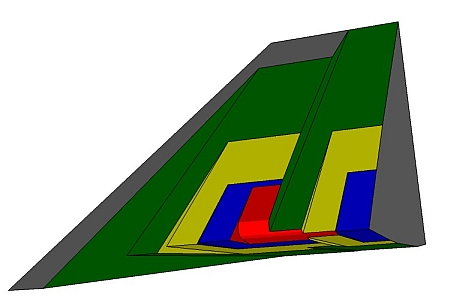
This model has 8 surfaces, but the sequence of events in creating the model again matches the sequence of events in honing and using a plane iron.
The surfaces, from left to right: