|
| Sharpening Station |
|
| Finest abrasives. | ||
| Microbevels front and back. | ||
| Use a jig. | ||
| Copyright (c) 2002-15, Brent Beach |
Where Am I?
You are in the honing section of my pages on hand tool sharpening. If you have prepared the primary bevel on your plane blade and are ready to put an edge on it, you are in the right place. Other topics covered in these pages include the whole sharpening process, grinding, the FAQ, and plane blade testing.When you use a plane you wear the blade on both the front and back. It makes sense that honing restores the edge, on the front and back.
Introduction
-
The Jig.
I always use a jig. Some people insist that a jig is not needed, in fact a waste of time. I am sure you cannot get the best edge without a jig. You decide.
I use a shop made jig that allows me to use front and back bevels, and in combination with two thin wooden slips, produce consistent microbevels.
This section begins with images of the jig, with an iron, on the plate glass ready to hone.
It continues with sketchup models and a construction step-by-step.
-
The Slips
In order to get the full benefit from this jig you really must make some fairly thin wooden parts. If you don't yet have a plane, it will be difficult. If you do, this section shows you how to make a planing stop for accurately making small wooden slips to size.
-
Simplified Jig The Quickie
Any jig is better than no jig, so I have developed a very easy to make version for people to try out. The jig will be accurate and easy to make, but may not be as durable as my standard jig. It should last many plane iron sharpenings, just not hundreds. (Although it might.)
-
The Glass Sheets
Abrasive sheets on glass provide a maintenance free honing surface that is always flat.
Using glass sheets without some backer to protect the edges is asking for problems.
-
The Abrasives
Putting them on - Fitting the abrasive to the glass sheets requires a trick - the adhesive is really sticky. You have to soak everything in water.
Taking them off - Getting the front part of the abrasive off when it gets worn is also tricky. You have the right tool for this job at hand.
-
As easy as 1, 2, 3
The steps in a typical sharpening session. A few seconds on each abrasive and you are ready to get back to woodworking.
-
Jigs for Sale
I no longer make jigs for sale, but you can.
Recommendations
There are some who say that you don't need a jig when sharpening hand tools. There are some who claim that this or that bench stone produces a fantastic edge. There are lots of stories about the old guy who sharpened up his tools on a bit of slate and got fantastic edges.If you want the best possible edges you must ignore all these stories.
- To get the best edge you must use the best abrasive. There are no better abrasives than the 3M abrasives discussed in these pages.
- To use the finest abrasives effectively you must use a jig that allows you to hone at the edge (not simply hone an entire microbevel produced by a coarser abrasive).
- To get the best edge you must hone both front and back bevels. Back wear happens, you must remove it.
Videos
I am making a series of short videos showing details of building the station (glass sheets, jigs) and sharpening.Videos to date:
-
Putting the abrasive on the glass.
A little tricky, especially since the abrasive has Pressure Sensitive Adhesive on the back. However, if you wet the glass before you start, it works pretty well. There are three videos -- 15 micron, 5 micron, 0.3 micron.
-
Setting the extension.
It is a little awkward holding the jig, the blade, and the combination square.
With a little practice, you can set the extension in a few seconds.
-
Honing
A short video showing me honing a plane blade.
-
Grind
A video in which I grind a primary bevel using a Silicon Carbide bench stone.
Feedback
Having problems making or using anything? Something you think might be better explained using a video? Tell me about it.The Sharpening Setup

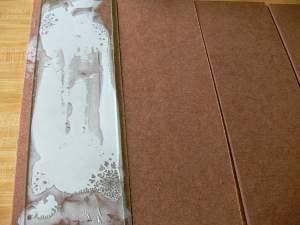
This is my current sharpening setup.
Rather than try to fit pieces of different abrasive on a single large sheet of glass, I now use a separate piece of glass for each grit. In this picture, from left to right: 0.5 micron, 5 micron, 15 micron. I have three other sheets of glass with 40 micron, 1 micron and 0.3 micron.
The plane iron is in the jig on the 15 micron sheet, ready for the first microbevel. You can see the small wooden slips on the other two sheets: 0.06" on the 5 micron, 0.10" on the 0.5 micron.
The baby oil is in the upper left. Baby oil is repackaged mineral oil. Any light, non-volatile oil will do. The oil lets the filings float up off the abrasive and get pushed out of the honing zone by the blade. This keeps the honing area free of filings and thus able to cut as it was designed to do. [Most mineral oil sold for medicinal purposes will be too thick - it won't work at all. Baby oil is just the right consistency.]
The combination square is set to the correct extension for this blade. The screwdriver to tighten/loosen the jig. Not shown -- the rags you will need to clean the oil and filings from the abrasive.
I bought a cheap plastic tool box to hold the glass sheets when not in use.
The Jig

You can use these 4 1/4" X 11" abrasives with or without a jig. If you decide to use a jig, you can make one like mine, or buy a commercial jig.
I started out using an eclipse jig, then switched to wooden jigs that simply slide on the glass. You can see a variety of jigs - commercial and shop made - at my Jigs page.
The jig system includes two thin wooden slips: 0.06" and 0.10" thick.
- By putting the 0.06" slip under the jig while honing on the 5 micron abrasive, you produce a second microbevel about 2 degrees more than the first microbevel.
- By putting the 0.10" slip under the jig while honing on the 0.5 micron abrasive, you produce a third microbevel about 1 degree more than the second microbevel.
|
Front view
This is Version 2 of the jig - easier to make, prettier as well. The dimensions are pretty much up to the person making the jig, except that the shorter jaw side should be about 1/8" tall if you intend to use back-bevels. The tall jaw can vary, depending on the length of the irons you intend to sharpen. I started with 1 1/2" stock, but now use 2" stock. The width of the jig should be comfortably wider than your irons, but not too much wider. If the jig is too wide, the shorter jaw will bend when you tighten it onto a narrow blade. I have jigs in several widths -- from 2 3/4" wide for 1 3/4" plane blades, up to 4" wide for 2 5/8" blades. |

|
|
Top View
The machine screws are countersunk quite a bit, so the heads will not scratch the glass. Notice the radical use of Robertson screws. |

|
|
Bottom View
The machine screws are captured by T-nuts, countersunk into the short jaw. If you don't intend to use back bevels you won't need t-nuts. |

|
|
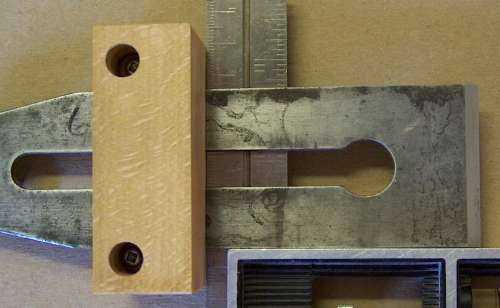
The jig with iron
The plane iron slips between the two pieces of wood, the nuts are tightened slightly, the extension of the iron from the front of the jig is set, the nuts tightened a bit more, and you are ready to go. Since this does not look like most sharpening jigs, here is a picture of the jig in use. First, the jig ready to work the first microbevel. |

|
| Now, the jig flipped over ready to do the back bevel. |

|
Building a Jig
Once you have the hardware (2 1" machine screws and t-nuts - I use #6 size) and the appropriate drills (depends on your hardware, see below), you should be able to build one (or three) jigs in 20 minutes.
 Before reading the following instructions, familiarize yourself with the internal structure you are building with the x-ray view of the jig.
You should be able to see that there are 4 different drills required. Working from the top to the bottom (the outside of the back jig to the outside of the bevel jig):
- T-nut head - use a 5/8 Forstner for this.
- T-nut shaft - use an 11/64 drill for this. Drill down through the centre of the Forstner hole.
- Machine screw - use a 9/64 drill for this. Drill down through the centre of the t-nut shaft hole.
- The Machine screw head - use a 1/4" Forstner for this. Drill from the outside of the bevel jaw, using the machine screw hole to centre this drill.
These sizes work for me, but you should check each drill size on scrap before doing the jig. I own a HSS drill bit set sized in 64ths that was pretty cheap. Single Forstner bits are now available for a couple of dollars each at the local hardware store - no need to buy expensive bits here or a set of bits.
Now, in detail.
| Wood selection |
The jig can be made from any wood, but I prefer hard maple. Tropical hardwoods tend to be too brittle - they split when you tap in the T-nut.
Standard 3/4" stock is ok, but thicker stock is better. Quarter sawn wood is best. When you rip a 1/8" thick piece for the short jaw from quarter sawn stock you end up with a flat sawn piece of wood - one less likely to split when you tap in the t-nut. The above jig was made from flat saw stock and the short jaw did not split, but why take chances?
You could make just one jig - starting with a 4" piece of wood, but it is very hard to work with wood this short. Start with a 14" piece of maple and make jigs for yourself and two friends.
|
| Stock preparation |
The height of the jig depends on the lengths of the irons you want to hone. The larger the jig the greater the extension of the edge from the front of the jig, so the more room you have between the jig and the abrasive while honing. Too big a jig and it won't handle short plane blades. A 2" jig will handle most plane irons.
Rip the tall jaw. I rip with a hand saw, then plane to size. You don't need to get the piece to exactly 2". As long as the size is consistent, any size will do. You can use the extension calculator to get extensions for any size jig. Rip the short jaw. This step requires some care because this side of the jig really should be about 1/8" wide. I rip a little wider then plane down to thickness. I plane against a wooden stop that is only about 1/16" above the bench top. While you are fiddling with thin stock you might as well make the slips. These take a little care because the material is so thin. It turns out you can plane a short piece of wood against a very small stop. I use a stop that is about 1/32" above the bench top and 2" pieces of wood. If you plane slowly and carefully, the slip will not move around while you are thicknessing it. [My planing stop is in a 1/4" deep slot in the bench top. To build a stop that is only 1/32" above the bench top, install a slightly thicker stop with countersunk screws then plane it down to height. I use this very thin stop only for planing slips - most of the time I plane against a taller stop.] A person with a quality cabinet saw and a very good blade may be able to rip these pieces and use them without planing to thickness. |
| Cut to Length | If you started with a 14" piece, cut it up into appropriate sizes now. Mark the sizes on the thick side, tape the two sides together around the stock, cut them up in your mitre saw. Mark the paired pieces. |
| Drilling |
Here is the xray again.
Before drilling I put the two parts of the jig together then tape around with masking tape. That is, tape around the ends rather than across the face. This keeps the short jaw better aligned to the tall jaw and prevents it from twisting when you are working with it.
Drill the (very shallow - 1/32") countersink holes for the t-nut head - right through the masking tape. I use a 5/8" Forstner bit for #6 t-nuts. The centre of this hole is 7/16" in from the edge, midway from front to back on the back jaw. With a drill bit sized for the t-nut shank, drill through the centre left by the Forstner bit the depth of the shank. Mine are about 1/4". This hole should be a close fit on the shank - friction between the wood and the shank helps hold the t-nut in place (in storage, no problem when is use). With a drill bit sized for the machine screws, drill through the centre left by the shank hole, drill right through the bevel jaw. The hole should be just bigger than the screw - the screw just slides in this hole, is not loose. Finally, flip the jig over and work from the outside face of the bevel jaw. With a drill sized for the machine screw heads, using the machine screw hole as a centre guide, drill the machine screw head countersink hole. You want a flat bottom, so a Forstner bit is best. This hole is the crucial hole since its depth determines how the screw and the t-nut meet.
In this xray view of the jig, the screw has been dropped into the hole from the top and extends less than 1/8" below the back jaw. The amount the screw protrudes must be just less than the thickness of the tool. Too much less and the machine screw will not catch the t-nut. Too much more and the screw will extend beyond the back jaw face and scratch the glass. |
| Install hardware |
 This picture shows a t-nut with all 3 pins turned up. In this application, you probably do not need all 3 pins. In fact, with a tight fit between the t-nut shank and the back jaw, the t-nut stays in place pretty well even with only one pin turned up, the others left aligned with the back.
Often the pin will actually go right through the jaw and show a bit on the inside. If this pin tip comes into contact with the plane iron, it will affect adjustment of the extension. However, if you position the pin on the opposite side of the shank hole, it is near the edge and could cause the wood to split. Notice as well that the pin on the other end should not be on the same grain line, or the jaw could split. If you use tropical hardwoods you may have to drill a small hole for the pin to prevent cracking. And you are ready to sharpen.
Or, without the xray view:
|


The Slips
 Making thin wooden parts is easy if you have a planing board like this one (and a digital calliper). (In case you are wondering what that brown thing up in the air above the planing board is, it is a wooden plane.)
Start with a flat 2 x 6 of some softwood (I had a cedar plank). Cut a slot across the width near one end 1/4" deep and just over 3/4" wide. Prepare a hardwood (I used maple; it should be fine grained) stop 3/4" width by 3/8" thick and attach it in the slot with countersunk screws. Plane the stop down until it rises above the board surface just less than the thinnest slip you will be making. I have several stops - one for very thin slips, one for thicker slips, one for use as a planing stop when planing thick stock.
For thick slips, you can start with a single longish piece of about the right thickness. For very thin slips I have found that a longish piece will flex during planing.
In the model I show two thin pieces of wood: the back slip serves to balance the plane. Work the two alternately, keeping them about the same thickness, as you plane down to the desired slip thickness.
This planing board works for the thin side of the jig as well.
 While reading Woodworking Joints by William Fairham I noticed this drawing (page 52), which he calls a Cradle for planing. Rather than have the slips on a surface pushing against a stop (as above), you can make a slot in a board. The slot depth should be somewhat less than the desired slip thickness. The slot width is not that important. You can make quite accurate depth slots with a router, like a Stanley #71.
If you make a lot of slips of the same thickness, a slotted board like this makes sense. If you are making just a couple of slips then working against a stop as above is perhaps a little quicker.
Simplified Jig - The Quickie

Any jig is better than no jig, so I have developed a very easy to make version for people to try out.
The jig is accurate and easy to make, but may not be as durable as my standard jig. Rather than us T-nuts, this jig relies on the holding strength of machine screw threads in wood. Mine has been used between 30 and 50 times and shows no signs of failure.
Start with a nominal 3" dimensioned lumber board (hardwood better, softwood will do) 1" longer than your iron is wide. If you are making a jig for irons for a #8 (2 5/8" wide) you need about 3 5/8" long. The grain runs horizontally in this model.
Remove the rounded corners (joint the edges) found on dimensioned lumber. Make sure the resulting block has constant width. In doing this you reduce the width of your 3" lumber from 2 1/2" to around 2". The exact width does not matter too much, as long as it is constant along the board. [It is much easier to joint a 12" long board to constant width than a 3 5/8" board - make 3 or 4 jigs and once and give some away.] [You will need to use whatever width you end up with as the large jaw height in the Extension calculator.]
For short tools, the 2" tall jig you get may be too tall. Select stock width depending on your tool lengths.
 Make a 1/8" thick jaw (see above description of planing board). The grain on the thin jaw should run across the width of the jaw, not across the height. If it runs across the height the jaw may split along the grain.
You are also slightly better off with plain sawn than quarter sawn wood for the large jaw. The screws will come in from the top. A screw driven tangent to the grain holds better than one driven perpendicular to the grain. A screw driven tangent to the gain is also slightly less likely to split the wood. I have made a quickie like this with the grain vertical - so the screws were threaded into end grain. The wood is a very hard tropical and the screws still hold, even though tapped into end grain, after many uses.
Use masking tape to clamp the two jaws together.
Mark for holes 3/8" in from ends, in the middle of the thin side.
Using a drill bit just a little smaller than the 1 1/2" flat head machine screws you are going to use, drill the holes. Test the drill bit on a piece of scrap. You need to check that you can screw the machine screw into the hole without splitting the wood. You also want to make sure the hole is small enough that the screw has good holding strength. Again, use a tap if you have one, or simply use the machine screw as its own tap.
Countersink the machine screw heads into the thin jaw. [Jig positioned to show countersink holes in thin jaw. Thanks to Brian Rytel for a little tutorial.]
If you have suitable taps, use them. If not, you should be able to drive the machine screws into the holes, using them to tap their own threads. Even if you use the screw as a tap this should provide lots of grip for many tightenings.
You are ready to try your jig. Measure the two jaws and use those numbers in the extension calculator.
The Glass Sheets
I used to use a single large glass sheet, but have switched to one piece of glass for each half abrasive sheet. The glass dimensions: 5mm thick, 6" wide, 16" long. Plate glass (window glass which you can buy at most glass shops) is just fine, no need for tempered glass. At local shops they charge for glass by area, with no extra charge for cutting. I just show up with a list of sizes and they cut it while I wait. Your yellow pages should have a list of shops under Glass, Window. Google can find them for you if you do a search on Glass, Window with the name of your town. [Some people recommend marble tiles instead of glass. Glass is always glass. Marble you buy is almost certainly not marble. Natural marble is probably too soft and probably not flat. Artificial marble can be just about anything. Stick with glass.]Soften the edges of the glass sheet with sandpaper before anything else. From the glass shop it can be pretty sharp. A few seconds with sandpaper will prevent nicks later.
I now glue the glass permanently to 1/4" hardboard - Masonite in this case - with Weldbond glue.
 Lay a reasonable amount of glue on the board.
 |
 Spread the glue out using a kitchen spatula - I used a soft white plastic spatula. Once the glue dried, it peeled off the spatula.
|
 Put the glass on and tape the corners - the glass can slide around when you aren't looking. Once the glue dries you won't be able to fix it.
|
The glue will cure by the next day. The backing board is more to protect the glass during handling than prevent the glass from bending under pressure - the bench is the real support.
The Abrasives
Abrasives are discussed in many places in these pages.Fitting the Abrasive sheet
I have made 3 videos -- 15 micron, 5 micron, 0.3 micron -- of me sticking various abrasives to glass. In the video I use a spray bottle to wet the glass. I put all three on YouTube in hopes that with three you could see all the possible problems and solutions.In words:
- Remove the backing from the adhesive.
- Wet your hand and rub the glass to get it a little wet, but not too wet.
- Lay one end of the abrasive on the glass. It should slide around on the glass. If it wants to stick, add more water to the glass.
- Slowly roll the adhesive onto the glass, watching for air bubbles forming under the paper.
- Rub any air bubble out immediately. If the air bubble will not move, lift (un-roll) the abrasive a little and try again. The abrasive should still lift easily. If you still can't push the air bubble away, remove the abrasive completely, add more water to the glass and start again.
- When the sheet is fully applied, it should still not be stuck to the glass - it should be possible to slide it around a little to centre it on the glass. You should also be able to work any air bubbles you missed to the edge.
- Put the backing paper on top of the abrasive sheet and with a cloth wipe fairly hard from one end to the other. This forces excess water out from under the sheet as well as helping to remove any small air bubbles under the abrasive. Removing excess water reduces the time it takes for the sheet to dry completely.
- Leave the abrasive over night to let the water dry out before you use it.
Removing worn abrasive
After some use the front part of the abrasive sheet will cut more slowly.In fact, there are two big changes in how fast the abrasive cuts. When you start with fresh paper, it cuts very quickly. This is because the very small number of very large bits of abrasive are doing all the work, and doing it quickly. This is actually a bad thing.
In any fresh abrasive sheet there are a few much larger pieces of grit. These pieces are well above the specified nominal grit size. This is a bad thing because these grits leave deep scratches and fracture the metal more than we expect (assuming the nominal grit size). Fresh abrasive acts as if it had a larger grit specification.
During first use, these large grit particles will be broken off or will shatter. The result is a much more uniform abrasive surface with many grit particles coming in contact with the bevel.
Once this initial high abrasive stage ends you enter a long period of pretty steady cutting speed. This is the ideal situation.
Eventually the time taken to hone a microbevel gets too long and it is time to remove the worn abrasive at the front of the sheet.
The PSA adhesive is very tough. You will have to get something sharp under the front corner to lift it a little. Perhaps you have a plane iron handy? I use a plane iron, bevel down.
-
Getting started.
Working at a corner, push the edge of the plane iron under the adhesive, perhaps sliding a little back and forth as you do. You should be able to get a small triangle of abrasive loose.
With this small (1/4 to 1/2" triangle) on top of the blade, press it onto the blade with one finger then tilt the blade to lever a bit more abrasive off the glass. You should be able to lift enough this way to let you get a good hold on the abrasive.
-
Across the front
With the blade still bevel down, while lifting on the corner, use the corner of the blade in a scythe motion to lift the paper across the front until you have a 1/2" strip off the glass. You want to slide the blade edge under the abrasive sheet, not cut it.
-
Lift most of the worn abrasive off the glass
The worn area is not worn evenly. At the start and end of each honing motion you press less hard, so wear the abrasive less. The top of the worn section is probably still pretty good. Even if it is not, you don't use the 1/2" near the edge or you will slip off the front.
So, I don't remove all the worn area - I usually leave half an inch.
-
Cut it off
Use an Exacto knife or scissors to cut off the worn piece.
Any lifted but not cut off bit will stick back down.
Typical sharpening session
Most people know how to sharpen, so this part won't break any new ground. Since I do use a jig, people who have not used a jig might get some ideas from the step by step discussion.
If a short movie would help, you can watch me set the extension here.
A little tricky the first time, with a little practice you should be able to set the extension in under a minute.
Get the extension you need from the extension calculator. Having gotten it you might write it on the jig.
Set that extension on your combination square.
With the iron in the jig, tighten the screws until iron can move in the jig, but not slip out. For me, this means tightening until the first resistance, then perhaps 1/10 of a turn. That is, almost no tightening at all. At this point, the blade will not drop out if you hold the jig with the blade facing down, but you can move it.
With the ruler of the combination square against the jig and the iron against the square, set the extension.
 Flip the square over and make sure the side of the iron is square to the front of the jig.
A little bit more tightening of both screws and I'm ready to sharpen. A little is perhaps another 1/10 of a turn. If the thin jaw is bowed, you have gone way too far. At this point, you could probably twist the blade in the jig if you really tried, but you won't apply any pressures like that while honing. [Even while grinding.]
Perhaps surprisingly, the iron rarely slips inside the jig once the nuts are tightened. This wide beech jig has excellent grip.
As well, even after hundreds sharpenings, the jig shows little wear from sliding on the glass and the glass in scratch free.
Precision
How accurate is this method of setting the angle?
When I set the combination square, I split the mark (half under the head). If I get sloppy and miss the mark by 1/4 of the distance to the next mark (once you try this you will see that such an error is almost impossible), then the resulting angle is off by about 1/10th of a degree.
There is no chance of error on the second and third microbevels.
Sharpening
Finally, ready to sharpen. A video of me honing a plane blade you might want to watch before or after (or instead of) reading the description below. The video is almost 3 minutes long - an average sharpening time for a blade with a reasonable primary. It would take longer if honing revealed problems with the primary.
 The first microbevel on 15 micron paper -- 1 to 2 minutes.
Lubricate the abrasive with a few drops of baby oil. How many drops is a few? Well, actually, more than a few. You want the full width of the blade to be pushing oil around, so squirt a line of baby oil across the paper about 2" from the lower edge.
Rest the blade on the abrasive, in the baby oil and check that the blade is making contact with the paper across the width of the blade. As you pull backward (always begin with a pulling motion rather than a pushing motion and you won't tear the abrasive if there is a problem with the blade) with light pressure on the blade, the trail of baby oil left behind will not be uniform if one side of the blade is high. Check the blade for being square in the jig if you notice this. [Note: If the existing blade edge is not square to the sides, then the blade will not lie flat on the abrasive. If there is a very small problem, you can put a little extra pressure on the high side to bring the entire edge in contact with the abrasive.]
In addition to moving forward and back, move from side to side so that you use the entire width of the abrasive sheet. You want even wear across the abrasive sheet.
When you finish there will be three distinct regions of the abrasive.
- The near area will have some oil and some black powder floating in the oil. The black powder is a combination of bits of steel scratched off the blade (called filings) and broken abrasive.
- The middle area will be almost free of oil, right across the sheet. It should show little or no build up of black powder.
- The far area, just past the farthest reach of the blade during sharpening, will have most of the oil and black powder. It may also have some small shiny bits - the wire edge as it was worn off the blade.
When are you done?
The nice thing about using a jig is that you can stop, check the microbevel, then resume honing at exactly the same angle. Do that regularly, each time wiping the baby oil off the bevel and looking for a uniform microbevel the full width of the blade.
| CHECK |
After a few seconds on the first abrasive, stop, lift the blade off the abrasive, wipe it off and look at the pattern of scratches the abrasive is leaving on the blade.
If you cannot see the scratches, hone again lightly but with the jig at an angle to the direction of motion (like skewing a bench plane). Stop, wipe off the oil and look for the scratches. If you still cannot see the scratches, get a felt tip pen and paint the entire bevel with a dark colour. Hone again lightly. If the scratches are forming a microbevel at the edge across the full width of the blade, then you can continue with the rest of the honing procedure. If the scratches are not at the edge, stop right now. Something is wrong. Check the extension first. If it is correct, then there is a problem with the primary bevel angle. You must go back and grind the primary again. There is no point in continuing to hone if the primary grind angle is wrong. If the scratches are only on one side of the blade then you may have a problem with the position of the blade in the jig -- check for square -- or the existing edge may not be square to the side. Honing does not remove enough metal to repair an out-of-square edge. You should regrind the primary to correct this type of problem. |
If the blade has a freshly ground primary bevel, then you are done when the first micro bevel is between 1/32" and 1/16". There are images of the first microbevel here.
If the blade has been honed before, then when you start the old 15 micron microbevel is resting on the abrasive, with the 5 micron, 0.5 micron and wear bevels actually up from the abrasive. As you work on the 15 micron abrasive, you hone metal away gradually removing the old 5 micron microbevel, then the old 0.5 micron microbevel, and finally the wear bevel. The wear bevel will be visible as a bright line at the edge until you are finished this step. Continue working on the 15 micron abrasive until the scratches reach the edge, across the full width of the blade.
The new 15 micron scratch bevel should look the same from side to side. If the bevel is wider on one side than the other, check the blade position in the jig. Do this early on in this step and each time you flip the blade over to do the back bevel.
The first time on the back bevel.
There is no point honing the back until you have finished the front -- until the first microbevel reaches the edge.
Flip the jig (and blade) over and work the back on 15 micron paper for a few seconds, again starting with a pulling motion. You are done when the scratches reach the edge, across the width of the blade (the wear bevel is no longer visible).
Repeat front and back a couple of times.
There is usually a wire edge at this point. It is created when you hone the front bevel, then weakened when you hone the back bevel. Do not worry about removing it at this point.
| [Aside: Why do I repeat the honing of the front and back on the 15 micron abrasive? What is the point of this step? Good question. It cannot be just to remove the wire edge, since that will happen when you hone the next microbevel on the 5 micron abrasive. Thinking it over now I can think of no good reason for repeating the front and back honing on the 15 micron abrasive. If you are careful to hone right to the edge on both front and back the first time, you can probably skip this repetition step and save yourself 30 seconds every time you sharpen!] |
 The second microbevel on the 5 micron paper with the jig on the first slip -- 1 minute.
I put the slips in front of the appropriate abrasive before I start sharpening so I won't forget to use them.
Since the honing on the 15 micron abrasive may have left a wire edge, always begin on the finer abrasives with a pull stroke. It will avoid ripping the abrasive. One pull seems to be enough, then you can use push pull strokes, moving from side to side on the abrasive to use the full width.
Again, I use baby oil to let the filings float up from the surface and get pushed out of the honing area. It also helps me see the contact line of the iron and the abrasive. The filings include small shiny bits produced as the wire edge is honed off.
When are you done?
The visual check is the presence of a narrow shiny bevel right at the edge, across the full width of the blade. This microbevel is very narrow, perhaps only 1/100" wide. The 5 micron abrasive produces very fine scratches that reflect light better than the scratches produced by the 15 micron abrasive. The quality of the surface is not like the wear bevel though - rather than a bright line, the 5 micron microbevel is a smooth even strip at the edge.
Why this works
When you start honing the second microbevel on the 5 micron abrasive, the slip increases the angle enough that the blade is resting solely on the edge. The honing action begins right at the edge, and gradually widens this microbevel.
Initially you are honing just a fraction of the previous microbevel (almost 0%?). Because you are honing such a narrow strip, metal removal is rapid even with the finer abrasive and the second microbevel widens quickly. The 5 micron abrasive removes metal at the edge to the depth necessary to completely remove the 15 micron scratches. As this second microbevel widens, the rate of widening slows. By the time this microbevel is half the width of the 15 micron microbevel, the widening rate has slowed to almost zero. The process is self limiting.
If you did not use the slip, you would be attempting to hone the entire first microbevel with this much finer abrasive. You might remove some of the scratches left by the 15 micron abrasive, but you have to spend a lot longer than 1 minute to completely remove them.
If there is a wire edge, it is touching the abrasive. If you begin with a push, you can easily rip the abrasive. So, always begin with a pulling motion. If you see the wire edge breaking off (silver flecks in the baby oil), repeat the pulling motion.
Second back microbevel
Flip and work the back bevel on the 5 micron paper with the jig on the first slip for a few seconds. The visual check for done is the presence of a narrow microbevel at the edge, across the full width of the back bevel.
As in the first stroke on the front bevel, the first stroke on the back bevel should be a pull rather than a push. The slip has increased the angle, so the blade is resting on the edge alone. Any wire edge will cut the abrasive if you push first.
It is at this point that the wire edge usually starts to break away - you will see small silver flecks in the oil.
Repeat on front and back.
I usually flip back and spend a few seconds on the front, then again on the back to complete removal of the wire edge. The wire edge is honed away by repeated back and front honing.
 Third microbevel on the 0.5 micron paper with the jig on the second slip -- 1 minute.
Again enough baby oil to make it clear that the entire blade edge is in contact with the abrasive.
Remember to pull first, to avoid having the (very much finer) wire edge (left by the 5 micron abrasive) rip the abrasive.
When are you done?
The visual check is the presence of an even narrower microbevel at the edge, across the full width of the blade. This microbevel should be about half as wide as the previous, and a little brighter. [When I first started doing this in 2002 I had no problem seeing this microbevel. These days I am not so sure. If the baby oil wake left by the blade shows that the full width is making contact with the abrasive, and you hone for 30 seconds, you are probably ok.]
Flip and work the back bevel on the 0.5 micron paper with the jig on the second slip for a few seconds. Again, check for the new microbevel across the full width of the iron.
Remember to pull first, to avoid having the wire edge rip the abrasive.
Again, I usually flip back and spend a few seconds on the front, then the back again to complete the removal of the wire edge.
Why this works
When you start honing the third microbevel on the 0.5 micron abrasive, the slip increases the angle enough that the blade is resting solely on the edge. The honing action begins right at the edge, and gradually widens this microbevel.
Initially you are honing just a fraction of the previous microbevel (almost 0%?). Because you are honing such a narrow strip, metal removal is rapid even with the finer abrasive and the third microbevel widens quickly. The 0.5 micron abrasive removes metal at the edge to the depth necessary to completely remove the 5 micron scratches. As this third microbevel widens, the rate of widening slows. By the time this microbevel is half the width of the 5 micron microbevel, the widening rate has slowed to almost zero. The process is self limiting.
If you did not use the slip, you would be attempting to hone the entire second microbevel with this much finer abrasive. You might remove some of the scratches left by the 5 micron abrasive, but you have to spend a lot longer than 1 minute to completely remove them.
If there is a wire edge, it is touching the abrasive. If you begin with a push, you can easily rip the abrasive. So, always begin with a pulling motion. If you see the wire edge breaking off (silver flecks in the baby oil), repeat the pulling motion.
Cleanup -- 1 minute.
Wipe the baby oil and iron filings off the three abrasives. I also wipe the baby oil and grit off the iron for each visual inspection. This helps keep the abrasives clean (especially the 15 micron, which produces most of the filings).
TimingThe time taken on the 15 micron paper increases as the first microbevel gradually widens across the main front bevel. When this first bevel gets too wide I regrind the primary bevel. I am very careful when regrinding the primary bevel to not actually grind down to the edge. Rather I grind away most but not all of the existing 15 micron microbevel. To see pictures of the blade taken during grinding, look here.
The time taken on the 5 micron and 0.5 micron papers does not change, since they always start from the same complete bevel produced by the previous grit. These second two microbevels are quick because they are very narrow. This means as well that the 5 micron and 0.5 micron papers wear out very slowly.
Jigs for Sale
I no longer make and sell jigs.If you make a jig, it is almost as easy to make 6 as it is to make 1. If you make extras and want to sell them through these web pages, send along a picture and contact details. I will add that information to this site. People wanting to buy a jig can then get in touch on their own.
Website Navigation
| You can email me here. |
Email your questions and comments.
Google brings people from all over the world to these pages. It probably brought you! If you can translate a page or two to some other language please email me. If you have any ideas on how to manage translations and versions of web pages, that would be helpful as well. Google will translate these web pages into your language. If you find that some words do not translate well and have better translations, let me know. |
| Sharpening. |
Return to the sharpening page. |
| Older version. |
The details of the jig and the glass sheets have changed a little over the years, but the basic plan remains the same. This is an earlier version of this page. |