
| Introduction |
|
| The Jig | |
| Saw Setting | |
| Saw Filing | |
| Some Theoretical Issues | |
| Sloping Gullets | |
| Copyright (c) 2002-15, Brent Beach |
I hope they clarify many of the issues related to sloping gullets and to saw filing in general. Let me know if you have any quesitons about any of the drawings.
My interest in Saw Filing arose first from a desire to use older saws, all of which were dull when I bought them. Since there was no Saw Filing shop in my area it was learn to file or don't use older saws.
Initially I filed using only a file handle and various visual aids. I had a piece of paper with lines at the bevel angle attached to the saw vice. Also, a block of wood on the file tip to maintain the rake angle. The results were poor.
I eventually found a used saw file holding jig that was a lot like the shop made jig I use today. It had a bevel angle setting adjustment that would not stay set. I eventually built my own version of that jig, then a couple of more versions. These pages include the jigs and how to build and use them, along with other material I discovered along the way.
| Rake - the angle between the file face and the vertical, in the plane of the saw plate. I removed parts of the jig to make this angle visible. | 
|
| Bevel - the angle between the file axis and the perpendicular to the saw plate, in the horizontal plane (when the saw is vertical). | 
|
| Slope - the angle between the file axis and the saw plate, in the vertical plane perpendicular to the saw plate. | 
|
A short History shows some patented saw filing jigs.
This section ends with a short section explaining The Problem -- why saw filing is difficult.

 Crosscut
This is a standard filing for a crosscut saw. The rake is 15 degrees, the bevel is 30 degrees. The model is to scale - an 11 points per inch ppi (10 teeth per inch tpi) saw that is 0.04 inches thick.
Crosscut
This is a standard filing for a crosscut saw. The rake is 15 degrees, the bevel is 30 degrees. The model is to scale - an 11 points per inch ppi (10 teeth per inch tpi) saw that is 0.04 inches thick.
You can right-click on the front view, then click View Image to see an explanation of how a crosscut saw works.
There are two actions: first, sever the fibres, second, push the severed fibres back and forth until they break off as sawdust.

 Rip
This is a standard filing for a rip saw. The rake is 5 degrees, the bevel is 5 degrees. The model is to scale - a 6 ppi (5 tpi) saw that is 0.04 inches thick.
Rip
This is a standard filing for a rip saw. The rake is 5 degrees, the bevel is 5 degrees. The model is to scale - a 6 ppi (5 tpi) saw that is 0.04 inches thick.
This saw is used for cutting along the wood fibres. Since you are moving along the fibres, the tips of a crosscut saw would have no fibres to sever - they would simply slide back and forth withuout cutting.
There is only one action: these teeth act like chisels, peeling shavings as they move along a wood fibre.
History At one time all saws were filed in what we would today call a rip filing: little or no set, little or no bevel. For example, I am told that the workshop in the Colonial Williamsburg historical site uses only rip saws. The era they reproduce faithfully is pre-1800.
 In 1864, H. W. Holly published The Art of Saw Filing which included many drawings of different crosscut filings, each designed for a type of cut in a type of wood (soft, medium and hard). He has slightly different filings for Mitre saws - where the cut is neither directly across or directly along the grain. The drawing at the right, Fig 12, is the filing for softwoods.
He writes, in reference to cross-cut hand saws: "This saw is more common and in more general use than any other saw."
Some time between 1800 and 1864, the idea of having a different filing for sawing across the grain not only arose, but a preferred set of filing angles was discovered, and, if we are to believe Holly, became the norm.
The Holly drawings appear in Disston catalogs and handbooks until at least the early 1900s.
All of the Disston saw catalogs that I have seen, going back to 1875, have both crosscut and rip saws.
A 26" 8ppi saw (ppi = points per inch) has over 180 teeth. Filing involves putting the file in the gullet between two teeth and shaping the front of one tooth and the back of the next tooth in one operation. So, you really file 180 gullets rather than 180 teeth. Usually you file every second gullet from one side of the saw, flip the saw end for end and file the other gullets from the other side.
To file 180 gullets in 7 minutes allows less than 3 seconds per gullet. That kind of speed requires talent and practice. I never come close to that sort of speed - 5 times as long per gullet is a good speed for me. For most people starting out, you should expect to spend at least half an hour on a 26" saw.
While this level of skill and speed is possible, most people would not achieve either unless they file saws for a living. The problem seems to be that the skill is easily lost between saw filing sessions. By the time you are back in the groove, you have already spoiled half the teeth on the saw.
Using this shop-made jig will reduce the number of variables to a manageable set, even after a long interval between uses.
Even with the jig, saw filing takes time. I can hone 10 planes irons in the time it takes to sharpen one saw. It is best to set aside some time, set up your sharpening station in good light, take it easy as you work through the saw. Look here for the complete saw filing process.
 The jig discussed in these pages is Version III. Version I, which looked almost the same, was a wooden version of a metal SAW Filing jig. A reader of the page describing Version I, Paul Womack, alerted me to an article on "Perfect Saw-Filing" that appeared in the Making of America series, hosted by Cornell university. He later sent me a scan of Furniture Gazette, 17th June, 1892, page 397 which appears on the right. Paul's web presence contains lots of woodworking tips and tricks.
This saw-filing jig was patented in 1876, patent number 173,866, by Elias Roth, of New Oxford, Pennsylvania. The circular part, B, allows you to set the bevel angle, the temporary guide E to set the rake. The jig slides in slots on the sides of the clamp that holds the saw, implying no ability to change the file slope.
While much praised in articles of the time, this jig did not get saw filers beating a path to Mr. Roth's door. There are many patents for variations on this tool, many much more complicated and none which you can build quickly out of wood.
I had seen pictures of similar jigs and finally realized that the arms are curved for a reason - they allow a full use of the file even when using bevel angles closer to 45 degrees. Using my original version, which had 90 degree arms, was pretty cramped in those cases. The new version, with angled arms, duplicates this useful feature.
In their 1902 Lumberman's catalog, they advertised this as Especially Designed to Assist Those Not Skilled in the Art of Saw Filing to File a Saw Correctly. I wonder about the psychology of that ad. A person buying this filing guide first had to admit to themselves they were not skilled in the art of saw filing. Purchasers would have to put aside the advice of their pals who said that real men file freehand. I wonder if Disston shipped the filing guide in plane brown wrapping paper?
The same ad appeared in later editions up to the 1919 edition with only minor changes to the copy.
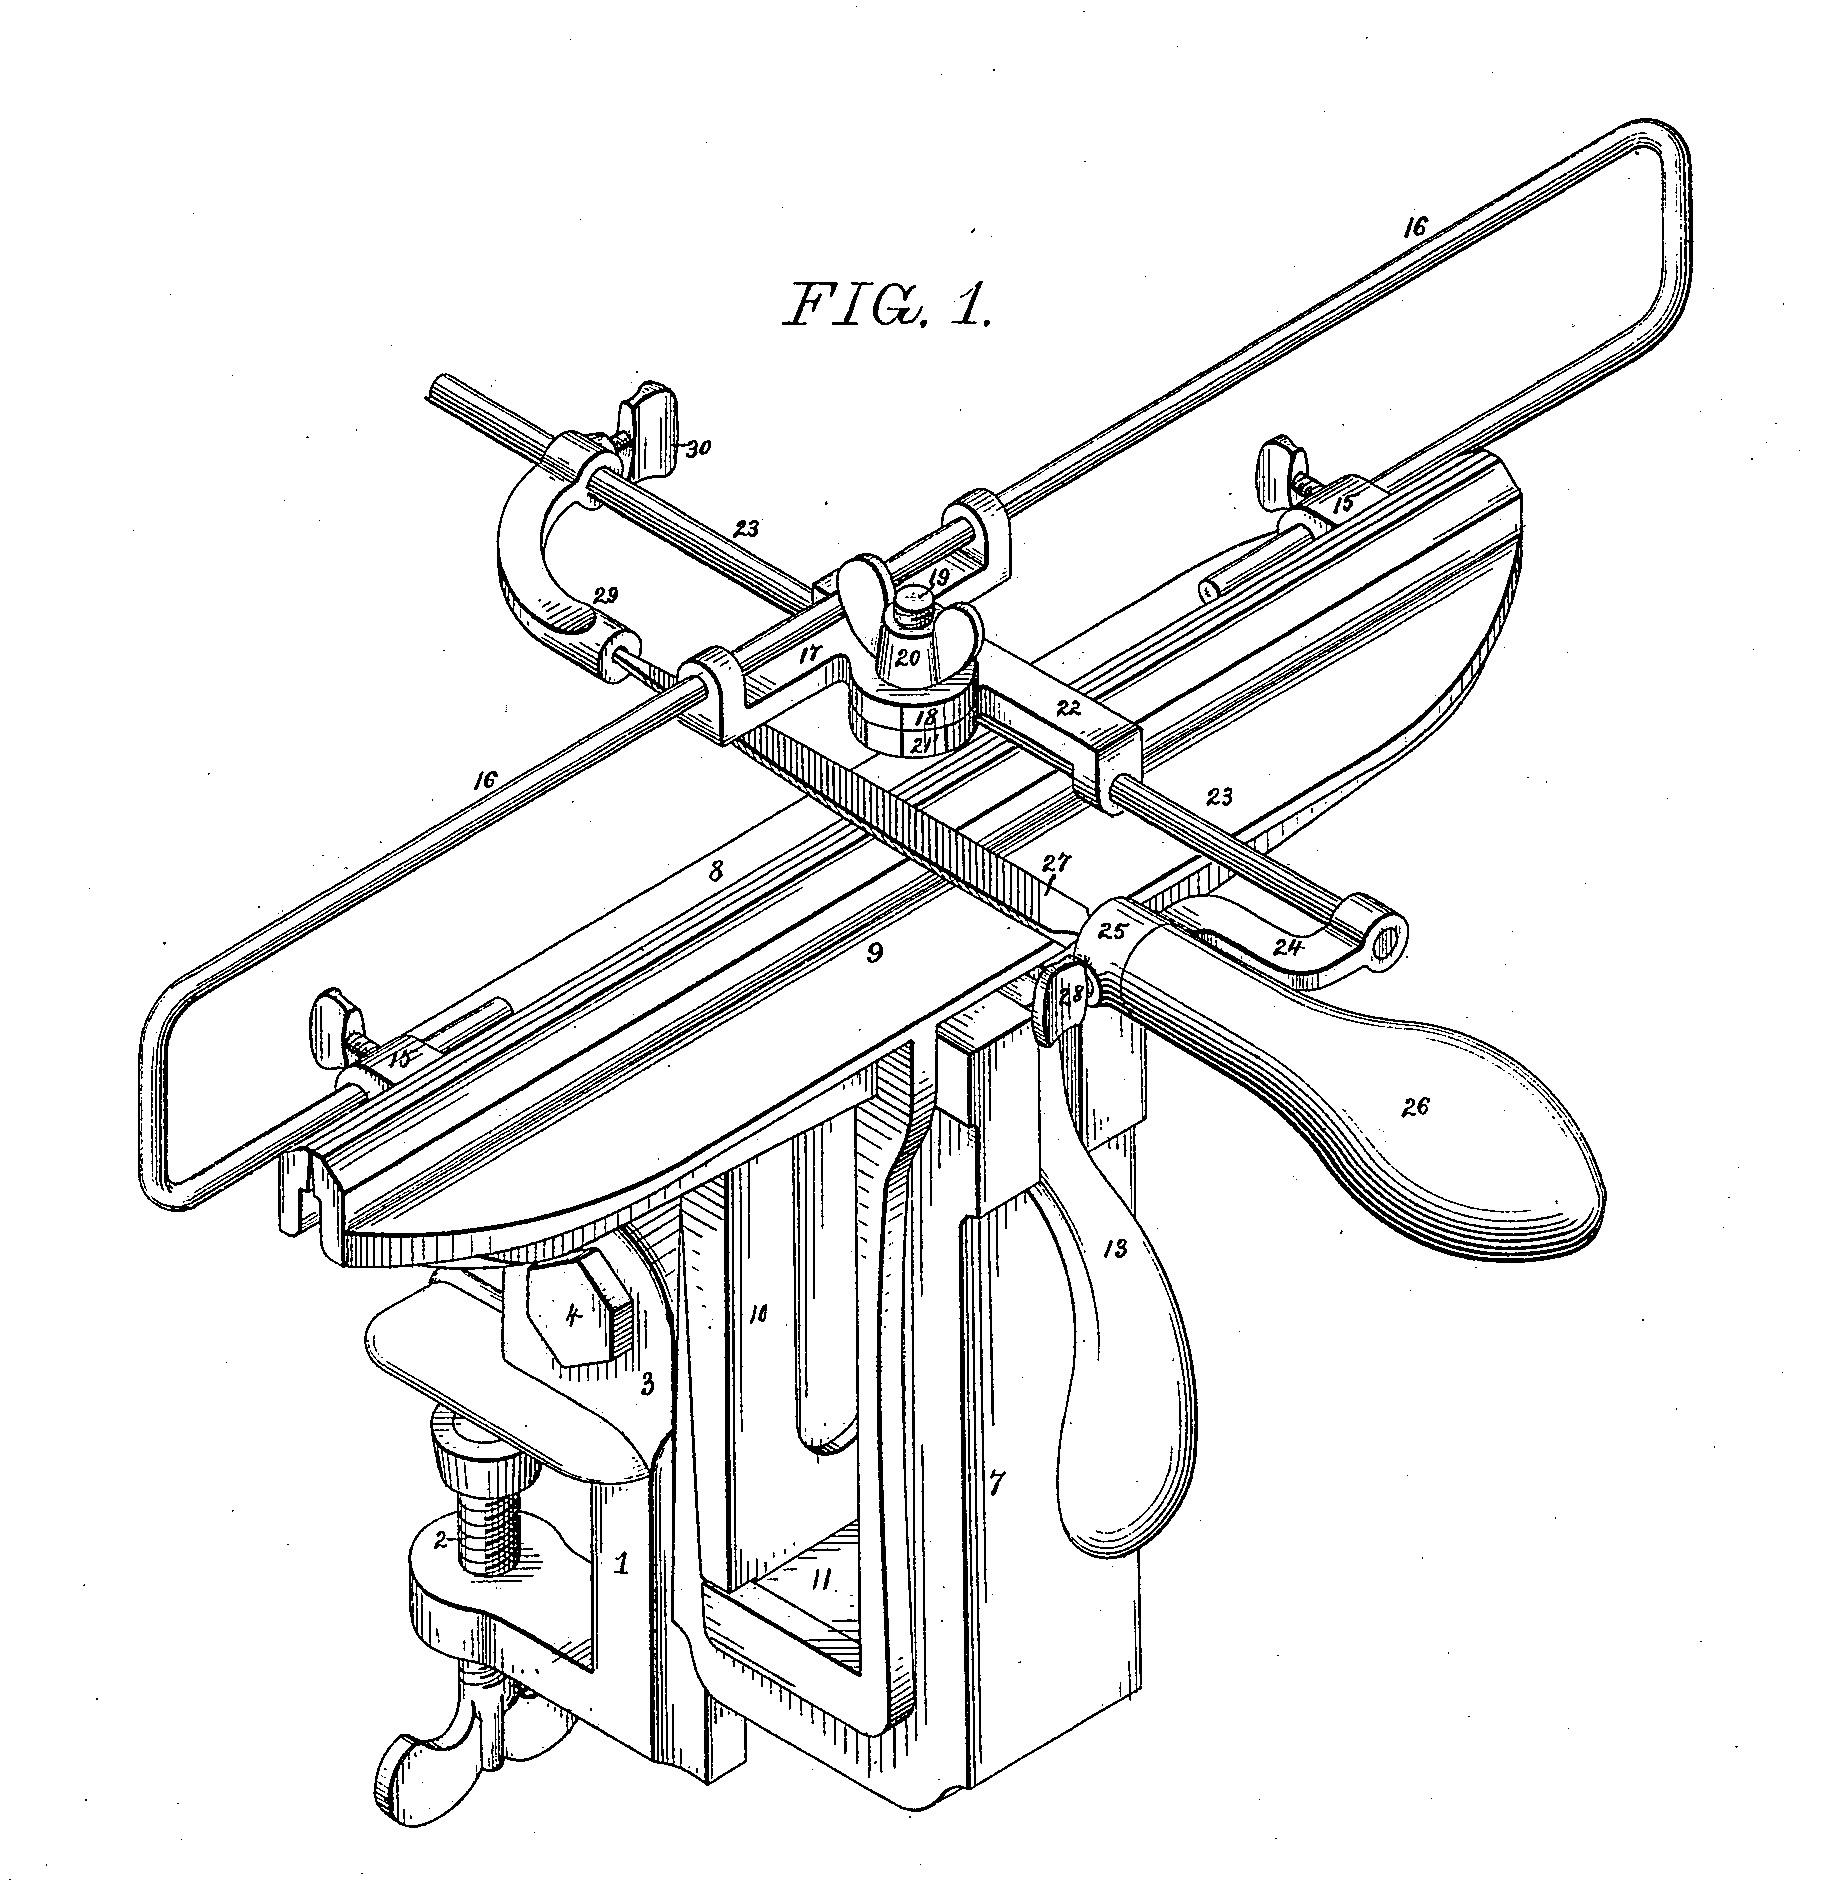
This design allows for accurate setting for all three angles: rake, bevel and slope. Refer to FIG. 1 from the patent, the perspective view.
Rake - Loosen thumb screw 28, which allows the file handle to rotate. Set the rake you want and tighten the thumbscrew.
Bevel - Loosen thumb screw 20, which allows the assenbly to turn in the horizontal plane. Tighten the thumbscrew.
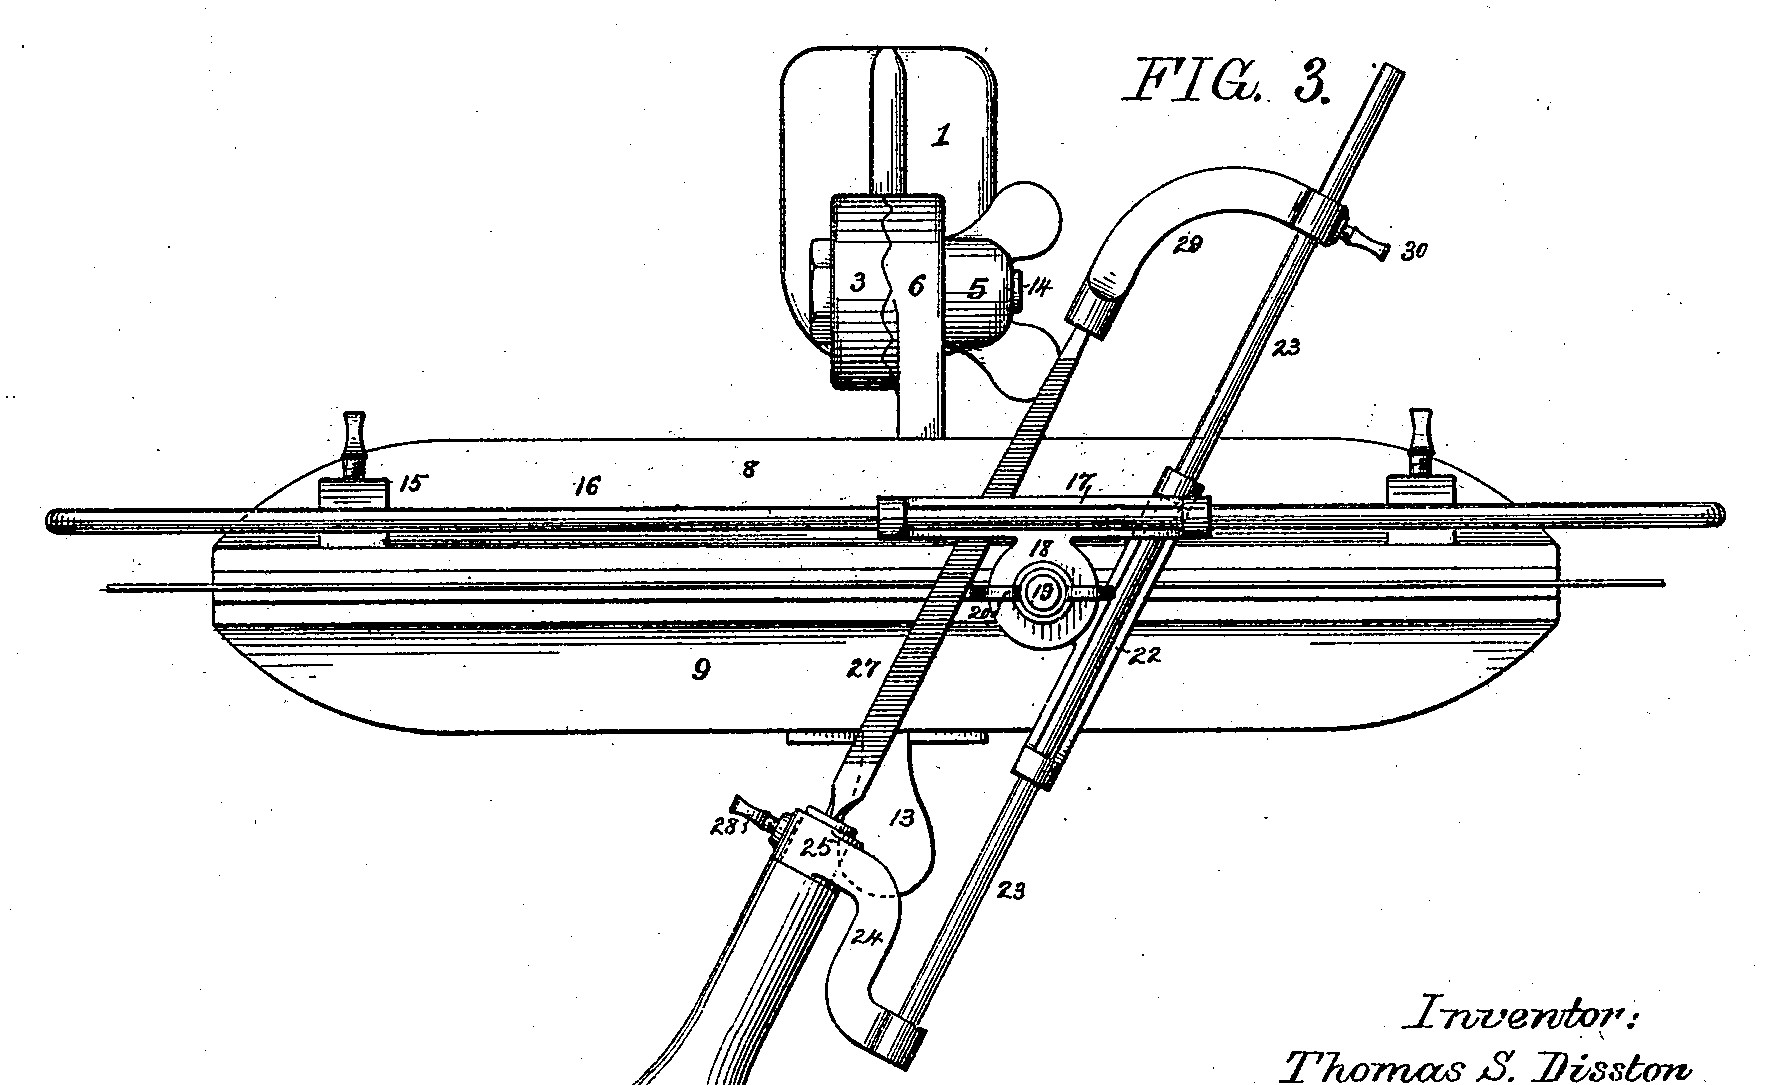
Slope - Refer to FIG. 3 from the patent, the plan view.
This happens in two stages.
The slope of the saw vice is controlled by wing nut 5 and serrated jaws 3 and 6. The teeth in the jaws reduce the number of possible slopes, but they do mean the slope adjustment will not slip during use.
Step 1: Set the saw plate slope using jaws 3, 6 and wing nut 5.
Step 2: Use the thumbscrews 15 to adjust the frame 16 so the sides are vertical and the file horizontal.
Note: If you want a slope setting not provided directly by the jaws 3, 6 and ae comfortable filing at a slight angle from horizontal, you can shade the angle of the frame 16 to get an angle between those offered by the jig directly.
Note: The Patentee is Thomas Disston.
Note: This appears to be an excellent saw filing jig. I have never actually encountered one in the wild, but am on the lookout.
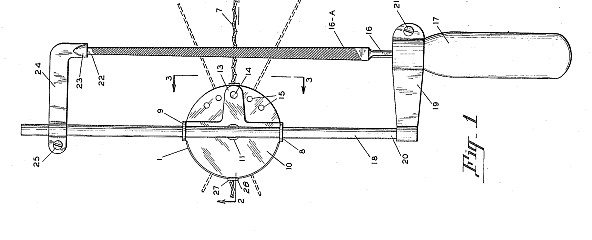
The first saw filing guide I encountered in the wild was based on this patent by James Speed - the Speed Corp patented Saw Filing Guide. Patent number 2,495,991.
The rake angle is controlled by the rotation of the file. You turn the file handle, #17, then tighten the nut, #21, to hold that angle.
The bevel angle is set by rotating the whole assembly including the upper disc #10 about the lower disc #1, which sits on the saw teeth. The arm #13 on the upper disc has a small boss #14 on the underside which catches small holes #15 in the upper disc.
If you exert any force while filing, or if the file catches, the discs rotate pretty freely, giving you an unexpected new bevel angle.
I used this filing guide a few times before deciding I could do better. My jigs arose directly from this guide.
I gave up the idea of having the guide be adjustable for bevel angle. Instead, I made a small number of single bevel angle sliders that handle the small number of angles I actually use.
Although patented in 1950, this jig missed the design advantage (in the Roth jig above) of angling the the arms that hold the file - increasing the usable range of motions for larger bevel angles.
Saw filing requires that you maintain three angles during the filing action. Worse, you make contact with the saw at a single point on the file, and that point moves down the file on each stroke, so the relative pressure required of your hands changes continuously.
While filing a saw we must keep three angles consistent throughout the operation: the rake, the bevel, the slope.
Defining these 3 angle can be confusing. Maintaining them during filing is very difficult.
While most people can file keeping the file more or less horizontal, it is much harder to file while keeping the file tilted upward. To simplify non-zero slope angles, most metal saw vices have a capability to tilt the saw blade from the vertical. To get a 20 degree slope, you tilt the vice away from you 20 degrees and work with the file horizontal.
There was a brief time in the latter third of the 1800s in which tilting the saw during filing was a common practice. A saw filed with non-zero slope has been said to have sloping gullets. Filing with non-zero slope is rarely mentioned today. I have taken some illustrations from the Disston Lumberman Handbook of 1917 and included them in a discussion of Sloping Gullets.