
| Introduction |
|
| The Jig | |
| Saw Setting | |
| Saw Filing | |
| Some Theoretical Issues | |
| Sloping Gullets | |
| Copyright (c) 2002-15, Brent Beach |
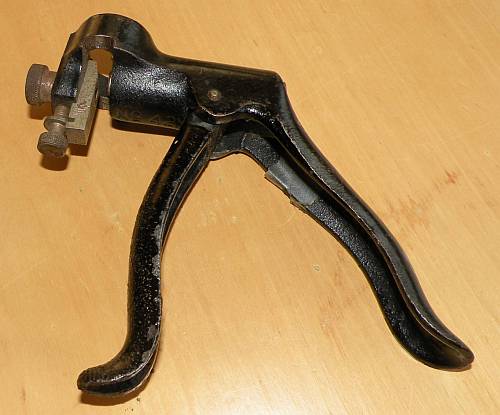 This is the Stanley 42X saw set, the saw set I find easiest to use.
It is called a pistol grip saw set (as opposed primarily to a pliers type saw set) because you hold the saw set like a hand gun.
The saw set rests on the teeth. As you pull the handle a piston (barely visible here as a silver glint on the right side of the gap) presses against the saw plate, pushing the saw plate up against the anvil on the left. A plunger rises from the middle of this piston, pushing the upper part of the tooth against the angled face of the anvil.
 While some saw sets have a round anvil with multiple setting angles, the 42X has a single fixed angle. The angle is between 14 and 15 degrees (about 14.25) The amount of set is determined by how far down from the tip the base of the angled face meets the tooth. You get more set by lowering the anvil.
The knurled nut on the front of the set serves to lock the position of the anvil in the frame. When this nut is tight, the anvil does not move. You can be confident that this works.
The knurled nut on the bottom of the front jaw positions the bevel of the anvil. If you move the anvil down the saw set bends the tooth farther from the tip - gives the saw increased set. If you move the bevel up the saw set bends the tooth closer to the tip - gives the saw less set.
There a hundreds of different designs of saw set. If you can find a 42X, get it. It has been out of manufacture since 1984, so you will have to look for them where you find old tools for sale. An internet search will find many for sale.
You may be wondering why I have not made a saw set out of wood and a few t-nuts. It turns out there are limits to shop made jigs. A shop made wooden jig for setting saws is well beyond my imagination.
This is how Stanley promoted the 42.
| New and Improved Saw Set No. 42 |
|---|
|
Capacity: Back, Panel, and Small Circular Saws, 18 gauge and thinner, having 14 points or less to the inch. Special plungers for setting fine tooth saws (more than 14 points to the inch) can be furnished.
This Saw Set has a blade clamping feature that will appeal to every tool user. A bushing advances before the plunger and firmly holds the saw blade so that it can't slip, thus eliminating any possibility of the plunger striking and crimping the side of the saw tooth. The angle on the face of the Plunger and Anvil is designed to relieve the strain at the bottom of the tooth thus producing a smooth, even bend with no tendency to tear or destort the base of the tooth. It's a "lifetime" Saw Set-and it is constructed to enable the user to readily replace any working part. |
In case you were wondering, 18 gauge is .049 inches or 1.245 mm.
You will see below that most good handsaws were less than 19 guage, typically around 0.04" thick along the tooth line.
Stanley uses the term "bushing" where I have used the term "piston". This piston is unique to the 42X (not found on the 42). It presses the saw plate flat against the flat vertical face of the anvil before the plunger makes contact with the tooth, pressing it against the angled face of the anvil.
 If the plunger face is damaged and no longer makes flat contact with the angled face of the anvil, you could presumably unscrew the handle, remove the "bushing" and plunger along with the springs, flatten the plunger, then put it all back together again.
The plunger is hardened steel, so cannot be filed. You should be able to re-face it, being careful to get exactly the same angle as the sloped anvil face. You could do this by beveling a piece of hardwood at the exact angle, sticking some 5 micron abrasive to the hardwood angled face, putting it in a vise, then with the plunger flat/horizontal, rubbing the face of the plunger on the abrasive.
The plunger is a small thin piece of very hard metal. Good luck.
You must make sure though that the bend is not too close to the base of the tooth. This is always more set than the saw was meant to take. It can also lead to cracking in the saw plate, beginning at the base of the gullet. Typically the tooth bend should be about 1/3 (dry hardwood) to 1/2 (wet softwood) of the way from the tooth tip to the tooth base.
A saw with too little set will soon let you know about it - the saw will bind in the wood. It will be hard to saw because the kerf is not wide enough to limit contact between the just cut wood and the saw plate. You can try to wax the saw to reduce friction here. If this does not work, you must increase the set.
A saw with too much set leaves a rougher surface. If you think of the front of the tooth as a knife, a tooth with no set cuts straight down using the tooth front. All cuts are on the same line. The result is a smooth surface. As soon as you add set, the flat surface disappears. Instead the tooth is making an angled cut resulting in a surface formed as a series of small valleys. I use no set on my mitre box back saw and get very smooth surfaces. A back saw is a special case because the saw kerf is usually only the thickness of the wood (rather than the width). This shallow kerf does not seem to grab the saw in the same way. Also, the saw remains vertical in the kerf, rather than wandering the way a handsaw would - again reducing contact between the saw plate and the work.
You want to avoid too much set for a second reason - the greater the set the more wood is removed during sawing. That means more work for the sawer and more waste. The differences are of course small.
I generally err on the side of too little set. If the saw binds I increase the set.
Each time you joint a saw you reduce the set because the tooth tip is closer to the existing bend. So, sharpening a saw slowly reduces the set. The change is small. You may notice a little binding after you sharpen. Make sure to set on the next sharpening.
Notice that when you set a saw you are actually bending the tooth in both directions. The new bend is lower than the old bend. As the tooth is crushed against the anvil, the tip hits first (because the existing bend is closer to the tip than the old bend). So, as the new bend is forming, the old higher bend is being removed. Crushing removes the old set at the same time as it adds the new set.
You can set once you have jointed and before filing - I usually do. I believe setting can slightly change the shape of the tooth. A good saw set must actually crush the tooth against the anvil for the set to hold.
Setting can change the filing (tooth shape), filing cannot change the set. (Well, a bad filing can, but a good filing does not.) The correct sequence is light jointing, setting when necessary, filing. If filing just removes the flat left by jointing then it leaves the same set on each tooth. It also leaves all the teeth at the same height.
To set the tooth in a way that set will hold you actually have to crush the tooth between the plunger and the anvil. This is called a plastic deformation - the tooth does not resume its former shape when the force is removed. You should actually be able to see the tooth change shape slightly when you apply the setting pressure. If you see the tip spring back when you release the pressure you have failed.
Another nice thing about the 42 X is that you can look down through the frame at the tooth tip and see the plunger push the tooth against the anvil. This allows you to centre the tooth on the plunger and to see the tooth being crushed.
I don't think you can press too hard. Give it a good shot. On the other hand, on a 26" 9 ppi saw, you have 234 teeth to set. This is one reason why a pistol grip saw set is better - you hold the set in a very natural position reducing the chances of straining your wrist (carpal tunnel syndrome) from the repetitive activity.
 Even with a good saw set it is possible to have some small problems with set variation from tooth to tooth. Some people say you can "side file" to remove any imperfections. I don't think it is that simple.
This is a drawing of a saw with the thickness of the plate shown. You can see that the saw tapers from teeth to spine. It also tapers from toe to handle along the spine. When new, the thickness along the teeth is uniform. Just back of the teeth the thickness increases from toe to heel. [Drawing from an old Chas. A. Strelinger catalog. Strelinger was a Chicago hardware merchandiser in the late 1800's. Apparently they actually measured a number of saws and put the numbers into their catalog.]
Most saw sets add a fixed set to the tooth that is independent of the thickness of the saw. If the saw tapers along the tooth line, then the set tips will also taper in thickness. This means as you push the saw into the kerf, the force resisting movement increases as you get to the teeth with more set. I have saws that suddenly catch when the work is about a foot from the heel. Careful measurement of the saw plate reveals an increase in thickness at this point. If the saw plate is thicker, the set teeth are wider. As the saw moves forward in the cutting stroke, the wider teeth near the heel catch as they enter the kerf.
The immediate reaction is to find a way to reduce the set on those wider teeth. One way to reduce the set is to hone those teeth from the side. The quickest way is to run a bench stone down the side of the saw, with the stone resting lightly on the teeth. This is called side dressing or simply dressing the teeth.
What happens if you use a bench stone to lightly dress the sides of the teeth?
While you may remove some small variation from tooth to tooth, there is no way to know if you have removed more of the set from the teeth at one end than from those at the other end.
A tooth with no flat will scratch its way into the side of the kerf as the saw moves through the wood. No flat means a relatively deep scratch.
A tooth with a wide flat will not scratch into the wood. Just like a lower wear bevel on a plane blade, the flat will cause the tooth tip to lift out of the wood. The wood will actually bend the tooth back into line - reducing the effective set of the saw. The result is a narrower kerf. As well, the friction between the wood and the saw increases, resulting in more heat and faster wear.
The skin of the saw blade is the toughest part of the blade. Remove this skin and you reveal the less durable interior metal. The result is faster wear.
How to solve this problem? First, don't assume your saw has the problem. Only if you notice catching in the third of the saw nearest the heel should you take special action.
A considerable effort, to be sure. Worth it if you use the saw a lot.
"Tell me more!"
"Well," he said, "I set the saw in my shop and test it and it worked just fine. Then I took it down to the boat shed and let it hang there for a couple of days. When I used it, it bound in the wood. The set was gone."
Is this magic? Can a saw lose its set when stored in salty air?
In fact, it cannot. What has happened though is that the wood stored in his boathouse is much wetter than the wood in his shop. Even though originally kiln dried, this wood has absorbed moisture from the damp air. He will require more set on saws he uses on this wood.