|
| Sharpening a new blade |
|
| Finest abrasives. | ||
| Microbevels front and back. | ||
| Use a jig. | ||
| Copyright (c) 2002-15, Brent Beach |
My other sharpening pages concentrate on the fine detail of plane blade edges. Using high magnification photomicrographs, I delve into the microscopic details of edges during honing, and after various levels of wear through actual use.
This page is oriented, for the most part, to things people can see without magnification. It attempts to answer the question - What will a woodworker see during the sharpening of a plane blade?
So, while I use a microscope to help understand what is happening during plane blade honing and wear, the microscope plays no part in my actual sharpening process. This page shows you what I am looking for in each stage of sharpening -- from grinding through honing the third microbevel.
The title, From New to Sharp, refers to the common claim by plane blade manufacturers that their blades are ready to use. In all my testing I have only found one blade that was ready to use. You should always hone a new blade before use!
Unless you have read the page on my jig, you may not understand microbevels and how they can be produced precisely.
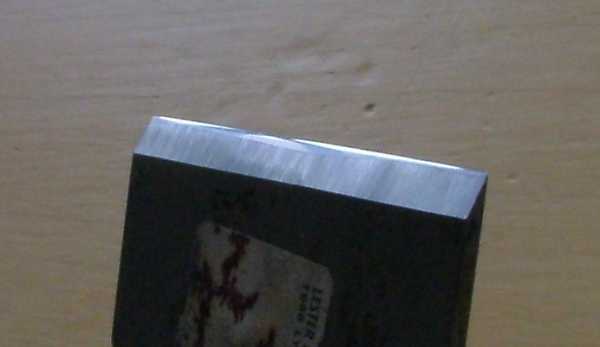 In the fall of 2005 I bought a NOS (New Old Stock) blade for a Stanley #10 from Gary Katsanis on the
Oldtools list. You can still see the hardware store price tag on the blade.
In the fall of 2005 I bought a NOS (New Old Stock) blade for a Stanley #10 from Gary Katsanis on the
Oldtools list. You can still see the hardware store price tag on the blade.
I was delighted to get an old blade that still showed the factory grind marks. Sharpening and using this blade would be almost like working in the late golden era of bench planes. (You might have to be a sharpening geek to understand.)
This is a picture of the sharpened blade. It shows the newly ground primary bevel and at least two of the microbevels. You will see better images of these microbevels below. For now, they are the bright lines right at the edge of the blade. The arc about 1/3 of the way from the left side is a lighting problem, not a problem with the honing!
While you may not have a NOS blade, you will have either a new blade, or just a dull blade. The sharpening stages are the same for your blade.
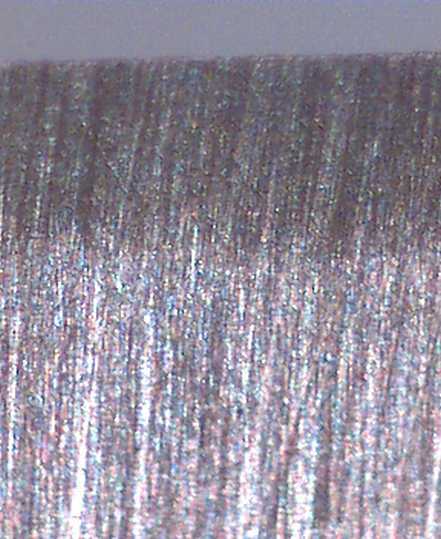
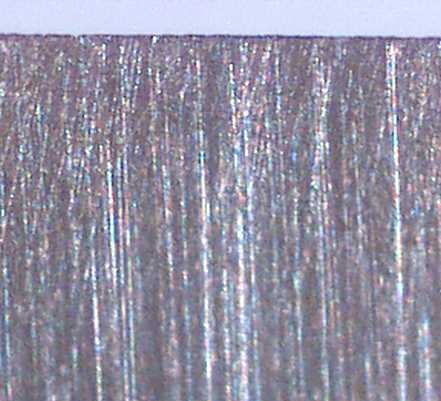
The images in this page are a combination of photographs, scans (using an Epson 4180) and photomicrographs (made using the INTEL QX3 computer microscope). The scans are about a 3.5 times magnification, the photomicrographs at 200 times. The 3.5X scans should give you a good sense of what you can see, the 200X images show what is really happening.
 I have recently switched from putting three abrasives on one large glass sheet. I now use three 6" by 16" glass sheets, each with a 7" by 17" backing board. The glass is glued to the backing board with Weldbond glue. The honing station page has a full description of gluing plate glass to a backing board. The glass in this picture is actually glued down - the glue dries clear. A bit of textured rubberized netting stapled to the back keeps the board from sliding around the bench.
The bigger working area means I can use a larger jig, now 2" tall, use half sheets of abrasive, and still have lots of room to work. The larger jig means that the distance from the front of the jig to the edge of the blade is greater. This allows longer honing motions which I feel are more controllable.
The size of the abrasive surface is one of the many advantages of sheet abrasives. Using a large glass sheet makes the most of that advantage.
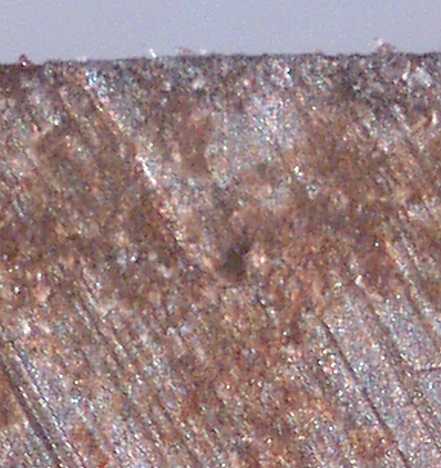
 I always like to get 200X images of a new blade - to see what the manufacturer think is a usable blade.
You won't be able to see this on your blade, but it gives you some idea of the quality of the edge on a new
blade from the manufacturer.
I always like to get 200X images of a new blade - to see what the manufacturer think is a usable blade.
You won't be able to see this on your blade, but it gives you some idea of the quality of the edge on a new
blade from the manufacturer.
This is the bevel side, at 200X. There is a little surface crud on this blade - not bad for a blade that appears to have sat on a hardware store shelf for 60 years. I rubbed most of it off with my thumb, but there is still a little in the lower right of this picture. This type of crud has no effect on the ability to sharpen a blade. It should be removed and the entire blade oiled before continuing though.
The factory grind scratches run square to the edge and are pretty rough. In two places deep scratches, indicated by a wide bright line, run right into the edge. If you used this blade as it is, you might be able to get shavings, you might not.
The slight darkening at the edge (some scratches stop short of the edge) suggests that they did a light honing at the factory. It may be a result of my rubbing the crud off with my thumb (a dirty thumb is slightly abrasive, a small leather strop in fact).
The edge itself is not perfectly straight - this wavy line is typical of factory sharpening.
The bevel looked slightly hollow but checking with a straight edge showed no obvious hollow. I believe they used a very large grindstone here -- much larger than any shop grindstone. Unfortunately I have no way of measure a radius of curvature.
I wanted to leave this as the primary bevel, but it turns out the bevel angle is 32 degrees, much too high. If your blade already has a 25 degree primary bevel, you may not need to grind the primary before honing.
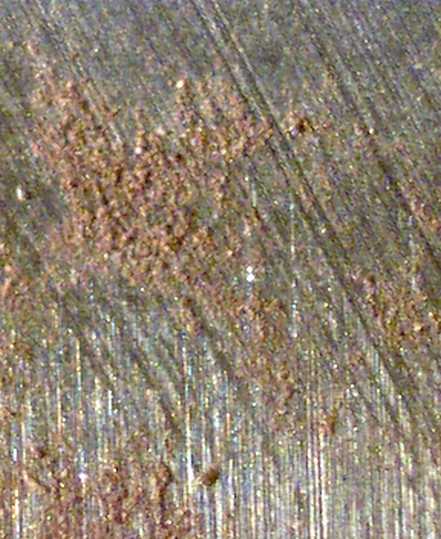
The back of this blade is interesting. First a 200X image of the back, including the edge.
The first thing to notice is that the area near the edge is relatively scratch free. I think they honed the back, but only near the edge, with a fairly high grit.
The second thing is that the scratches are angled rather than square to the edge. This means there was a step after the grinding of the iron that was done at a different angle to help the person doing the grinding see that he had flattened the entire back near the edge.
Again, lots of crud on the back of this blade. All of this rubbed or was honed off with no deep pits.
This is a 60x image of the back, about 1/2" from the edge.
The angled scratches at the edge meet the square to the edge scratches that cover the rest of the blade. The three distinct regions on the back suggest a three step manufacturing process:
| The high magnification images show a common feature of unused plane blades - while the manufacturer may say they are ready for use, and while they may look sharp without magnification, you really do have to hone the blade before use. |
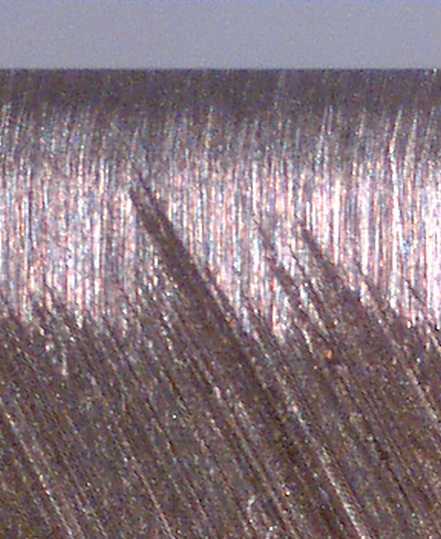
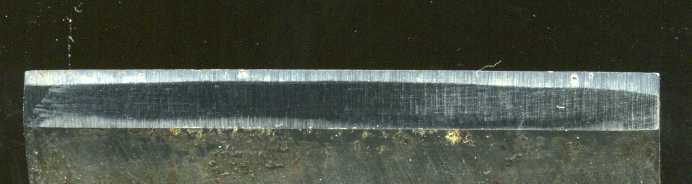 The factory bevel was at 32 degrees, so I reground the primary bevel. Using my 1" belt sander and a 120 grit belt, I started grinding the primary bevel at 25 degrees. This is a scanner image (with the blade still in the jig to hold it at the correct angle for the image) of the primary bevel one-third of the way through the grinding.
The old grind is still in the 1/32" near the edge, the new grind back of that.
The boundary between the new and the old grind is not a really straight line at this point. As it gets closer and closer though, I take more care to not actually hit the edge.
 About half done, and the new bevel is slowly approaching the actual edge. There are high spots and low spots, but this is not a bad grind so far.
The difference in appearance of the scratch pattern from the previous image is a scanner setting problem, not a real difference.
 A few more minutes and some careful work and this is the result.
Even though this image is from a scanner, not the QX3 microscope, the same technique of counting pixels is possible. Working from the actual blade width - 2 1/8" - and counting pixels in this image, the new primary bevel width is now about 0.21" and the very narrow remnant of the original primary bevel is between 0.004 and 0.0014" wide.
While this image is at about 3.5 times magnification, this remnant of the original primary bevel is visible without magnification. Grinding near but not over the edge is certainly possible with a little practice. At least it is on a 1" belt sander with a shop made tool rest.
The major problem with the original blade, the high primary bevel angle, has now been corrected, as have the small cosmetic problems.
|
I hope these pictures convince you that you can grind a blade without grinding the edge itself. Grinding the edge is a risky option. As you near the edge, the remaining metal gets thinner and less able to carry away the heat generated by the abrasive. The metal at the edge can quickly overheat, drawing its temper - its hardness and ability to resist wear.
You can avoid the problem by grinding with very light passes and stopping just short of the edge. |
The middle of the blade is about 0.006" higher than the corners.
It is also clear from these pictures that the corners of this blade have suffered a little in storage - they have been worn down or chipped off a very small amount. This is much clearer in the next scans of the back of the blade.
A check of the back with a straight edge (no photo, not even sure how to get such a photo) revealed that the back was a little concave - the sides higher than the middle by a few thousandths.
In grinding up to the factory edge with its slight crowning I have created a non-flat bevel that will show up more obviously during honing. The problem of straightening a slightly crowned edge comes up again later in the sharpening session.
 The blade has been honed, front and back, using 15 micron 3M microfinishing abrasive on glass - my standard sharpening process. This is the front bevel - honed at 29 degrees.
The microbevel is over twice as wide in the middle than at the sides of the blade. This irregular microbevel is a result, I think, of the two small problems with the original blade: the cambered edge and the concave back. First, grinding up to a cambered edge results in a concave bevel - concave side to side of the blade, not concave edge to back of the bevel. Honing a concave bevel produces a microbevel that is wider in the middle. Second, the slight concavity of the back tends to result in more metal removal at the side of the blade when honing the back, increasing the camber of the blade.
This slight irregularity will not affect use, it just increases the first microbevel honing time slightly.
 This is an image of the back of the blade, again using the scanner.
Again, notice the effect of the slightly concave back -- more metal removed near the sides than in the middle. In fact, the factory grind scratches still reach the edge near the middle of the blade.
 A few more seconds front and back on the 15 micron abrasive. The first microbevel on the back has now removed all factory grind scratches near the edge, except at the far right side of the blade.
Why has honing not produced a full width microbevel? I suspect that the person who flattened the back at the factory took a little more off near the sides. Perhaps the right side landed on the abrasive first, or left the abrasive last. Small problems like this are perhaps unavoidable when working without a jig on fast moving abrasives.
Failure to hone right to the side of the blade is a problem for this blade in particular, since the #10 - A Carriage Maker's Rabbit Plane - is designed for planing right up to the side of the blade in cleaning out large rabbets.
|
The first microbevels should span the blade, front and back. This first honing step may reveal problems with the grinding step. Often it makes sense to repair these defects by returning to the grinder, before continuing with the finer abrasives.
For example, if the first microbevel is much wider at one side of the blade, then the edge is probably not square to the sides. It is usually better to square the edge on the grinder, regrind the primary bevel, then start honing again. |
 With a good 15 micron microbevel across the full width of the blade, front and (almost) back, I moved on to the 5 micron abrasive at 31 degrees.
If you look closely at this scan, you should be able to see the new microbevel right next to the edge. In fact, it looks like there are three regions: the 5 micron microbevel at the edge, next a region showing both 5 micron and 15 micron scratches which shows up as a light line, then the 15 micron microbevel.
Notice as well that this second microbevel is of more uniform width across the blade. This is because the second microbevel is formed entirely within the first microbevel. Since the first microbevel was produced using a jig and a flat abrasive, it is flatter than the primary bevel.
I don't believe I can get a really flat bevel using the 1" belt sander. The problem is the width of the abrasive, so it applies as well to grindstones narrower than the blade. A wide belt sander might produce a flatter bevel.
 A scan of the back, again showing the two microbevels - in this case a little easier to see out near the sides of the blade.
The very slight concavity of the back of this blade will require a little extra care during honing of the back bevel. Pressing down closer to the middle of the blade should ensure a full width microbevel.
The scans gave you an idea of what you will be able to see with the naked eye. To really see what is happening, look at this 200X image of the front microbevels. The slightly darker region near the edge (the top third of the image) is the 5 micron second microbevel. The lower 2 thirds is the 15 micron first microbevel. If you look really closely you can even see the region between which shows both types of scratches.
The difference in the sizes between the 5 and 15 micron scratches shows up clearly here, but differently than it does in the scanner image.
Underlying all three regions, almost like a watermark, are a set of angled lines tilting to the left. I don't recall any scratches like this in the original grind, but they must have been there. Scratches at this angle were present and clearly visible on the back.

This is a 200X image of the back microbevels after the 5 micron abrasive.
At the edge (the top quarter), the 5 micron scratches of the second microbevel.
Back of that (the middle third), the 15 micron scratches of the first microbevel.
The factory grind angled scratches are at the bottom.
Notice that the boundary between the 15 micron scratches and the factory grind scratches is very uneven, with some of the factory scratches extending far into the 15 micron zone. This indicates that the factory abrasive was made up of grits of a variety of sizes. The 3M microfinishing abrasives are much more uniformly sized.
| While the second microbevel is much clearer in the 200X images, it is visible to the naked eye. Stop honing on the 5 micron abrasive when this second microbevel spans the blade evenly. This step should require less than 30 seconds. If it takes a lot longer the abrasive is worn and should be removed/replaced. |
 While I can usually see this third microbevel without magnification, I have been unable to get a good camera or scanner image. The narrow microbevels are too shiny. You may be able to see this microbevel on your irons in good light.
The third microbevel does show up in this is a 200X image of the front microbevels after the 0.5 micron abrasive.
At the edge the 0.5 micron microbevel at 32 degrees. I probably spent a little too much time on this grit (or at least, could have spent less time) because I have removed most of the 5 micron microbevel.
The bright halogen light I use with the QX3 is mounted at about a 45 degree angle to the surface. If the surface were perfectly smooth, all the light would reflect off the surface at 45 degrees and go out the far side. With no light reflected straight up into the microscope, the surface would look black.
With the larger grits, and the resulting deeper and wider scratches, the incoming light is scattered, with some going straight up and being caught by the camera.
With the very small grits, and the resulting shallow and narrow scratches, there is very little scattering. When the wavelength of the light is larger than the width of the scratches, almost all of the light reflects out the other side at 45 degrees.
When I look closely I think I can see some very fine scratches in the third microbevel in this image.
This is a 200X image of the back microbevels after the 0.5 micron abrasive.
The microbevel at the edge, the almost scratch free third microbevel, was made with the 0.5 micron abrasive. It has replaced about half of the second microbevel, or about 1/8th of the image height. Again, very faint scratches in the 0.5 micron microbevel. This is the first iron used with this particular sheet of abrasive (in fact, all three sheets were fresh for this test). The abrasive does break down with use. After a few blades, the scratches left by the 0.5 micron abrasive will no longer be visible.
| While the third microbevel is very difficult to photograph or scan, it is usually visible to the naked eye. Stop when it spans the blade. This step usually requires less than 30 seconds. If it takes a lot longer the abrasive is worn and should be removed/replaced. |
Rather than a single primary bevel, the dull blade has three microbevels on both the front and back from the previous honing. As well, it has a wear bevel on both the front and the back.
The first challenge is to remove all of those bevels, creating a new first microbevel that reaches the edge across the full width of the blade.
 This is a scan of the worn blade. The bright line along the edge in the middle of the blade is the wear bevel. The wear bevel is usually visible if the blade is clean and pointed at a light so the light reflects off the blade at about a 90 degree angle. That is, the blade points at the light and your eye is right above the edge. [The wear bevel angle is 45 degrees, the angle between the wood and the blade.]
The blade shows wear only in the middle because my test involves jointing a 1" board. By using only the middle inch of the blade and taking care to get full length, full width shavings on each pass, I am able to achieve a consistent test.
 In re-honing the first microbevel, the goal is to remove ALL of the previous 5 and 0.5 micron microbevels, as well as all of the wear bevel.
This is a scan of the front bevels after the blade was honed at 29 degrees using 15 micron abrasive. The new first microbevel is the only microbevel remaining.
The edge no longer has any camber - it is straight within the accuracy of the scanner resolution used.
 This is a 200X image of the new first microbevel, showing that the scratches now reach the edge. There is no evidence of the old 5 and 0.5 micron microbevels, nor of the wear bevel.
The very narrow dark strip right at the edge is the wire edge. You can read a whole lot more about the wire edge here.
I generally do not re-grind a dull blade unless the first microbevel is already more than about 1/3 of the width of the primary bevel. At the start of this second honing, the first microbevel was about 1/4 of the width of the primary bevel. After the second honing with 15 micron abrasive, the first microbevel is just over 1/3 of the primary bevel width. I will start the next re-honing with a regrind of the primary to remove most of the first microbevel.
While it takes a microscope and 200X photomicrographs to see the fine detail of the microbevels, you can see enough with the naked eye to reliably produce three microbevels across the full width of a plane blade using sheets abrasives on glass and a simple shop made wooden jig.
The sharpening process is fast, accurate and reliable.
This blade has a slightly convex back. If you put the blade back-down on a flat surface, the sides touch and the middle is above the surface. The thickness is constant across the blade.
In use, the blade is flattened against the flat frog by the pressure of the flat lever cap. That is, the blade is flat in use. It is only convex when out of the plane.
Since the blade is flat in use, we must keep it flat during sharpening. The fact that the blade is flattened by the jig is a help. An eclipse style jig would not flatten the blade during honing - in fact it could make it even more convex if you over-tightened. Even in my jig, while flat at the jig the blade can be out of flat at the edge.
How to ensure the blade is flat during sharpening? First, press harder on the corners of the blade when sharpening the front bevels. Second, press harder on the middle of the blade when sharpening the back bevels.
It is much harder to compensate while grinding. I freehand grind up to the edge. During this operation, there is no pressure flattening the blade. It might help to put the cap iron on while grinding, since that will flatten the iron a bit. In any case, if you grind up to the edge, leaving a bit of the old honed/wear bevel, you will not be changing the camber of the edge.
If you have such a blade, mark it up with magic marker so you will always be aware of the problem and the correct compensation required during honing.