|
| Belt Sander |
|
| Finest abrasives. | ||
| Microbevels front and back. | ||
| Use a jig. | ||
| Copyright (c) 2002-15, Brent Beach |
A 1" belt sander will let you create primary bevels on most edge tools relatively quickly, once you replace the tool rest. It is easy to grind at any desired angle, with little danger of overheating provided you use sharp abrasive belts.
Powered grinders (belt or wheel) are not the only option for grinding the primary bevel. You can use bench stones. I usually do.
| NOTE Both the belt sander and the bench stones produce a flat primary bevel. It is very difficult to freehand (without a jig) hone a plane blade or chisel with a flat primary bevel. If you won't be using a jig to hone, then you should probably hollow grind your tools using a grinding wheel. If you insist on using dull blades (freehand honing), then a hollow ground blade will probably not be quite as dull after honing as a flat ground blade. |
|
Warning - Misuse of any grinder can result in serious injury. In the standard position the belt is turning toward the tool. If you move the tool too quickly into the belt it can catch - possibly destroying the belt, possibly pulling the tool from your hands and flipping it around the room. Inattention around a spinning abrasive belt can lead to injury.
Put the tool on the tool rest away from the belt. Move the tool up the tool rest until it makes contact with the belt. There is never a need for excessive force. If the belt is not cutting it is worn. It is almost certainly overheating the tool. Time for a new belt. I have never had a problem with a belt but have received reports of even good belts having problems. Be careful. |
|
NOTE The belt sanders I own (3) are designed and sold to hobbyists who make occasional use the machine. They are all probably capable of thousands of hours of use. Below you will see a review of one of the cheapest belt sanders that has been used for sanding wooden parts for 10 years. This is much more demanding use than occasional tool grinding.
If you are looking for an industrial machine - a machine that will get heavy use 40 hours a week for many years - you will have to spend a lot more than the $40 to $80 these machines cost. Industrial belt sanders/grinders cost from $2,500 to $5,000 and more. Single diamond grit belts can cost more than these small machines. |
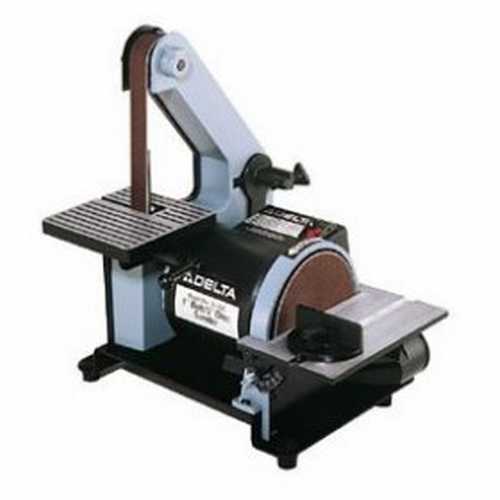
These small machines were originally used by hobbyist wood workers to finish sand small projects. The rest supplied with these sanders is not a tool rest - it is a wooden object rest. The first one I bought was called a Belt Sander.
In my use, they are belt grinders. Either name is fine, with perhaps a slight preference for belt grinder. A search for "belt grinder" got 306,000 hits, while a search for "belt sander" got 2,860,000 hits.
Here are a few of the reasons why I prefer a belt sander:
People have even clamped portable belt sanders upside down in a vice and use them. People also race portable belt sanders.
The belt sander came with a large tool rest which could not be set to the angles needed for grinding edge tools - typically in the 20 to 30 degree range. You will have to make a new tool rest - details below.
A 120 grit AlO (Aluminum Oxide) abrasive belt will quickly shape tool steel without over heating. Where a lot of grinding is required though -- when changing the bevel angle on a plane iron -- a grit as low as 60 should be used.
While it works very well as a grinder (rough shaping of the bevels), I don't believe any high speed abrasive should be used for honing (finishing the edge). High speed abrasives heat the edge very quickly, especially at finer grits (finer than 120) and even more if the abrasive is a little worn. I have belts with grits as small as 15 micron, but no longer use them.
A 1" belt sander can replace a grinding wheel for many sharpening applications. I have both, but now only use the grinding wheel when removing lots of metal, and almost never on edge tools.
I happen to own a Delta, but have seen many knock off versions that appear identical. The knock offs are usually in the $60 range.
| Update 12/01/29: | |
| Wobbly wheel | The drive wheel on my belt sander is metal. Newer versions have a plastic wheel and in the case of at least one the wheel wobbles. The belt still tracks. I don't know if this can cause a problem by weakening the belt backing, leading to early failure. Check your wheel right away and take it back if it wobbles. |
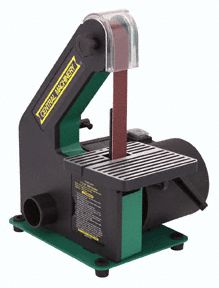 Wow - even better. Harbor Freight sells this little gem. It does not have the useless sanding wheel but does have the useless tool rest which you will have to remove and replace with a tool rest like the one below. At $40 this is a great buy. Not only cheaper than a grinding wheel, as well as better for the reasons discussed below, it costs less than the after market tool rest most people buy for their grinding wheel.
In February 2008 this was here on the Harbor Freight web site. While you are there, get some belts - the price looks good but I have not used the belts so have no idea how well they work. (No affiliation. Some readers have suggested the HF belts are not very good. I use Klingspor belts.)
I did manage to buy one of these belt sanders - thanks Ted - and tested it out. It works just fine. By fine I mean: belt tracks, platen seems solid enough. I was able to use the same tool rest as I had made for my Delta - you will have to replace the tool rest that comes with the sander. I have not used it as much as I have used the Delta. Others report using these belt sanders for years. One extremely heavy user reported burning one out. If you intend to sharpen every day you probably want a more substantial machine. If you will only be sharpening your own edge tools, should be no problem.
Update: Peter Schumacher sent me an email, which said (among other things): "Your Harbor Freight sander is a dead ringer for my Woodtek sander. I have owned and used it for over 10 years. I'm a hobby woodworker, mostly wooden toys and small furniture pieces. I use it mainly it smooth curved toy pieces. I have gone through dozens of belts with no problems. I have sanded with enough pressure to bring the motor to a stall many times. No problems at all." Looks like an good alternative!
Update 2: A reader has told me he was able to rewire this unit to have the belt move in the other direction. While this sounds safer - less chance of a catch - I would not do it for the reasons reasons outlined below.
 The Harbor Freight unit is the basis of a knife sharpening setup ("Edgemaster Blade Sharpener"). In a recent email conversation with the developer of the system, I learned that he has sold 400 units based on the Harbor Freight belt sander. He has had no complaints about quality problems. He does advise against the belts that Harbor Freight sells - they use Klingspor belts exclusively. Edgemaster is now a Franchiser of a Knife Sharpening business. As of June 2011, he is again selling his modified version of the Harbor Freight belt sander.
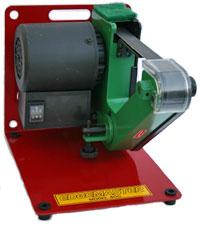
The Robert Sorby site has a couple of videos on how to use this belt sander. They show a tool holder that does the finger nail grind on wood turning gouges.
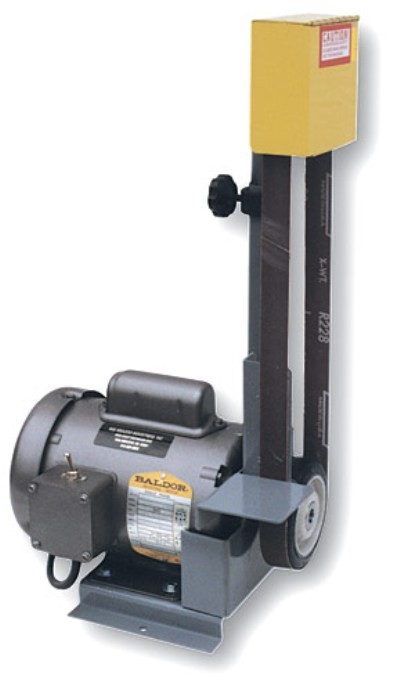
The belt sander has a 1/3 horsepower Baldor motor - should have no problems with this for anything short of all day everyday heavy grinding.
Even with this machine, I expect you would want to build your own tool rest.

Larry Williams uses a much more substantial belt sander, part of a grinder/sander combination machine.
You can see that his shop made tool rest allows very small grinding angles, and allows him to grind complex tools like this gouge. The wider abrasive would also allow more evenness in grinding wide tools like plane blades.
At first it appears that Larry chose to position his tool rest so that the tool hits the belt below the platen (belt support). In fact, there is a notch in the side of the platen. The platen is continuous from well above to well below the area in use.
A nice design. This is clearly a much more substantial setup than mine. With practice, I think most people could do some pretty good free hand grinding on this machine with a tool rest like this.
Larry's grinder was written up in more detail in a Woodnet discussion in 2007 that has since disappeared.

Derek Cohen from Perth Australia uses a much bigger belt sander and has built a tool holder for it. He describes it here.
The bevel angle is determined by the extension of the edge from the front of the tool holder. The jig slides back and forth on the bar, much like a Tormek.
I am not sure why Derek chose to set an extension from a jig which holds the blade rather than use a tool rest (as both Larry and I did). Perhaps it would be hard to use a tool rest with a horizontal belt.
The problem with this method - jig on a rod - is that as you remove metal the angle changes (increases). With a tool rest, the angle does not change as you remove metal.
This setup - with the belt horizontal - puts the tool in an awkward position for good control. With a vertical belt (or a grinding wheel) positioned to have the tool between waist level and eye level, you are most able to see and control the tool edge. With this setup, you can neither see nor control the tool edge well.
I have used Klingspor belts for years and been happy with them. I source mine locally and it turns out I was only able to buy the Economy Belts. I had no idea they sold even better belts.
Klingspor has an online site that sells their belts. They sell Alumina Zirconia in 24, 36, 40, 50, 60, 80 grit, Gold Aluminum Oxide in 120, 150, 180, 220, 320, 400 grit, Economy Aluminum Oxide in 40, 50, 60, 80, 100, 120, 150 grit, and Premium Aluminum Oxide in 36, 40, 50, 60, 80, 100, 120, 150, 180, 220, 320, 400, 600 grit.
Lee Valley has long sold 1 x 30 abrasive belts. I see that Lee Valley now sells a 3M Aluminum Oxide belt that they call a Grinding Belt in grits 180, 320, 500, 1200.
I tend to use belts away from the edge, to shape a blade back of the edge to prepare for honing. I call this the primary or first bevel. I think of this as a grinding operation because it removes metal but is not part of the honing process since it never involves the tool edge. For grinding you would not need the very high grits unless you were working on knives and want to get a particular finish on the primary bevel.
If you want to try power honing you might try some of the higher grits.
The Economy belts that I have been using are X weight. These are sturdy belts. I have never had a belt failure even with the abrasive moving into the edge. The higher grit belts that you might use for honing an edge have lighter backing. More care would have to be taken when using these belts. I don't think normal use would ever cause a failure, but an inadvertent jamming of a tool into the belt could destroy it.
I intend to get some of these finer belts for my experiments with knife sharpening.
| Belt failure |
|---|
| In the spring of 2017 I was using my belt sander to reshape a splitting axe. (Yes, I am working on a page on sharpening axes.)
Two belts failed. The good news - the failed belt got stuck inside the casing. It did not fly out of the machine where it could cause some harm. The bad news - both belts failed at the join. I close look at the belts suggests to me that the failure was in fact a failure of the adhesive in the tape used to join the belt. The adhesive had just gotten old. These belts are many years old - perhaps as much as 15 years old. While both belts were unused when I put them on the belt sander and started to use them, I suspect that the adhesive had simply dried out over time. Both belts failed quickly - after a few minutes of grinding. Are there any lessons to learn here? Perhaps to not buy too many belts at one time. Perhaps it is better to buy belts more or less as you need them. I know it is hard to pass up a good price on supplies (or on classic planes or chisels or saws or ...). However, if a belt can fail from simply sitting around too long, perhaps that deal is not as good as it seems. |
I have made replacement tool rests from both galvanized metal framing material and from acrylic. I prefer the acrylic version.
Having done a little wood turning, I favour a tool rest that lets me get close to the work and hold the tool in my left hand while controlling the motion with my right. These tool rests give me that option.
| Update 12/01/29: Modify existing tool rest | ||
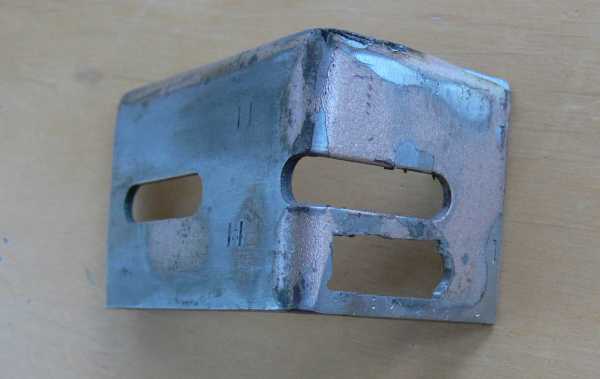
| A website visitor, Marko, pointed out that the tab on the underside with the slot for the tool rest adjustment bolt could be modified to allow shallower angles. It is currently straight. By making it L-shaped you could achieve lower angles. It looks like a couple of cuts in the sides are required as well.
In the second picture you can see that the tool rest behind the belt had to be modified as well. Marko can set the tool rest to 23 degrees. |

| |
|
Here is the modified rest at a shallower angle.
I think this rest has several problems, but you may find it works for you. The distance between the belt and the rest is a bit large. It might be a little too easy to stick something in there that then gets dragged down into the rest. A second problem is the distance from the belt edge of the rest - as modified the distance is 4 inches. You will be holding the tool where it extends off the tool rest. That puts your hand a long way from the point of contact with the belt, increasing the difficulty in controlling the tool edge. A narrow rest lets you hold the tool near the point of abrasion, increasing your control. Most tool rests use on wood turning lathes are very narrow, allowing a grip very close to the cutting tip. This tool rest must be wide enough that you can easily hold the tool flat - assuring the correct angle. It should also be narrow enough to allow controlled movement of the tool against the belt. Getting a width that is wide enough and also narrow enough is important. |

| |
 I started with a bit of angle iron,
Tools used: hack saw, small metal vice, drill press, high speed steel drill bit, file. Depending on your skill with a hacksaw, this could take 15 minutes. The metal should be fairly stiff but there is not a lot of downward pressure on the tool rest during use.
 The replacement tool rest does not look a lot better when installed, but it works.
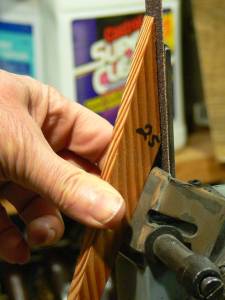
Here, the tool rest is set at 25 degrees.
Since I do almost all my plane iron grinding at 25 degrees, I use an off-cut with a 25 degree angle on the side to set the tool rest (see below).
For other angles I use an adjustable plastic protractor. You can set a bevel gauge from a protractor and use that.
One of the big advantages of a belt sander is the ease and accuracy of setting the angle. Because the abrasive is flat, not curved, one entire surface of the scrap rests flat on the abrasive and one rests on the tool rest. (With a grinding wheel, the scrap is tangent to the wheel over a very short distance, a more difficult setting.)
This really is all you need. No fancy tool rest because I do all my grinding freehand! A little strange for someone who uses a jig for honing, but I can freehand the grinding step because I almost never grind the edge itself! See more about how much to grind in the grinding overview page, at my From New to Sharp page, and at my Sharpening Radiused Blades page.
 Inspired by a mostly acrylic tool rest made by Chris Hudson I made this entirely acrylic tool rest. The nice thing about acrylics, you can easily join pieces with just a little solvent. They also saw (rip or crosscut saw), drill and sand well.
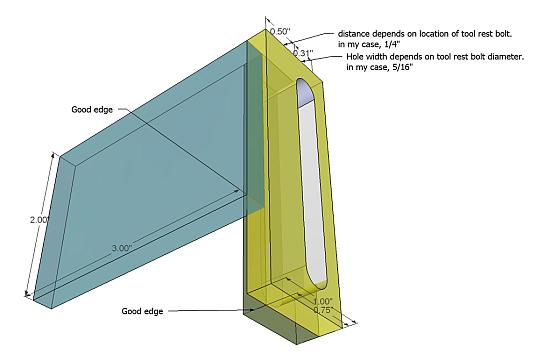
This Sketchup model shows the crucial dimensions, assuming my belt sander. First, the slot for the tool rest bolt must have at least 7/32" clearance from the inside of the tool rest to clear the housing. Second, the slot must be at least 5/16" wide to accommodate the tool rest bolt. These dimensions may not be the same for your sander.
I have updated the former translucent model with this opaque model - hopefully easier to understand. The blue piece is the tool rest - 3" wide, 2" tall. The yellow piece on the end connects to the tightening bolt. It is 1" by 2" and is welded to the end of the blue piece. The green piece forms the second part of the connection to the tightening bolt - it is 3/4" by 2". Welding here means chemically joined - a solvent softens the acrylic briefly, letting the mating parts weld together.
Notice in the model that there are two edges labelled Good edge. These edges must be smooth and square to keep the tool rest square. My piece of acrylic was 5" wide and these are the original outside edges - produced by the big saw at the plastics store. If these edges are good the model will line up and the joints will be strong. The second (outer, yellow) 1" piece was added to increase the strength - I just did not think that the tool rest would be strong enough without this.
I cut the 3/4" piece first - using one good end of the original. Then I cut the 1" piece - no good ends. That left the 3" piece with one good end.
How strong does the tool rest have to be?
You don't press down on the tool rest when grinding. You have your fingers beneath the tool rest and your thumb on top of the tool. You squeeze the tool between the thumb and fingers of your left hand. Your left hand (mainly your thumb) controls tool movement back and forth across the tool rest. Your right hand provides gentle upward pressure - along the tool rest - moving the tool against the abrasive. While the force you exert is mainly squeezing, there will be upward and downward forces on the tool rest while you grind.
If you decide to try plastic, check the flexibility before spending too much time building the tool rest. My metal tool rest (above) is just over 1/16" thick and is very rigid. If you can easily twist a 3" by 2" piece of your plastic, it will not be rigid enough. In my tests, acrylic that was 0.093" thick was too flexible. The final version was 0.236" (about 6mm) thick and plenty stiff.
To add another wrinkle to this type of tool rest design, Richard Butts made an MDF version of this acrylic tool rest. He intends to make a steel version if the MDF version continues to work for him.
| Working Acrylic with hand tools. |
|---|
|
I have had no problems working acrylic with hand tools.
SawingTo cut it I have used both Rip and Cross-cut saws. Lately I have been using my Mitre-box with a saw having a standard filing for wood. The saw has almost no set so occasionally it seems to bind in the kerf. I think that the Acrylic is actually melting then solidifying, trapping the saw. Tilting the handle up and down lifts the saw out of the kerf. The saw quickly clears the kerf and starts cutting again. When using a Rip saw (not in a mitre box, just working by eye) I hold the rip saw at the usual 45 to 60 degree angle. This means that few teeth are in the acrylic. When using the mitre-box, the saw is in contact across the full width of the acrylic. This full contact along with the very lightly set saw seems to generate much more heat. I can smell the acrylic - which is probably the fumes of melted acrylic. This is probably not something you want to breathe on a regular basis. While the resulting edge is much smoother with the finer cross-cut than with the rip, the fact that you may be breathing the acrylic vapour is a worry. Perhaps once the kerf is started, a cutting oil in the kerf might keep things cool and reduce off-gassing. Score and SnapA quicker method is to first score the cut line with a special acrylic scoring knife. Use a straight edge. The scoring knife will shave bits off a steel straight edge, so I use another straight piece of acrylic along the line.I score both side of the plastic, then with the scored line along the edge of the bench, tap with a heavy mallet. The edge looks good but may not be flat. You can plane acrylic to remove any unevenness. DrillingI have used both brad point and Forstner style bits to drill holes in acrylic. Low speed in a small drill press works pretty well. Again, with larger holes you might get some melting so a cutting oil might help. The slot is made by drilling a series of holes with a Forstner bit, as close together as possible, along a scratch for the slot centre line. I then use a strange looking drill bit called a Drill Saw which allows me to grind off the ridges between the holes. This is a bit of a tricky/tedious operation which leave a rough but usable slot. If you know of a better way to make the slot with hand tools, I sure would be interested. Removing the PaperIf you have had the acrylic for a few years, the protective paper may be hard to remove. Soaking in a strong detergent, a cleaner, degreaser, full strength, over night, has loosened the glue on the paper for me. Wet the paper with the detergent then store the wetted acrylic in a plastic bad so the detergent doesn't dry out. Read the instructions on the detergent before using. |
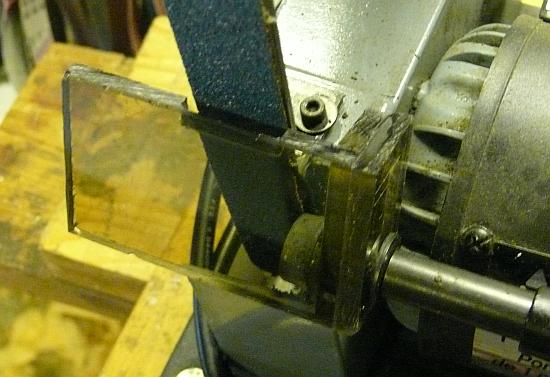 Here is the acrylic tool rest on my Delta belt-sander. You can see I have sanded off a bit of the underside of the tool rest to allow the tool rest to get closer to the belt.
I use the same Acrylic tool rest on a General Belt-sander/grinder machine. That machine comes with a tool rest that cannot work. See the failed design and the same machine with the acrylic tool rest installed.

 If you do a lot of small angles, this version may be better for you. The problem is that for small angles, the tool rest is too short to get close to the belt. With the small tool rest you must have a lot of unsupported tool extending above the tool rest. In this model of the tool rest, the side piece is 3" long, giving you 1" more extension upward toward the belt if needed.
I built the 3 1/2 inch tool rest shown on the belt sander in order to grind 15 degree bevels on a machete. It is not exactly like the drawing. Rather it is a scaled up version of the first model. It can be made from a 3 1/2 inch by 5 inch piece of acrylic with just two cuts (as described above). The position of the tool rest bolt and the shape of the shroud in front of the bolt mean that 15 degrees is about the smallest angle that can be handled with this type of tool rest on this machine.
Note - While an acrylic tool rest can be quickly built with hand tools, the resulting tool rest is a poor conductor of heat. Any heat build up in the tool will remain in the tool and not be carried away as it would be with a metal tool rest. Be more careful with tool heat when using an acrylic tool rest.
 This is my snazzy double ended angle setting jig - one end 25 degrees, the other end 20 degrees. This one cutoff handles 99% of my grinding angles.
As you can see, setting the angle is foolproof. What you can't see, so will have to take me word for it, is that setting the angle takes 5 seconds once you find the jig.
 A quick Sketchup drawing of the angle-setting jig. If you have a protractor, just draw the lines at the angles you want and rip off the scrap. If you don't have a protractor, use the ratio from this drawing to measure down the side to get the right angle.
 Here it is after the waste has been cut off.
The total length does not matter, nor does the thickness.
Edge shaping is discussed in detail in the Sharpening Radiused Blades page.
As you can see in this picture, during edge shaping the blade is at 90 degrees to the belt. You can just see the tool rest in front of my fingers - it is parallel to the belt. The plane blade is resting on the edge of the tool rest (it happens I cannot set my tool rest to 90 degrees, so set it a 0 degrees and use the edge).
I usually mark the desired shape on the back of the blade and grind down to that line.
When shaping the edge, I am not trying to form the primary. Once I have the desired edge shape (which can be straight if I am just removing a nick), I switch to the second type of grinding - forming the primary bevel.

The fingers of my right hand are below the rest and behind the blade. My right thumb is on the front of the blade at about the same level as my left thumb. Most of the control comes from my left thumb, which pushes the blade to the right, then draws it back to the left. The right thumb is a follower, not a leader in this operation.
You should practice moving the blade back and forth, up and down, with the belt sander turned off. You should have a smooth back-and-forth motion which brings the whole blade in contact with the abrasive. You should also be able to move the blade up into the abrasive, or back down away from the abrasive smoothly. When you are confident of the motion, then try it with the sander actually running. The blade should be down, away from the belt when you turn the belt sander on.
Working back from the desired final microbevel angle gives me a primary bevel angle of 25 degrees for most plane blades. In some cases other angles work. For example, if you are only planing along the grain on softwoods without knots, you can reduce the final microbevel angle by from 5 to 10 degrees. You would decrease the primary bevel angle by the same amount. With some tool steels and some woods a larger final angle may be required. You are safe to start with 25 degrees and experiment for unusual situations.
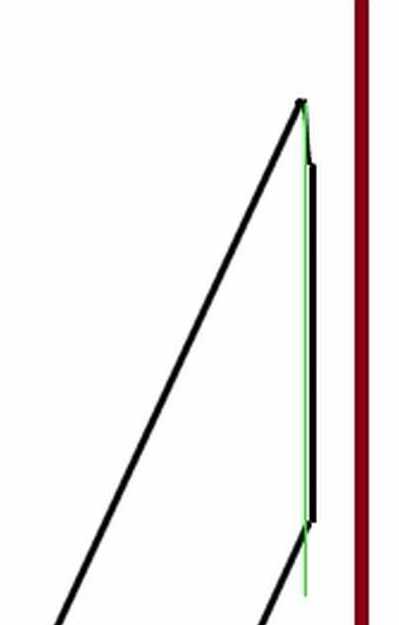
This drawing represents the ideal case - the old primary is already at the correct angle. With some new blades and almost all used blades that have been ground by people unaware of the importance of the primary angle, the old primary angle will not be correct. You can decide which one of three situations you are facing if you put a relatively fine abrasive belt (600 grit) on the belt sander and do a light pass across the blade. Look at the bevel and decide where the belt is scratching the primary.
| Scratch | Current angle | Action |
|---|---|---|
| Scratches only at the edge. | Primary less than desired angle. | Stop right now and hone the tool. Most planes will work just fine with a primary a little less than 25 degrees. You may as well hone the tool and see if it works. If it is too weak (a plane blade that chatters), then you can grind it back a little farther then hone again. |
| Scratches only at the base of the bevel. | Primary more than desired angle. |
You cannot hone the plane blade until the primary bevel reaches almost to the edge. Extended grinding is required.
Switch to a very low grit - I often use 40 grit if a large blade needs a lot of grinding. These very low grits usually don't heat the blade up very much, but you should still check for over heating every 5 or 10 seconds. The pattern - a few quick light back and forth passes, dip in water, look at the progress you are making. The primary should be uniform across the blade and approaching the edge. If the primary is farther from the edge in one part of the blade, work that part a little more. When the primary grind gets within 1/32 of the edge, switch to a higher grit, perhaps 120, and continue until the primary is almost at the edge. With particularly bad blades the primary may approach the edge near one side of the blade but not the other. This usually means the original blade had a higher included angle on one side than the other. This is not at all unusual. Still, stop before you reach the edge and try to hone the blade on 15 micron paper. This honing will give you a straight edge, square to the sides, across part of the blade. Go back to the belt, work the primary again stopping just before the edge. The primary should extend across more of the blade. Alternate honing and grinding until the honed microbevel is the full width of the blade and less than 1/32nd of an inch. |
| Scratches across the full width of the blade, from the base of the bevel almost to the edge. | Primary already at the desired angle. | This must be a blade you ground before. Grind using 120 grit, checking progress of the primary bevel toward the edge ever 5 to 10 seconds. Keep the blade cool. |
With high enough heat for long enough, the crystal structure of the steel changes. The steel softens (its temper is drawn). With a high speed abrasive the time before the temper is drawn can be quite short. Soft steel is much less durable than hard steel.
| What are sparks and how hot are they? |
|---|
|
From Metallographic Polishing by Mechanical Methods, Fourth Edition by Leonard E. Samuels:
"The generation of sparks of this nature is an indication that the temperature of the chips being cut from the surface exceeds approximately 600 �C (1110 �F). The oxide formed on chips of this nature melts at this temperature, whereafter oxidation proceeds catastrophically. The temperature of the oxide and metal then rises rapidly, and small incandescent globules of molten oxide are formed. It is these glowing globules of oxide that are seen as sparks." Why does this matter? If it was molten iron rather than molten oxides, the temperature would be 1500 �C (2730 �F). So, it is not disastrously hot, but it is seriously hot. Again, from Samuels: "A general conclusion can consequently be drawn that the generation of sparks during the abrasive machining of any ferrous metal is a positive indication that undesirably high surface temperatures are being reached." It is undesirable for Samuels because he wants to machine a specimen and reveal the real structure of the specimen, not the structure as changed by the machining process. It is undesirable for people sharpening tools because it weakens the metal of their tools. Worse, it weakens the metal at the edge most - the part of the tool which must be best able to endure wear ends up the least durable. |
Stationary belt sanders spin the abrasive quite quickly. In the case of the Delta (most 1" by 30" belt sanders), the motor runs at about 3,400 rpm. The wheel turned by the motor is 3.5" across which means the belt moves 11" every motor shaft rotation. That works out to 52 feet per second.
A 60 grit Silicon Carbide belt moving at 2.3 ft/s can generate local temperatures of 650 �C (1,200 �F) in 5 minutes. The time drops quickly with increasing belt speed. At 4.25 ft/s that temperature is reached in only 8 seconds. I cannot find any estimate for time required to reach that temperature when the belt speed is 52 ft per second, but it must be very small.
While local temperatures will reach a temperature at which loss of temper is almost instant, it takes longer to actually heat the tool enough to affect temper.
Grinder motors spin at about the same rpm as belt sander motors. Since the wheels are from 1.7 (6" wheel) to 2.3 (8" wheel) times the circumference of the belt sander drive wheel, the abrasive speed is greater by the same amount. Since amount of heat generated is exponential in abrasive speed you need to be even more careful when using grinding wheels.
More pressure means more heat. With increased pressure each grit scratches a deeper groove. Deeper groves generate more heat since more metal has to be deformed. A light touch when grinding will reduce the chances of over-heating.
More grit particles means more heat. A finer grit usually also means more grit particles per square inch on the belt and hence more grit particles in contact with the tool. More grit particles mean more scratches. More scratches mean more heat.
Fresh abrasive generates less heat than worn abrasive. As the abrasive wears the tips of grits fracture. Fracturing almost always produces a new tip that is flatter (the included angle in the tip in contact with the metal is larger). Flatter abrasive particles remove metal more slowly, creating more heat as they work.
A worn belt may also have attached metal filings - swarf. This is less of a problem with belts than with grinding wheels. The belt flexes around each wheel (one of which is quite small) each revolution, tending to dislodge swarf. Any swarf retained in the belt will generate a lot of heat as it rubs past the tool.
When grinding we usually want to work as quickly as possible. Rapid metal removal improves with higher belt speed, larger grit, fresh grit, increased pressure. Two of these increase heat, two decrease heat.
Surface area of the tool in contact with the abrasive also affects heat generated - larger surface area means more grits in contact which means more heat. When you grind a knife - 0.01" thick just back of the honed bevel, 15 degree honed angle - the bevel is only 0.02" wide (assuming the knife is double bevel sharpened). When you grind a plane iron - 0.25" thick plane iron at 25 degrees - the bevel is 0.54" wide. With over 25 times the metal thickness, expect 25 times the heat build up.
Metal tools are good conductors of heat. Heat generated on the grinding surface quickly moves into the nearby steel. The rate at which heat is carried away depends on the temperature difference between the surface and the rest of the tool.
The thin part of the tool near the edge has almost no steel into which heat can flow. Any heat generated here has to flow diagonally into the thick part of the bevel, a longer path with less ability to draw heat away. The thinner the edge (smaller included angle) the faster heat builds up.
The abrasive can either pass the tool edge first or last (move into or away from the edge). As the abrasive passes across the bevel, the heat rises quickly. The abrasive and any swarf ground off is hottest just before the abrasive moves out of contact with the tool. The abrasive cools down as it moves around its path. It is cool when it arrives back at the tool.
Having the abrasive move into the edge reduces the danger of over heating the edge and drawing the temper there.
I prefer the belt-moving-into-the-edge mode of operation. Are there any advantage to the belt-moving-away-from-the-edge mode of operation
The Good
The Bad
As discussed above, machine grinding can ruin your tool (heat) and perhaps even hurt you (exploding belt). You must be aware of what is happening during the grinding process and react accordingly.
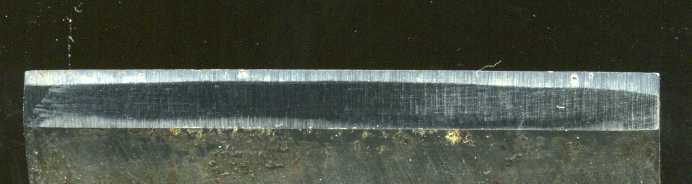
In this picture, you see two bevels. The narrow bevel at the edge (top in this picture) is what is left of the factory grind. For some reason, this blade left the factory with a 32 degree primary bevel. This scan was done part way through regrinding the primary back to 25 degrees. See the whole sequence of images in this discussion of grinding a primary bevel.
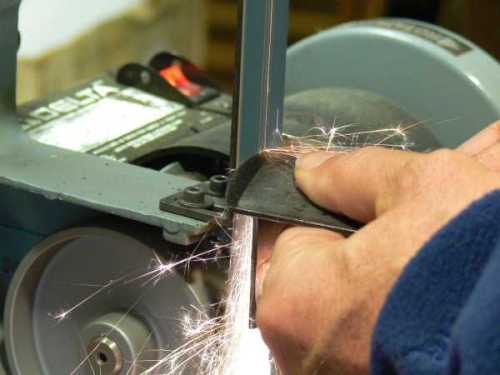
The sparks are hidden under the blade, so you cannot really see where the abrasive belt and the blade meet. If the edge appears to be square to the belt, you are probably pretty close.
After 10 seconds in light contact with the abrasive, dip the tool into water. There should be no steam or bubbling on the surface of the tool. After you dip the blade into the water, wipe off the bevel and look closely at it to check your progress. If you find you are grinding one side more than the other, you can correct the problem by rotating the blade a few degrees on the tool rest. For example, if you need to take more off the left side of the blade (when viewing the bevel), then you want to work the right side a bit more (viewed from the back) so tilt the blade a bit to the left (raise the right corner). A very small tilt should be all that is required.
Grinding pressure is exerted by pushing the blade up along the tool rest into the belt. Remember you are squeezing the blade and tool rest, not pushing the tool against the tool rest. The light upward pressure, from your thumbs, moves the tool into the belt. If metal is not being removed quickly with light pressure, there is a problem with the belt.
A fresh 120 grit belt will take off lots of metal without heating the blade. As the abrasive on the belt dulls, metal removal slows and the blade starts to heat up more. If you notice serious heating, try a fresh belt. I also have a large rubber eraser for cleaning the belts - these belts can fill with grit from grinding and a clean belt grinds cooler.
If the bevel is a mess - someone else did it of course - you might want to start with a larger grit. Remove most of the metal using a 48 grit belt, switching to a 120 grit belt when you near the edge. Again, stop short of the edge.
I check progress regularly, as I dip the tool in the water, stopping before the new scratches reach the edge.
I have another page that includes a number of actual size images of a plane blade bevel during grinding. Scroll about half way down the page.
| You can email me here. |
Email your questions and comments. |
| Sharpening. |
Return to the main sharpening page. |
