|
| Grinding |
|
| Finest abrasives. | ||
| Microbevels front and back. | ||
| Use a jig. | ||
| Copyright (c) 2002-15, Brent Beach |
Grinding is the use of abrasives to shape an edge tool. Most grinding takes place back from the edge, uses coarse abrasives, may use a machine powered abrasive. Grinding gets the tool ready for honing. A failure to achieve the correct tool shape, or overheating which draws the temper of the steel, cannot be corrected by honing. Getting the grinding right - although it does not directly work on the edge - is an essential first step in the sharpening process.
Honing works right at the edge itself, uses very fine abrasives, is almost always done by hand with the assistance of a jig.
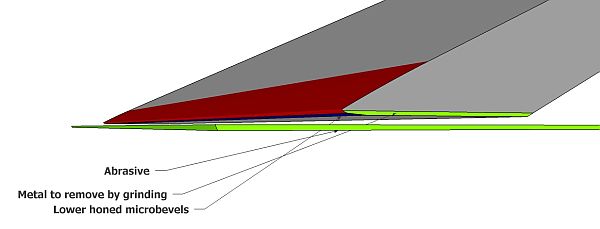 In this sketchup model, a plane iron is shown above a green abrasive that will grind metal away to reform the primary bevel. The red area of the plane iron represents the wear bevel - on the upper and lower surfaces. The drawing is way out of scale of course, since the wear bevel is small compared to the thickness of the tool.
The green area on the plane blade shows the metal that will be removed during grinding: the whole lower surface except a little bit at the edge. You should leave a narrow bit of the old wear bevel during grinding. I try for about 0.01". I could go closer, but that would increase the chances of over heating the edge.
The blue area on the underside represents the old honed bevel. Again, this model is not to scale. The wear bevels are exaggerated to make them clear in the diagram. The lower wear bevel is actually less than 0.001" wide! Since you are stopping 0.01" from the edge, grinding leaves the entire lower wear bevel and most of the last two lower honed micro bevels.
This diagram applies when grinding using a belt sander as well. The abrasive will remove metal across the primary, leaving a small unground area at the edge. The primary bevel is flat. If you use a bench grinder, you still should aim for leaving a small unground area at the edge. The primary bevel will be hollow.
When the tool requires a lot of grinding -- to reshape the edge, to remove nicks -- you may have to grind the edge itself. This should be a rare event for any tool. Most of the time you should be grinding to reduce the size of the old wear/honed bevel region, without actually touching the edge with the coarse grinding abrasive.
|
It is simpler to just grind through the old edge. Why should you stop just before reaching the old edge?
The short answer is that grinding the edge does so much damage to the metal at the edge that you probably will not correct the damage during the first honing. If fact, the edge will be in much worse shape after grinding than it was before grinding. The damage is so bad that you cannot easily remove enough metal with the fine abrasives used during honing to remove all the damage. In more detail then, grinding through the edge with coarse abrasives:
|
Mike Darlow says this: "Ideally when you regrind you should leave just-visible bands of honed surface. Your tool is thereby shortened only by honing, and lasts a long time. This process also minimizes grinding time, and the possibility of heating the tool tip above its steel's tempering temperature and thus softening it."
1900 Shapleigh Handbook, page 39: "If the tool already possesses the right shape, grind carefully right up to this edge, but not grinding it entirely off. The time to stop grinding a tool is just before the old bevel is ground off." |
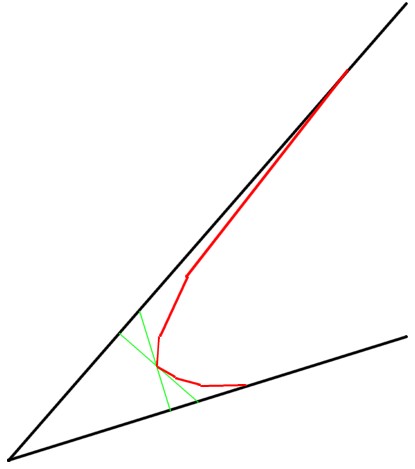
We want to rehone the front and back to return to a side view profile which has two flat bevels meeting at a point (an edge of near zero radius). We can usually sharpen an edge by rehoning alone 2 or 3 times per grind. Each honing widens the honed bevels. Eventually it is faster to regrind - removing most of the homes bevels - rather than hone again.
When you are grinding the primary bevel, the existing edge is like a scribe mark to which you plane or saw: it defines the goal. With a scribe mark, the goal is to split the mark, not to remove it. Any work you do after the mark is gone is guesswork. The same is true of the existing edge. If you grind through the edge, your visual clue for straight and square is gone. The resulting edge will be neither straight nor square. You will see this as soon as you start to hone the first microbevel. Because the honing abrasive is flat, the microbevel will have a straight and square to the edge. If the ground primary is not straight and square, the width of the first microbevel will be too wide in some places, too narrow in others.
If you have not reviewed the actual size grinding images mentioned above, check them out. You will see how close you can get to the edge without touching it.
If you grind up to, stopping short of the edge, the edge is still straight and square to the side after grinding.
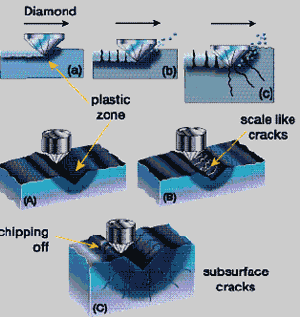
Consider first the case where you grind through the edge. The scratches left by the abrasive continue to the edge. The metal below the base of the scratches, up to 3 times the depth of the scratch, has been damaged. The crystal structure has been disrupted by the force of the grit shaving off metal.
During honing, you hone away metal to the bottom of the deepest grinding scratch. With all signs of the grinding scratches gone, you may think you are finished with the first honing abrasive. Wrong. There is still a layer of metal that was deformed during grinding. You cannot see that damage. The deformed metal looks just like undeformed metal. In the lab the deformations are detected by use of mild acid etching. These acids attack deformed metal more quickly than sound metal. Under high magnification the deformation zones become visible as valleys underlying the original deep scratches. The assumption that metal that looks smooth is not deformed led to an erroneous theory of metal abrasion associated with the name Beilby Layer.
Consider next the case where you grind almost to the edge. The metal at the edge retains the structure it had when it was last honed. If you use the set of 3M abrasives I use, the last abrasive is 0.5 micron. Abrasives under 1 micron cause almost no subsurface deformation. Assuming the wood does not contain too much silica, the wearing away of the metal at the edge during use does not add any deformation - the crystal structure and hence the strength of the steel is retained. Not having caused any deformation by a grinding step, you have none to remove. Once you hone to the correct geometry, you have finished.
Honing until you get a wire edge does not get you past the damaged metal. You can get a wire edge even before you have removed all of the grinding scratches. That is long before you have removed the damaged metal. Hoping that the presence of a wire edge means you are ready for the next honing step is a false hope.
In summary then, grinding through the edge makes honing far more difficult. If you fail to remove all the damaged metal, you have an edge that will wear faster. More sharpening, more grinding steps, ... In order to remove all the damaged metal you have to hone for much longer. Worse, there is no visible indication that you have removed enough metal. The presence of a wire edge is not enough.
You may think you are speeding up the sharpening process by grinding through the edge, but you are either ensuring inferior steel at the edge, or a very long honing step with no means of knowing when to stop.
NOTE: This diagram has been criticized as not applicable to metals because the material removed during abrasion of steel is shaving like, while this picture shows small particles (gemstone dust). The point of this diagram is not the shape of the material removed, it is what is left behind. Specifically, the fracturing of the crystal structure below the bottom of the scratch. Both steel and gemstones have a crystal structure. Both crystal structures react in the same way to abrasion.
|
The periodic formation of bands of intense shear is now known to be intrinsic to the formation of machining chips, and it is inevitable that parts of these bands are incorporated in the new surface being generated. -- Leonard Samuels - Metallographic Polishing by Mechanical Methods |

All abrasives are made up of a variety of grit sizes - the nominal grit size is an average, with some grits smaller and some larger. With coarser abrasives the permitted variation from the nominal grit size is larger. When the tool hits an oversized grit, the result can be a nick. With finer abrasives, and in particular 3M Micro abrasives, the range of grit sizes is much more closely controlled. I have never had a problem like this with the coarsest 3M Micro abrasive I use - the 15 micron.
I have found the same problem with other coarse abrasives. I use a coarse Norton Silicon Carbide bench stone for hand grinding. If I grind through the edge with that stone, I get nicks. These nicks cannot be removed in one honing cycle - they are too deep. [To remove these nicks I have to hone using 15 micron, grind the primary again up to the edge, then hone again with 15 micron. Rinse, repeat.]
| temperature = speed / 2 |
| temperature in degrees fahrenheit |
| speed in feet per minute |
A belt sander runs at about 3,150 feet of abrasive past the tool per minute (1,575 degrees F), a 6" grinder at about 5,400 feet per minute (2,700 degrees F), a 8" grinder about 7,200 feet per minute (3,600 degrees F). Even a low speed 8" grinder runs at about 3,600 feet per minute (1,800 degrees F). While the belt sander will generate lower flash heats than either a 6" or 8" grinding wheel, it is clear that all three will create very hot spots on the tool edge. You don't need a formula to tell you this. With all those white hot filings shooting off into the air, you know the surface of the tool is heating.
While you are grinding, heat moves from the surface up into the tool. At the base of the bevel away from the edge, there is a lot of metal to sop up that heat. Near the edge, there is far less metal so it gets a lot hotter. As you grind closer to the edge, the amount of metal to sop up that heat is insufficient to prevent the tool from reaching the temperature at which the tool edge loses its temper (it softens rapidly). A soft edge will fold in use.
Stopping 0.01" back from the edge will greatly reduce the chance of heat build up and loss of temper. Using a bench stone will eliminate any chances of over heating.
| You can email me here. |
Email your questions and comments. |
| Sharpening. |
Return to the main sharpening page. |
| Bench Stone. |
How I grind with a bench stone. |
| Belt Sander. |
More discussion of grinding using a belt sander. |