|
| Slanted Jig |
|
| Finest abrasives. | ||
| Microbevels front and back. | ||
| Use a jig. | ||
| Copyright (c) 2002-15, Brent Beach |
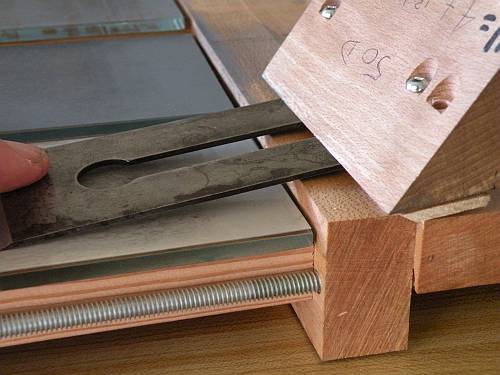
 This is version 2 of my honing jig, shown with the wooden slips that allow you to put 3 microbevels on a blade. The sharpening operation is fast and reliable. It can produce any desired angles by adjusting, either during jig construction or jig use:
 Well, in three situations a slightly different design may in fact be better!
First, when grinding the primary bevel on a plane iron using a jig and a bench stone. Grinding on bench stones is different from honing on abrasive papers because bench stones wear differently - they dish (go out of flat). You can reduce dishing by using the full surface of the benchstone (more below). To do this, the distance between the blade edge and the front of the jig must be at least the length of the bench stone.
Second, when grinding the primary bevel or honing microbevels on chisels. Chisels are different from plane irons in two important respects. First, they are often shorter and narrower. Second, there is no need for a back bevel on a chisel.
Third, when grinding or honing very short plane blades. With standard bench plane blades I use a 2" jig and a blade extension between 3 and 4 inches. What if you plane blade is shorter than 4" - for example, the blade for a Block plane, or perhaps the Stanley #95 Edge Trimming plane?
This modified slanted jig is better suited to these situations.
This is the first slanted jig I made. It was designed to allow full length grinding on an 8" bench stone. Since I use it for grinding primary bevels, and not using back bevels, it is ok that the screws extend through the top of the short jaw.
Specifications:
 This is a Google SketchUp model of a slanted jig. I have done a number of SketchUp models of sharpening jigs. This page also discusses the geometry of the sharpening problem in some detail.
The following table gives the sizes and angles for a few possible slanted jig applications. While you can use these as basic models, after building your jig measure the various lengths and angles and use them in the extension calculator. Do not rely on this table for your extensions.
| Typical slanted jig specs | ||||
|---|---|---|---|---|
| Tool | Included angle | Jig height | Typical extension | Maximum jig travel |
|
Grinding 7" plane blade | 50 degrees | 5" | 5 4/32" | 9.1" |
|
Honing 3" bench chisel | 35 degrees | 5" | 1 4/32" | 5.9" |
|
Honing 4" block plane blade | 45 degrees | 5" | 2 30/32" | 7.3" |
|
Honing 3" block plane blade | 35 degrees | 5" | 1 4/32" | 5.9" |
|
Honing 1 1/2" block plane blade | 35 degrees | 3" | 23/32" | 3.5" |
 Once you have the hardware (2 1" machine screws and t-nuts - I use #6 size) and the appropriate drills (depends on your hardware, see below), you should be able to build one (or three) jigs in 20 minutes.
I found this hardware locally. If you have no local source you might try this mail order company that sells the T-nuts and machine screws at pretty good prices (less than I have paid for them!). If you do, let me know if they provided good service. I will add customer feedback to the jig faq. If there are problems, let me know if you have a better mail order supplier. [Update 13 08 - One reader reports that this company is located in Boston, has in store pickup for on line orders and provides excellent service.]
I was testing the design in this series of photos so just used scrap douglas-fir from around the shop. I would normally use hard maple for this jig. I later made 13 slanted jigs from hard maple, and will try to get those pictures into this page soon.
Here I am making 6 jigs in parallel, to be used for honing chisels. It is much easier preparing the stock working with 14 inch wood you later cut down to jig size, than working with 2 or 3 inch pieces.
First, produce the bevelled edge at the angle you decide you want. For this set I just planed the bevel down. For a later set I ripped close to the desired bevel line, then planed down to the line.
Second, prepare the thin jaw. It is a rectangular, not slanted. The line through the middle of the thin jaw is the line along which the tension machine screw will lie. There should be 1/2" or more thickness along this line on the large jaw.
Tape them together for sawing into the final jig sizes.
 Can you see my mitre box and saw? With the jaws taped together you can saw the two parts and get them the same length.
 We need the thin jaw to not rotate during drilling, so tape the jaw the other way.
 You cannot see it here, but the centre line for the holes is determined by dropping a perpendicular from the short jaw to the front face. You can see where the line would go in the next picture.
The important point is that the screw along this line will emerge from the thin jaw at a point which is convenient for the T-nut. So, position the T-nut on the thin jaw, draw the line perpendicular to the thin jaw to the face of the thick jaw, then across the thick jaw.
 This first drill hole corresponds to the deep countersink hole we do for the square jig.
Holding the jig to drill this hole requires a little innovation. I opened the jaw of my drill press vice until the jig fit with the thin face flat on the base of the vice.
The jig is not firmly held in the vice - it is just positioned. You will have to hold the jig on the ends during the drilling. If you are not comfortable doing this, use another clap lengthwise to position the jig lengthwise in the vice. The drill will engage the wood first on the high side and try to push the jig to the right out of the vice. Run your drill at the lowest speed and lower the drill bit slowly to manage this problem.
 The jig needs all the strength it can get, so drill these holes as shallow as possible. You can perhaps see that the drill bit did not touch the wood on the shallow side of the hole.
I use a Forstner bit sized for the head of the screw - no washer.
 Next, the through hole, sized for the screw diameter. Back into the vice on the drill press.
The centre hole left by the Forstner bit serves as a guide for this drill bit.
This hole goes right through both jaws, so be sure the jig is positioned correctly in the vice.
Then, working with just the thin jaw, from the outside (the side that was not against the thick jaw), first drill the hole for the T-nut barrel. Since there already is a hole coming out of the thin jaw, you have a guide. This is like the corresponding step in the regular jig construction, but here you work with the jaws separated.
Then, use a Forstner bit to drill the very shallow countersink for the T-nut. Again, very similar to the corresponding step in the regular jig construction, but here you work with the jaws separated.
 Assemble the jig, then using the extension calculator, determine the appropriate extensions for the tool you want to sharpen.
For chisels, you will need to measure the chisel thickness at about the point at which the chisel will sit in this jig. A bit of a catch 22, but not a problem if you estimate the thickness, work through the calculation to get the extension for the estimated thickness, measure the actual thickness there and repeat!
This is a Stanley bench chisel in one of the small test jigs, set up for grinding using the Silicon Carbide bench stone.
 You can see in this picture of a slanted jig that the distance from the thin jaw to the edge may well be different that the distance from the thick jaw to the edge. You could make an effort to get these to line up exactly, or you could use this calculator which requires that you specify the difference between the two distances. I have called the difference the jaw extension delta. Positive values mean the thin jaw is farther from the edge, negative values mean the thin jaw is closer to the edge. This value is used in calculating the back bevel angles.
This calculator shows the extension, to the nearest mm. Default sizes of the various jig components in metric:
| Short slip | .2 cm |
| Tall slip | .3 mm |
Outputs include:
 There are a number of fairly common planes with very short blades. Lee Valley makes a number of planes, including the Veritas Iron Edge-Trimming Plane with a 3" blade, the Squirrel-Tail Palm Plane with a 1.75" blade and the "Little Victor" Plane which appears to have an even shorter blade.
Adam Belley made a slanted jig for the Palm plane blade. The wide jaw is 6" long with a 35 degree angle.
Even with this extreme jig there are still problems. Since the blade is so short, the back bevels are a bit larger than I typically prefer. To minimize the back bevel, you might skip the slips when honing the backs. This means it will take a longer, but you will get a lower final planing angle.
With this jig - almost 5 inches tall with a 50 degree jaw angle - the range of motion is almost 8 inches. To make full use of this range of motion, you would need more than 8" of clear glass in front of the abrasive. With an 11 1/2" piece of abrasive you would need about 20 inch glass plates.
 The key to my sharpening system is multiple honed bevels, each at a slightly larger angle. The way I have always done this is by using slips under the jig. For the slip to work under the jig, the wide jaw must be slippery. If you review the stone vice page, you will see that earlier versions of the stone vice that did not have a glass plate did not work because the surface of the wide jaw was not slippery enough.
An alternative to raising the jig for each abrasive is to lower the abrasives. In this example of that principle, I have attached the usual 3M abrasives (from top to bottom - 15, 5, 1 micron) to 6 mil glass. I am using them as if they were oil stones. This is Version 3 of the stone vice.
You can see that I am able to use almost the entire abrasive.
 The key to setting the abrasive heights is to make a couple of slips. For this jig (almost 5 inches long, 50 degree jaw angle) appropriate slips thicknesses are 0.18" and 0.27". As usual the supporting wood pieces are just a little longer than the glass plates.
When setting the heights, begin with the slips: the thick slip under the find grit, the thin slip under the medium grit. Then the glass plates. Finally the support pieces. Put the stone vice around the whole thing upside down and tighten the thumbscrews. Lift up carefully - the slips and the glass plates remain on the flat surface. Set the slips aside and put the glass plates on the support pieces and you are ready to go.
Almost a great idea!
 Here is the rub! You cannot do back bevels on the fine grit. Well, you can but the range of motion is around 1 inch before the back of the blade hits the raised wide jaw.
So, interesting but not useful for tools that need back bevels.
Don't they all, you ask! Well, some chisels do not need back bevels.
After a little testing with this setup, I am inclined to modify my standard sharpening configuration. Rather than use 11 inch long pieces of abrasive on a 16 inch glass plate, I will try 8 1/2 inch pieces. That gives me almost 8 inches of room in front of the abrasive to slide the jig.
That means rather than using the front 3 inches of the longer sheet, I will be using the entire sheet. Longer motion, few motions, faster sharpening.
I will also continue to use the glass plates with this stone vice, but in the normal mode. That means facing the upper surfaces with glass (both surfaces since you lay the stone vice upside down on a flat surface to set the support piece height) and using slips.
This would allow me to have many more grits available while only using a 3 X 8 inch piece of glass for each grit.
 This is a Google SketchUp model of a 3 abrasive stone vice, using all abrasives in the plane of the glass and conventional slips. This model is part of a larger discussion of sharpening jigs with Sketchup models.
Return to the Sharpening and testing home page.
Lost? Try looking around the site map. You can also reach the site map from the little map at the top of each page.
Questions? Comments? You can email me here.