|
| Water/Oil Stone Vice |
|
| Finest abrasives. | ||
| Microbevels front and back. | ||
| Use a jig. | ||
| Copyright (c) 2002-15, Brent Beach |
|
Well, all you water and oil stone users will be delighted to know that it is possible to use my jig with your stones!
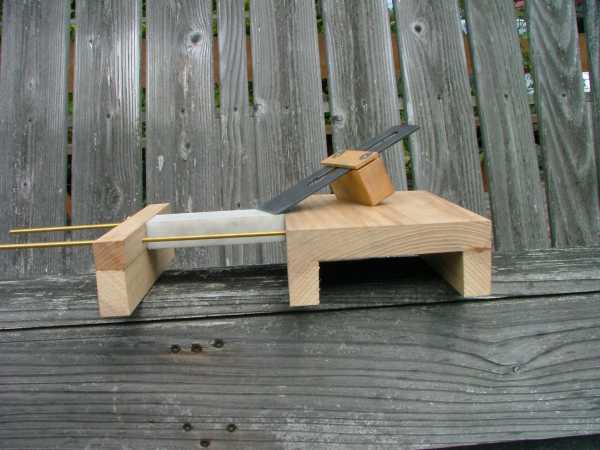
While on a long bus ride across coastal Uruguay, I got to thinking again about the problem of using my jig with water stones or oil stones. An earlier, very elaborate solution, did not work. My jig must slide on a flat smooth surface in the plane of the surface of the stone. The problem is to produce this surface. The solution turned out to be quite simple: build a vice with one wide, smooth jaw. Put the stone in the vice, with the surface of the stone level with the wide, smooth jaw.
Well, I have made four versions of the vice now, slowly improving the design. This pages shows the jigs in the order they were built.
Contents
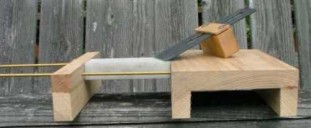
Version 1I made Version 1 out of wood. I happened to have a piece of Ash around the right size, so used it.
The stone vice is a little dirty - the result of having been used once with a water stone. It worked, but once again I was impressed with how messy water stones can be. Anyone building one of these for use with water stones definitely should consider using some sort of plastic. I am investigating plastics that can be worked with hand tools but can be bonded together like plexiglas. Any ideas? Using the Stone ViceSetup is easy and foolproof. Turn the stone vice upside down on a flat surface, put the stone in place, tighten the wing nuts. Flip the stone vice and stone over and use on a flat surface. You are ready to almost sharpen.Check that the stone and wide face form a flat surface using a long straight edge. Assuming a 5" wide vice face and an 8" long stone, then an error of 1/32" (straight edge high or low) at the vice-stone junction corresponds to an error of .22 degrees, which is acceptable. Flat is best. An error means that either the front support is not square to the top, or the stone ends are not square. The second problem is hard to correct with this design, but does not arise in the Version 3 design because the stones rest on wooden blocks. The vice appears to be able to easily hold the stone well enough for sharpening with only finger tight pressure on the wing nuts. With my particular hardware, turning the wing nuts turns the threaded rod inside the nuts on this end, but it still gets the job done. You might want to use wing nuts on both ends. ExperienceI have used the stone vice just a little while experimenting with using water stones for quick stock removal of the primary bevel on plane irons. To date I have been using a 1" belt sander for this, but am looking at alternatives. While the 800 grit water stone was fairly fast, it was pretty messy.Version 2The mess associated with stones would be very hard on any wooden stone vice. However, Plexiglas is an alternative that can be worked for the most part with hand tools. I did use a drill press for all the holes, but cutting and smoothing was done with hand tools.
Version 3With additional stones with slightly different shape, came the need, then the inspiration, for version 3. There are two main differences between this and earlier versions.First, the vice does not grip the stones, but pieces of wood just a bit longer than the stones, called stone supports here to distinguish them from the vertical parts of the vice, which are called simply supports. This removes any danger of breaking thin stones.
Second, because the vice grips the stone supports rather than the stones, it is no problem to hold several stones at the same time. This is a big advantage since there is no set up time between stones - all the oil stones are available all the time. In fact, you need only set up the version 3 stone vice once. When you are done, lift the stones off and put them away. Next time just put the stones back in the same place and you are ready to sharpen.
SetupAs with the first two versions, setup involves
Version 4 Experience with the wooden bodied stone vice revealed an unexpected problem when using the slips: the jig kept slipping off the slip.
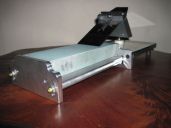
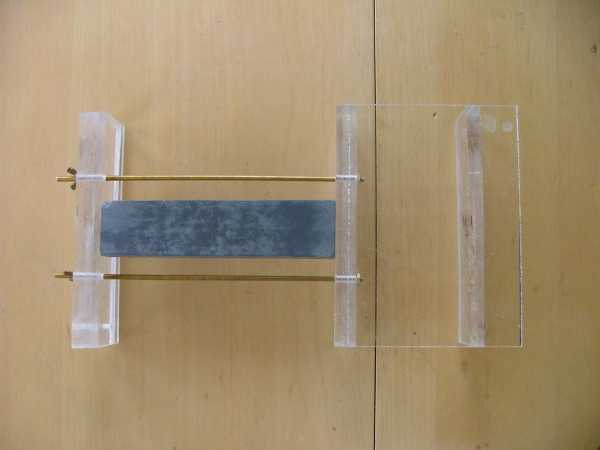
The problem does not arise when using a wooden jig and wooden slips on glass. It happens, by chance rather than design, that there is less friction between wood and glass than between wood and wood. So the jig stayed on the slips when honing on glass and I did not notice the potential problem. I glued the glass to the wooden vice using the same glue I used to glue the glass to the backing boards for honing - Weldbond. See that link for a full how-to on gluing glass to wood. Although I use this stone vice mostly for grinding primary bevels (so don't often use slips on it), I still decided to glue on a glass surface. The reduction in sliding friction is worth the extra effort. I put glass on both faces - it seemed to be no harder than just putting it on the long face, and dimensioning the shorter face to match. I used 6mm glass. Thinner glass would probably work just as well. Note It is a little hard to see in the picture, but the stone is not actually gripped by the vice. In fact, it is resting on a piece of wood (a support) that is gripped by the vice. The support is about 1/16" longer than the stone, so the stone can be lifted out and switched end-for-end, or flipped over. The tension rod placement, the support thickness, and the stone thickness must all be taken into account so the that support is between the tension rods (not above or below) in use. This vice holds only 1 stone. I found that I was always using the 3 wide vice with a single stone, so made the new vice 1 wide. I used Version 4 when doing the second round of bench stone tests and it worked really well. Sketchup Model of V4
The build order may be important. Make the vertical pieces first and drill two of them for the threaded rod before glue up. The holes should be aligned so that the threaded rod is about in the middle of the stone support board. The stone support board is a little longer than your longest stone. If the threaded rod is too near the top or the bottom of the the stone support board, the jig will rack. Making the stone support board thick will mean the jig will handle a greater variety of stone thicknesses. Remember that there will be glass on the entire upper surface, so take the glass thickness into consideration when positioning the threaded rod holes. Once the supports are finished, glue the wide piece between the two verticals, glue on the glass pieces and assemble. George Daiber George has made a couple of significant improvements in the design of the stone vice.
The vice is aluminum except for the sliding surface, which is glass faced. George elevates the abrasive surface above the sliding surface and uses a matching elevation on the jig. He rests the jig on plastic slider to compensate for the raised abrasive. This allows him to use smaller back bevel angles. The interesting innovations are related to the way the rods fit into the jaws and the shape of the stone support plate.
Design ParametersThe main problem that prevents the stone vice from working well is a failure to have the stones and the long vice face planar. These checks during construction and use will prevent that.
Error AnalysisIf, for whatever reason, the stone surface is out of flat with the wide vice face, then honing will produce a rounded, rather than a flat, microbevel. When the iron rests on the near end of the stone, there is a 1 degree error in the angle. When the iron rests on the far end of the stone, there is again a 1 degree error. However, when the plane iron is half way between the two extreme positions the error is not 1 degree. It turns out that at the midpoint of the jig's travel, the angle at the edge is an extra 1/2 degrees (half of the amount of the error). So, over each jig motion the angle at the edge varies from 30 degrees, up to 30.5 degrees, and back to 30 degrees. This means that only at the midpoint of the jig motion, when the angle at the edge is greatest, are you actually honing the edge. The rest of the time you are honing at a slightly lower angle, so you are honing a bit back from the edge. The result is a rounded microbevel, not a flat microbevel. When you look at the iron to check for the presence and width of the microbevel, you do not see a single reflecting surface. Instead, since the microbevel is rounded, there is no angle at which it reflects the light particularly well. It looks like no microbevel is being formed. I suspect that even the best hand honing produces this type of microbevel. Most people will vary the height of the back of the blade by more than 1 degree (which corresponds to lifting the back of a 7" long plane iron by about 1/8"). The result is a rounded microbevel.
Fortunately, if you build the stone vice so that all the legs are of equal height, the stone face will be flat with the vice face.
NavigationCheck out my jig page for a simple jig you can make in your shop, along with a sharpening set up using sheet abrasives, that reliably produces excellent edges, for all types of plane irons.Return to the Nitty-Gritty page. Return to the Sharpening home page. |


 Sketchup drawings. I have recently started using Google SketchUp to draw the various jigs I designed and built. The new
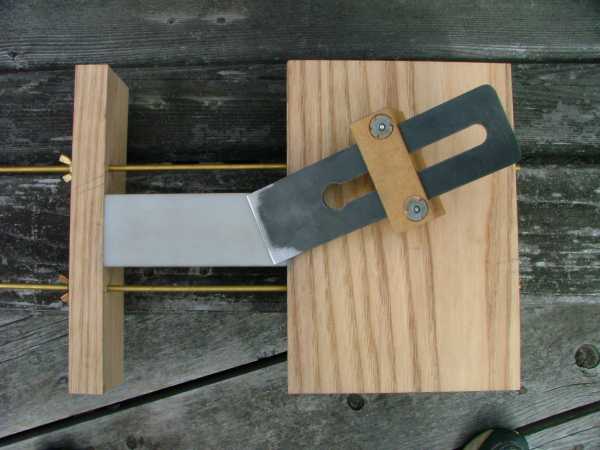


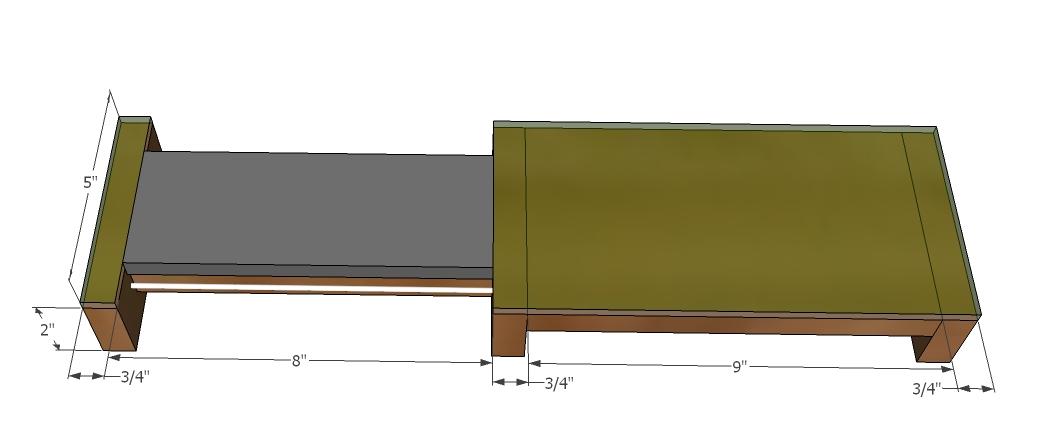 This is a sketchup model of the version 4 jig, with dimensions.
 For the movable rod mechanism to work best you must keep the rods in the middle of the support plate. George does this with slots in the side of the plate. There can be no racking. A slot is not essential - a rabbit would do.
 George originally found my site after being frustrated sharpening a bevel up plane. George now uses back bevels on all his plane irons.