|
| Shepherd A2 |
|
| Finest abrasives. | ||
| Microbevels front and back. | ||
| Use a jig. | ||
| Copyright (c) 2002-15, Brent Beach |
In summary, the blade showed poor edge durability and the edge deterioration common to A2 blades.
If you are unfamiliar with any aspect of the testing protocols or other test results, please refer to my sharpening overview.
At 0.108" thick, it is thicker than original equipment Stanley blades, but thinner than some other replacement irons. This extra thickness may cause a problem in certain planes with very narrow mouths. I had to set the frog back on the test plane, but was able to get adequate clearance for shavings.
They machine the back for flatness, so the blade is actually 0.104" thick at the working end.
The blade is about the same length as a new Stanley blade, but 3/4" longer than the Lie-Nielsen replacement blades. The extra length cannot be in the blade below the slot - that is limited by the geometry of the frog. The extra length, or perhaps better stated, the reduction in length achieved by Lie-Nielsen is achieved by shortening the rest of the blade.
I have included two pictures of the blade as delivered.
|
First, the back of the blade, at 200x magnification.
Notice the chip out of the blade. It appears that the pit extends left and down into the blade. I suspect this is a carbide that popped out during back grinding. The grinding marks are parallel to the edge and relatively rough. People not using back bevels would want to smooth the back pretty carefully (even though it has been machined flat), and be certain they had worked the front bevel enough to remove any pits from popped out carbides. While a flat back is important, a smooth back is even more important. A flat back is only required to prevent shavings from getting caught under the cap iron. It takes a lot of unflatness to prevent an adequate fit, assuming the cap iron is tuned and there is adequate lever cap pressure. I feel the stress on back flatness rather than back smoothness is entirely misplaced. It is also possible that people using machine grinders will continue to have problems sharpening these blades - with carbide chipout persisting. I was able to sharpen the blade, using manual sharpening methods, without any new chipout. |

|
|
The front bevel, 200 X magnification, as delivered.
There is a burr at the edge. It looks to me like the machining of the back rolled a burr onto the front bevel. The rest of the front bevel reflects light very poorly, suggesting it has either been ground with a very fine abrasive, or not ground at all. Given the similarity in colour to the unmachined parts of the blade, I suspect the latter. In any case, not usable right out of the box. (Not really a problem, since almost no blades are.) |

|
All of my testing has used the following blade angles:
| Angle | Total | |||
| Primary | 25 | 25 | ||
| First microbevel | 29 | First back-bevel | 2.5 | 31.5 |
| Second microbevel | 31 | Second back-bevel | 2.6 | 33.6 |
| Third microbevel | 32 | Third back-bevel | 2.7 | 34.7 |
|
The back bevel, 200 X magnification, after sharpening.
I followed my standard sharpening sequence, producing this back bevel after the 0.5 micron abrasive. The three bevels are fairly clear. The bright area is the 15 micron bevel, a bit more than half of the darker area is the 5 micron microbevel, the rest is the 0.5 micron microbevel. |

|
|
The front bevel, 200 X magnification, after sharpening.
Again, the three bevels are fairly clear. There are some scratches across the 0.5 micron microbevel. This usually means that the 0.5 micron abrasive has become somewhat dull. I spend about 30 seconds on both the 5 micron and 0.5 micron abrasives. From experience this is enough to remove the scratches left by the larger grits, until the paper gets dull. In any case, the edge is now ready for the test.
|

|
|
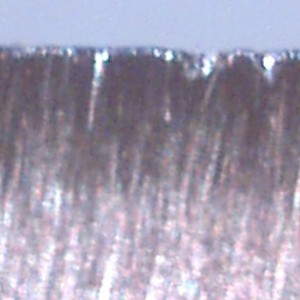
The front bevel, 200 X magnification, 100 passes.
The edge shows two types of problems. First, there are several fractures. These are typical of the fractures I found, there were other worse fractures. Many A2 blades wear in this way - the large carbides break away leaving these gaps. This blade is among the worst though. Second, the blade is showing higher than normal wear - about 9 pixels after 100 passes is a poor result. This much wear would not be expected even in a poor high carbon steel blade. There is a chance that heat treating and grinding to produce the flat back have seriously weakened the blade near the edge. It is possible that after several sharpenings the blade may have less chipout and better wear resistance. |
|