|
| Bench Plane Camber |
|
| Finest abrasives. | ||
| Microbevels front and back. | ||
| Use a jig. | ||
| Copyright (c) 2002-15, Brent Beach |
 Camber refers to the convex shape of a tool edge when viewed from the front or back. We specify the amount of camber either as the height of the middle of the blade above the line between the corners of the edge, or by the radius of the circle implied by the edge.
The blade model on the left is 1 1/4" wide and has a camber of 0.14". Used in a bevel down plane, it will take a 0.1" shaving.
The blade model on the right is 2" wide and has a camber of 0.48". Used in a bevel up plane, it will take a 0.1" shaving.
| Plane type | Blade width | Shaving thickness | 12 degree bed | 45 degree bed | ||
|---|---|---|---|---|---|---|
| Camber | Radius | Camber | Radius | |||
| Smoother | 2" | 0.001" | 0.0048 | 104" | 0.0014 | 357" |
| 0.003" | 0.0144 | 34.7" | 0.0043 | 119" | ||
| Jack | 2" | 0.01" | 0.048 | 10.4" | 0.014 | 35" |
| 0.025" | 0.12 | 4.2" | 0.035 | 14" | ||
| Scrub | 1.25" | 0.05" | 0.24 | .93" | 0.07 | 2.8" |
| 0.1" | 0.48 | .65" | 0.14 | 1.45" | ||
| Scrub plane cambers | |
|---|---|
| This drawing shows the camber you would use in a Stanley #40 Scrub plane to get shavings 0.05" thick. The blade is 1 1/4" wide and is bedded at 45 degrees. | 
|
| This drawing shows the camber you would use in a bevel up Scrub plane to get shavings 0.05" thick. The blade is again 1 1/4" wide and is bedded at 12 degrees. | 
|
Given the large radius of curvature it is impractical to draw a curve on the back of the blade and grind to that curve (the method recommend for cambering a scrub plane blade).
Instead, you can achieve a very small camber like this by honing carefully.
You don't have to use a scrub plane for rapid stock removal. Any plane with a relatively open mouth will work - provided the mouth is wide enough to pass the thickest shaving you intend to take.
You can use wider and longer planes for rapid stock removal. Some actually prefer a longer plane since it reduces the chances of putting the board out of flat when scrubbing.
|
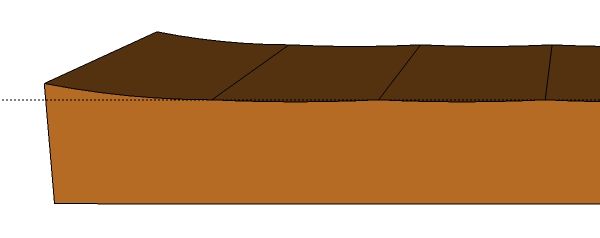
This is a sketchup model of a board after one pass of a scrub plane taking 0.1" shavings. This is a very thick shaving compared to the 0.002" (or less) thick shavings you would take with a smooth plane. The paths of the next shavings are shown - each has the centre of the blade running down the right crest of the previous furrow.
The dotted line is 0.1" from the top surface. You can just see that cuts after the first actually go a little deeper than the 0.1" line. |

|
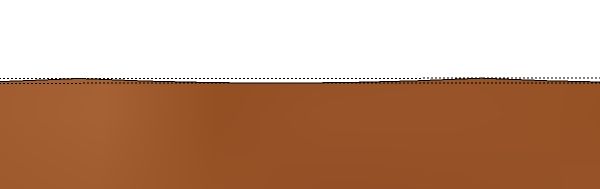
| This is a sketchup model of the board after many passes with the scrub plane, each centred on the right edge of the previous furrow. In spite of having a very aggressive set, the resulting board is quite flat. |
|
| How flat? From the sketchup model, the ridges are only 0.012" tall. This is still quite a lot of material to remove if you only have a smoother with set around 0.001". You need an intermediate plane with set between these two. |
|
Of course, if you are unable to make perfectly positioned furrows, each centre lining up on the previous right ridge, you will begin with the intermediate plane working larger ridges. You might go for a slightly larger camber in that case.
If you skew this plane along the direction of travel, the sole will ride several ridges. This means you cannot actually deepen the furrows, you can only lower the ridges.
You can draw the edge pattern on the back of a scrub plane using a disk of suitable radius. For the very small camber you need for the other bench planes, you cannot get a disk of suitable radius and mark the blade conveniently.
In fact, for the cambers listed above you cannot reliably use grinding at all. You could easily remove many times more metal than you want with just a touch on the grinding wheel or belt sander.
Fortunately you can produce these very small cambers while honing. You will need a feeler gauge of the appropriate size - pretty common for checking spark plug gaps. You may have things around the house of appropriate thickness if you don't have feeler gauges, but many common things are too thick. Paper for printers is usually 0.004". A thin cash register receipt may be only 0.002".
You need a straight edge. The glass sheets you use for the honing abrasives will do. With the blade perpendicular and the edge on a glass sheet, try to slide the feeler gauge/paper under each corner of the blade.
When shaping the edge remember you want a smooth curve. To get a smooth curve you roll the blade side to side by moving finger pressure from one side to the other as you push the blade back and forth on the abrasive. A smooth transfer of pressure results in a smooth camber on the edge.
The honing motion is pretty complex. First you want to use the full width of the abrasive, so the whole blade is moving from one side to the other. Then you want to camber the blade, so you are gradually transferring pressure from one side of the blade to the other. All the while you are moving back and forth on the abrasive. I usually complete one side to side on the abrasive while completing one transfer of pressure from one side of the blade to the other. This may take about 6 back and forth motions.
 This 2" wide blade has camber of 0.004". The blue line joins the corners, the camber is the height above the blue line in the middle.
This is an old (Pat Ap'l 19,92) Stanley blade with a pitted back. Because I use back bevels I have no need to remove all the superficial pitting. Each time I hone a back bevel I remove any pitting in the crucial area of the blade which actually makes contact with the shaving.
I was able to put this camber on the blade while honing on the 15 micron abrasive alone. The microbevel was very narrow at the start, and not too wide when done.
 This scan was made after the 5 micron abrasive.
This is the middle 1/3" of the blade.
The boundary between the 15 micron and 5 micron abrasives is under the blue line.
 This 2" wide blade has camber of 0.011". The blue line joins the corners, the camber is the height above the blue line in the middle.
It took a couple of cycles to get this much camber. I honed on 15 micron and checked the camber. It was about half of what I wanted and the honing bevels were getting a little wide. I used a bench stone to grind away some of the primary at the outside to reduce the width of the honed bevel. I then honed again. Again the 15 micron honed bevel was a little wide, so I went back to the grind stone again. After the third 15 micron honing I had this camber.
If the change is small, you can use a hone-then-grind strategy.
You can easily retain the existing camber if you grind up to but not through the existing honed edge. As you grind, keep checking the width of the remaining old honed bevel. Work those areas where the remaining old honed bevel is widest. Aim to retain a uniform width of honed bevel across the blade. Use the grinder of choice: stone, belt sander, grinding wheel.
You can remove the camber from a lightly cambered edge by honing on 15 micron with pressure only in the middle of the blade. The new honed microbevel will be very wide in the middle, narrower to the sides.
If you cannot get the blade straight enough with just 15 micron, return to the grind stone and grind the primary working mostly in the middle of the blade. Grind as usual for a consistent retained honed microbevel. When removing slight camber there should be no need to actually grind the edge.
If the blade is heavily cambered, you have a couple of options. Working with a grind stone you can simply grind the primary working mainly in the middle of the blade until you have removed all the honed microbevel. Hone on 15 micron to re-establish the edge shape. Repeat grind/hone until the edge is straight.
You can also work with the belt sander. Treat the blade like a blade with a nick in the middle. Square the edge as shown on the belt sander page - blade perpendicular to the belt. Hone at the first microbevel angle using 15 micron to attempt remove the bluntness. If the 15 micron microbevel gets too wide, regrind at the primary bevel angle but do not remove all of the 15 micron honed bevel. Repeat with honing the 15 micron microbevel and grinding the primary until the the front and back first microbevels meet at the edge. When looking at the edge with the blade heel away from you, you should not be able to see the edge.
The cutting angle - the angle the shaving follows as it moves up the top surface of the blade - is the sum of the upper bevel angle (the angle of the bevel at the edge on the upper side of the blade in use) and the blade bedding angle. Tearout often can be reduced by using a larger cutting angle.
In any plane you can increase the cutting angle by increasing the upper bevel angle. If you use back bevels on all plane irons like I do, then you know that the upper bevel angle on a bevel down plane iron is the angle of the back bevel. If you want to increase the cutting angle for such a plane then you increase the back bevel angles. This is easy to do by using a jig with a thicker back jaw. You can also use separate thicker slips for honing the back than the front.
With bevel up planes you increase the cutting angle by increasing the front bevel angle. You can do this during grinding or during honing. Lee Valley sells blades for the bevel up planes with front primary bevel angles of 25, 38, and 50 degrees. Of course, you can buy a 25 degree blade and grind it yourself to any primary angle you want.
The following sketchup models are based on the camber needed to take a 0.01" thick shaving - 0.041" on a 2" blade used bevel up in a low angle (12 degree bedding angle) plane. This camber is independent of the front bevel angle - it depends only on the blade width, blade bedding angle, and shaving thickness.
 This sketchup model shows three blades - primary bevels 25, 38 and 50 degrees - with straight edges (no camber). The red volume is the metal that must be removed in order to get the camber required to take 0.01" shavings with a 2" wide blade. (Remember, these are blades used in a bevel up plane, bedded at 12 degrees.)
Looking at the upper surface of each blade, we see the arc of the camber. This shape is independent of the primary bevel angle - it is the same for all three blades. Sketchup computes this upper-surface area to be 0.016 square inches.
Looking at the side of each blade, we can see the thickness of metal to be removed. The thickness is greatest for the 50 degree primary, thinnest for the 25 degree primary. However, the length of the new surface is shortest for the 50 degree primary, longest for the 25 degree primary. The area of each of the parallelograms is the same - sketchup computes this side-surface area as 0.006 square inches.
The volume of metal that is removed in going from the straight edge to the cambered edge is the same for all three blades.
The rate of metal removal during grinding depends on a number of factors. However, for a given tool and a given abrasive the only remaining factor is the load, the force with which the tool presses against the abrasive.
The formula is specified in terms of the load on a single abrasive particle. As the grinding angle decreases the area of the bevel increases. With greater area the number of grits making contact increases. As the number of points of contact increases, the load per grit particle decreases. So, the metal removal rate per grit particle drops. Since the number of particles has gone up in exactly the same ratio as the load has gone down, the total metal removal rate is the same.
The metal removal rate is the same for any grinding angle.
 Having looked at grinding to achieve camber, we now look at honing the resulting blade. Honing will produce a series of microbevels, with the angle of the last microbevel giving us the upper bevel angle and, when added to the bedding angle, the cutting angle we want for a particular wood.
Is there a difference in effort honing a micro bevel depending on the primary bevel angle?
This sketchup model shows three blades with different cambered grinds. Each blade is cambered for a 0.01" shaving. The primary grind angles are different: 50, 38, and 25 degrees, working from top to bottom.
All have been honed (in sketchup only!) until the microbevel is about 0.01" wide. The little triangle at the corner shows the amount of metal removed during each honing. This amount of metal is removed along the entire edge, since the honed edge and the ground edge have the same camber.
Since all microbevels have the same width and are at the same angle - 55 degrees, all triangles have the same height. The area of the triangle is then proportional to the length of the base - with that for the 25 degree primary the longest at 0.006102", the 38 degree about half as long at 0.003552", and the 50 degree shortest at 0.001064".
The amount of metal to remove in each case is proportional to the area of this triangle. Honing the microbevel on the 55 degree primary bevel iron removes about one-sixth of the metal removed if you start with a 25 degree microbevel.
 In the above grinding examples, the cambered bevel is always at the same bevel angle as the original bevel. This need not be the case. In this model, the original primary bevel is at 25 degrees, the cambered bevel (deeper red) is at 50 degrees.
You need not grind the entire bevel, just enough to allow you to then hone a micro bevel. Honing then would follow the model for a full 50 degree primary (be quite quick).
Each time you had to regrind because the honed bevels had gotten too wide, you would extend the 50 degree bevel up the face of the original 25 degree bevel. Eventually all trace of the 25 degree bevel would be gone.
In this model, the 50 degree grind is about twice the width of the first microbevel (when it is added, at 55 degrees). Anything wider than the first micro bevel is enough to start.
 What jig shape would be appropriate for honing a 55 degree microbevel on a plane iron that is under 4" long? With the Lee Valley jig you would need an extremely short extension - the blade edge barely beyond the front of the jig. Honing would be quite difficult.
You can quickly make a jig in your shop that easily handles this honing angle. For example, a 6" jig with a 75 degree slant looks like this sketchup model. A jig handmade by an expert craftsperson - you - in 15 minutes.
A jig this size can be used for both grinding the primary at 50 degrees, and honing the micro bevels starting at 55 degrees.
 This is the back of an iron - to show the camber - lying almost flat on the scanner (still in the jig). The iron has camber around 0.045" which is about the target. This camber is not that round - perhaps a little too pointed.
Never having tried to do this before it took a little longer than perhaps it should have. However, given that I was grinding using a bench stone the total time was not too bad - 4 two minute sessions with a scan between sessions to check the camber and record the event for posterity. The required motion and pressure are quite different from honing an iron with little or no camber. You really have to work the corners.
The Silicon Carbide stone is still pretty flat. Trying something like this on a water stone could result in a great deal of damage.
 This is the front bevel. The ground bevel looks a lot like the sketchup model! (I should not be surprised, you may be.)
Recall that this is a 50 degree ground primary on a pre-existing 25 degree ground primary. The honed microbevels are next.
 The front view after the 15 micron abrasive at 55 degrees. The micro bevel is pretty clear, especially at the right side. This is a scanned image - control of lighting is much harder with a scanner, but you do get to see the entire tool edge.
The 15 micron bevel varies in width from 0.013" to 0.022" - it is wider at the outside than the middle. This may be operator error, or a result of not cambering the jig, or both.
Honing at these large angles is different. There seemed to be no danger of cutting the sheet abrasive, but at the start it seemed to dig a little. Beginning with several pulling motions seems to be required. Later on back and forth honing is fine.
Honing a sharply cambered edge is different. Since I use baby oil as a cutting fluid, I can see how much of the blade is in contact with the abrasive. It is a very narrow bit of the blade. In fact, it is an almost zero width bit of the blade. This means any force is concentrated in that very tiny area. Very light pressure and constant rotation of the tool is required to prevent flats. I don't see any flats on this edge, so steady motion seems to be enough.
This is a good honing job, but I think I would get better and faster with experience.
 The front view after about 30 seconds on the 5 micron abrasive, using my standard slip.
The good news - the edge is still smoothly cambered.
The bad news - this honing application will require new slips and a cambered jig. First, too much of the 15 micron micro bevel is being honed. I should have paid more attention when using the extension calculator. Using a standard slip (0.064") with this much larger jig means the angle change is too small to get the desired microbevel effect. Second, since the jig has to tilt up on the corner when honing the outside corners, it kept slipping off the slip! This would be less of a problem with a correctly cambered jig.
Even with these problems, this is a pretty good edge given the camber.
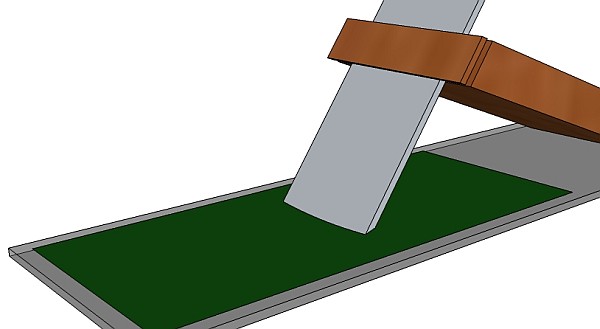
 This is the plane iron in the jig trying very hard to look like the above sketchup model. Although sitting on the 0.5 micron abrasive on glass it is currently set for 50 degrees - the primary bevel grinding angle.
You cannot see it clearly in this image, but the base of the jig that slides on the glass is flat. In spite of that I was able to produce this very convex blade shape. If I were going to do this a lot I would camber the jig to complement the blade. This jig camber matching would involve a calculation similar to the used in the blade camber calculation. (No jig camber is correct for all blade camber situations. Any given jig camber could be in the middle of the range of matching tool cambers. If you have radically different honing situations - very different camber, very different honing angle - you should make one jig for each.)
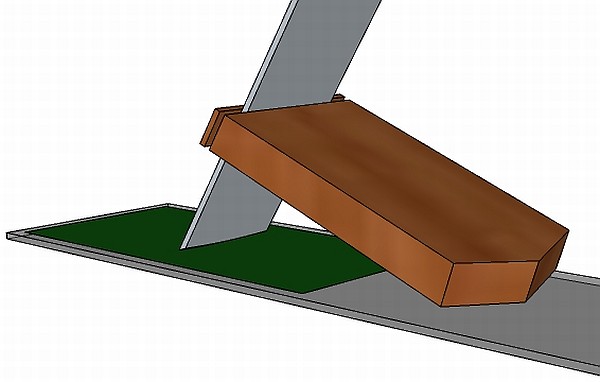 This a a modified version of the jig, suggested by Mark Wells. He correctly realized you don't actually need a matching camber - just the ability to tilt the jig. Make the V at the jig base with more camber than your worst case plane iron. It will work for all irons. I have not tried it yet, but it makes sense to me.
Using a jig like the one shown above, you can readily produce the edges just like the models. The time taken grinding and honing seem to match those suggested by the models. I did not try most of the cases. I did grind a partial 50 degree cambered primary on a 25 degree straight primary. I did not grind a full 25 degree cambered primary on a 25 degree straight primary. I did not grind a full 50 degree cambered primary on a 50 degree straight primary. I believe such tests would show that grinding would go faster for the 50 degree case, for the reasons given above.
The one combination I did test may not have been a particularly likely combination. Is a highly cambered blade with a high cutting angle useful? Yes, you can be concerned about tearout when taking thick shavings. Is that often the case?
For typical planing operations with bevel up planes - micro bevels ending around 35 degrees for a cutting angle of around 47 degrees - you would need a different jig. A 4" jig with a 50 degree slant would work for the shorter blades Lee Valley sells with its planes. I believe you would be better off getting the blade with a 25 degree bevel and adding camber at whatever angle you need by adding a partial cambered grind as shown above.
The Lee Valley blades are very thick - 3/16" - surprising that they felt this was important for a bevel up plane. Grinding a full (straight or cambered) primary on a blade this thick will be a challenge. As shown above, the grinding problem is simpler for steeper bevel angles.
Having shown that putting a cambered bevel on these vary large included angle tools is possible, and having demonstrated a practical ways to achieve this goal, I still must wonder why anyone would bother. Using a blade with a 55 degree included angle to plane wood makes little sense to me. Even when perfectly sharpened this blade is quite dull. It will get duller quickly with use. My preferred order of solutions to the squirrelly wood problem is:
I will develop a calculator for the jig camber and put it on the scrub sharpening page. It appears it will be fairly easy to grind and hone a bevel down scrub plane using an appropriate (3" rather than 6") jig. Cambering the base of that jig will reduce the chances of loosing the slip when rotating the iron. In the mean time, having too much camber on the jig - that is, more camber than necessary to produce the camber you want on the iron - is not a problem. A flat jig base helps - but does not ensure that - you get an edge square to the side of the iron. Here you want a round edge. You can safely put a lot of camber on the jig.
Sharpening radiused blades - part III
Return to the Nitty-Gritty page.
Return to the Sharpening home page.