|
| Extension Calculator |
|
| Finest abrasives. | ||
| Microbevels front and back. | ||
| Use a jig. | ||
| Copyright (c) 2002-17, Brent Beach |

The jaw on the bevel side of the tool. Its height, along with the extension, determine the front bevel angle.
The jig has two jaws - the bevel jaw and the back jaw. Typically the bevel jaw is from 1 inch to 2 inches tall, although the bevel jaw if slanted (more below) can be 5 inches or more tall.
The jaw on the back (non bevel) side of the tool. It's height, along with the extension, determine the back bevel angle. It is usually quite thin - starting at 1/8 inches.
All of my early jigs had square jaws. The blade and jig front form a right angle triangle. This is fine for longer tools. For short tools, or when you want a longer range of motion, an angled jaw works better.
Slanted jigs increase the distance from the tool edge to the jig base. This can be important for short chisels and plane irons, as well for grinding the primary bevel. In both cases a slanted jig increases the length of the sharpening motion, improving control and speed.
The blade is held between the bevel and back jaws. You will need to find out the thickness of your blade. If you don't own a digital caliper or micrometer, and don't know the thickness of your blade, use the default blade thickness of 0.09 - an average thickness.
The angle you want to get on the first abrasive, without any slips.
If you are honing, this is the angle of the first microbevel. For plane irons, I usually use a first microbevel angle of 29 degrees.
 The honing angle is fixed by these 5 values. If we want to hone at a different angle, we have reset to the extension for that angle. We can avoid resetting the extension by putting a slip under the base of the jig. When honing the jig rests on the slip and the slip skids along the glass. This little bit of extra height slightly increases the honing angle.
This slight increase in honing angle means that when we start honing on the next finer abrasive the tool is resting on the edge. Only the edge is touching the abrasive. With very fine abrasives metal removal is very slow. By isolating the abrasive action to the edge we can remove the correct depth of metal even though we are using a very fine abrasive.
The short slip is used under the jig with the second abrasive to produce the second microbevel (the first microbevel is produced using no slip). I usually use a short slip that is around 0.06" thick. With a taller jig, you might want a slightly thicker short slip.
The tall slip is used under the jig with the third abrasive to produce the third microbevel. It should be about 50% thicker than the short slip (mine is 0.1" thick).
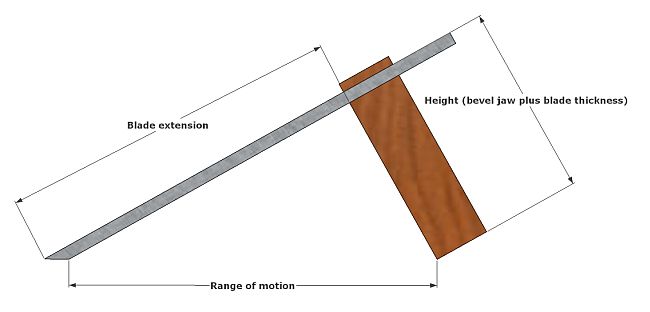 For a given jig, the angle at the edge depends on the extension - how far the tool edge is from the front of the jig. So, extension is the single essential measurement you will have to make each time you use the jig.
However, aside from determining the sharpening or honing angle, the extension has one other important effect on honing - it determines the range of motion of the jig. Range of motion is the amount you can move the jig on the glass sheet without the tool falling off the abrasive or the jig running into the abrasive.
I have found that a range of motion over 4 inches is pretty good for honing. For grinding, where more force is required, an 8 inch range of motion is much better.
Why is this important? It turns out that the beginning and end of each honing motion are the toughest bits. This is where you will make all the mistakes. The middle portion, once you have reached operating speed, is error free. The longer the range of motion the better will be your honing success.
If range of motion did not affect how well you hone or grind we would be satisfied with one jig for all our work. We could make, for example, a 1" high jig and be done with it. Most jig manufacturers were done with it at that point.
We increase this range of motion two ways. First, by making the jig taller. For every inch we add to the jig height we add 2 inches to the range of motion. Unfortunately, we also add 0.87 inches to the amount of blade extending from the front of the jig. This is fine for longer tools like full size plane irons. It stops being a solution quickly for shorter tools like some chisels and short plane irons. It is a real problem for very short tools like knives (short from spine to edge).
 The second way we can increase the range of motion is by using an angled jaw on the jig. More on this below.
So, you want a jig size that lets you maximize the range of motion - to the extent you can given the length of the tool you are honing.
You can reduce the number of failed attempts by using the Jig size from blade length calculator below. It lets you work from the length of your plane iron or chisel to the correct size of jig. The basic problem is that the jig must grip about 3/4" of the blade. The maximum extension is about 1 inch less than the blade length.
Generally you want a jig that gives a range of motion over 4 inches if possible, 8 inches for grinding. Balancing large range of motion with the size of the tool you are honing is the essential first step. The Jig size from blade length calculator lets you design an appropriate jig.
Page history
When I first made these jigs, I started with a table of jig sizes. I struggled to make the jig parts exactly the size given by the table. With the introduction of this extension calculator page, you can make the jig any size you want (depending on the wood you have), then use the calculator to find the correct extension for that jig. If you have a piece of scrap 1-7/8" tall, don't plane it down to 1-1/2", use it as it is.
As well, I made all my early jigs with the thin side 1/8" thick, because that was the size in the tables I have worked out by hand. The calculator lets you specify the thickness of the thin side. Now you can select a thickness that produces the back bevel angles you want.
As well, for years I used slips with thicknesses 0.06" and 0.10". The calculator now lets you supply slip thicknesses. The key is that the first slip add about 2 degrees, the second slip about half that again. Once you have your jig made, use the calculator to find slip thicknesses that complement its dimensions.
I no not expect people to use the tables any more. I have moved them off to another sheet.
The Calculator was updated in June, 2006 to show the back bevel angle as well, both for the basic jig and for the jig with slips!
The Calculator was updated in October, 2006 to handle non-square jigs. These jigs are most useful when grinding the primary using a bench stone, or sharpening chisels.
This was was updated in July 2011 to change the terminology. Now, the jaw on the bevel side of the tool is called the bevel jaw. That on the back side of the tool is called the back jaw. (Changed from tall and short, respectively.)
The angle the plane iron makes with the abrasive is determined by the sizes of the parts of the jig, the blade thickness, and the amount the edge extends beyond the front of the jig. The formula that relates the variables:
| E = (Tj + Tb) / Tan(A) |
|
 This formula assumes that the jig has square jaws. The formula that applies when the jaws are not square is only slightly more complicated and has been incorporated into the calculators below.
 The new angle, called the Jaw Angle, is angle at the jig face. The default is 90 degrees. By using lower angles, you can increase the distance between the blade edge and the jig front, giving you a longer range of motion during sharpening. With a 45 degree jaw angle, you can use the full length of an 8" oil stone when grinding a typical bench plane blade.
Jigs with this shape are also useful with short chisels. Usually with short chisels the edge can only extend an inch in front of the jig, so the distance between the chisel edge and the jig front is quite small. With an angled jig you can make a 5" tall jig with a 35 degree jaw angle that allows a 5" range of motion with the shortest chisel.
This angling of the jaw face does not assist back bevel honing in the same way. In fact, it reduces the distance from the blade edge to the leading edge of the short jaw, reducing the range of motion. For this reason, jigs with jaw angle other than 90 degrees would typically be used only for front bevels, not for back bevels. They are most useful for
The calculators now have 7 inputs that let you define a variety of different jigs and honing situations.
Referring again to the Sketchup model:
The height of the jaw on the bevel side of the tool, along with the extension, determine the front bevel angle.
The jig has two jaws - the bevel jaw and the back jaw. Typically the bevel jaw is from 1 inch to 2 inches tall, although jigs with a slanted jaw can be 5 inches or more.
The height of the back jaw, along with the extension, determine the back bevel angle.
The short slip is used under the jig with the second abrasive to produce the second microbevel. I usually use a short slip that is around 0.06" thick. With a taller jig, you might want a slightly thicker slip.
The tall slip is used under the jig with the third abrasive to produce the third microbevel. It should be about 50% thicker than the short slip (mine is 0.1" thick).
All of my early jigs had square jaws. I have recently been experimenting with jigs which hold the iron at larger angles to the jig front face. Such slanted jigs increase the distance from the tool edge to the jig base. This can be important for short chisels and plane irons, as well for grinding the primary bevel. In both cases a slanted jig increases the length of the sharpening motion, improving control and speed.
If you don't own a digital caliper or micrometer, and don't know the thickness of your blade, use the default blade thickness of 0.09 - an average thickness.
The angle you want to get on the first abrasive, without any slips.
If you are honing, this is the angle of the first microbevel. I usually use a first microbevel angle of 29 degrees.
Outputs include:
NOTE: Although this calculator uses metric units, it uses a period '.' rather than a comma ',' as the decimal point. Thus 3 1/10 cm is written 3.1 (not 3,1).
This calculator shows the extension, to the nearest mm. Default sizes of the various jig components in metric:
| Short slip | .2 cm |
| Tall slip | .3 mm |
Outputs include:
 You have a plane iron or a chisel and want to make a jig for it (and all its similar pals).
As mentioned before, generally we want a tall jig because that maximizes the range of motion when honing or grinding. A range of motion shorter than 1 inch is quite hard to use. A range of motion around 3 or 4 inches is quite comforatble. I find that any jig over 2" tall works pretty well. Much taller and they become a little unwieldy.
Width We also have to decide the appropriate width for the jig. Generally, because the back jaw (the thinner jaw) will bend if the jig is a lot wider than the tool, we want the jig to be a bit more than 1 inch wider than the tool. This 1 inch allows for the space taken up by the screws and T-nuts plus a bit of leeway in tool width. You can use the same jig for a 1/2" wide chisel as a 1" wide chisel, but probably not for a 2 inch wide chisel.
Thickness Jig thickness is not as important, but it does matter. Most of my jigs are made from standard 3/4" stock. I have made jigs from 1/2" stock but they tend to be more fragile. The jig grips the tool on the front and back face. If the jig is over 1/2 inches thick this grip is usually pretty good.
Height Get the appropriate height from this calculator. For that you need:
 For example, I have a bench chisel that I want to hone. The chisel is just over 3" long. I will be using 3/4" thick wood for the jig. That means I will be able to have an extension of not much more than 2 1/8". At that extension, the chisel is 0.22" thick. (Notice the plus sign in the blade extension box - writing 2 1/8 does not work).
A little tricky the first time, with a little practice you should be able to set the extension in under a minute.
 Get the extension you need from the extension calculator. Having gotten it you might write it on the jig.. I have a printed table of of blade extensions for various first microbevel angles I use for various blade thicknesses.
Set that extension on your combination square.
With the iron in the jig, tighten the screws until iron can move in the jig, but not slip out. With the blade of the combination square against the jig and the iron against the square, set the extension.
 Flip the square over and make sure the side of the iron is square to the front of the jig.
A little bit more tightening of both screws and I'm ready to sharpen.
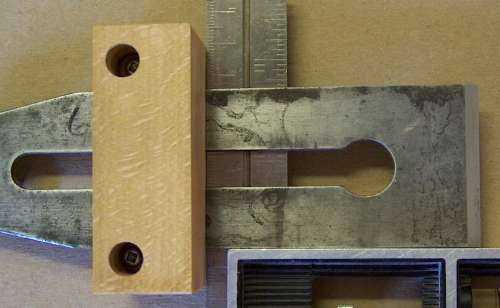
Perhaps surprisingly, the iron rarely slips inside the jig once the nuts are tightened. This wide beech jig has excellent grip.
As well, even after hundreds sharpenings, the jig shows little wear from sliding on the glass and the glass in scratch free.
 Many people who use jigs that rely on blade extension make up a jig to simplify extension setting. At its simplest it is a strip of wood nailed to a board, the distance you want from the edge. You then push the jig up against the edge of the board and push the blade forward to the stop.
This is quick and accurate and fine if you only need one or two extensions. This model shows two stops - one for plane irons in a 2" square jig, one for 1/4" thick chisels in a 2" slanted jig.
| 2" tall, 3" wide | This is the most used size jig. It works for most bench plane irons. |
| 2" tall, 3-3/4" wide | For the wide blades use in #7 and #8 planes. |
| 1-1/4" tall, 3" wide |
For short blade, like block plane blades, where the extensions required for the taller jigs are greater than the blade length.
You might consider a slanted jig for these blades. |
 One thoughtful reader of these pages asked about tapered blades - which thickness do you use in the extension calculator?
My first instinct was to suggest using the thickness where the jig grabs the blade. Thinking it over a bit I concluded this was wrong.
First, until you know the extension you don't know where to measure the thickness. Duh! You could put a thickness into the calculator, get the extension, measure that distance from the edge, get a new thickness, put that thickness into the calculator, rinse, repeat, ...
Even that will not get the correct answer because all the calculators assume the sides of the blade are parallel.
This sketchup model shows the tapered plane iron, drawn from a blade I have. The jig size was arbitrary.
Rather than a single blade thickness, you need to supply two thicknesses and two lengths:
The calculator uses these thicknesses and lengths to calculate the taper angle. It uses the taper angle to compute the correct extension - the distance from the edge to the jig face perpendicular to the jig face (not along the upper blade face).
How much of a difference does it make to use the tapered blade calculator? Not a lot.
Using this calculator and this blade (the thicknesses and distances in the model) and specifying a 2" jig this calculator gives an extension of 3 28/32".
Working back from this extension in the sketchup model, I find the thickness there is 0.16907.
Putting that thickness in the original calculator we get 3 29/32" extension.
Specifying a honing angle of 28.9 or 28.8 degrees in the tapered blade calculator give an extension of 3 29/32".
So, the error using the original calculator is no more than 0.2 degrees *** provided you enter the thickness at the extension it calculates. Getting the correct thickness could take several interations of the calculator: guess an extension, measure the thickness there, enter that thickness in the calculator, calculate, measure the thickness at the calculated extension, update the blade thickness input to the calculator, calculate, ...
If you grind using one of my jigs and a stone, using the tapered blade calculator will give you the correct grinding extension.
If you grind using some other jig, their extension setting is probably wrong.
If you grind using a belt sander, setting the tool rest to the desired grinding angle will get the wrong angle at the edge. The edge angle will be the tool rest angle minus the taper angle. If you grind using a grinding wheel, the usual tool rest setting algorithms will yield the wrong tool rest angle. Again, the error will be small and should not affect honing much.