|
| Abrasives |
|
| Finest abrasives. | ||
| Microbevels front and back. | ||
| Use a jig. | ||
| Copyright (c) 2002-15, Brent Beach |
Abrasives are either naturally occurring or synthetic minerals. The molecules of the mineral align into lattices (regular 3 dimensional arrays) with very strong bonds, producing crystals with hard and sharp corners. The most commonly occurring natural abrasives are oxides of aluminum and silicon. The most common synthetic abrasives are aluminum oxide, silicon carbide, and newer minerals like boron nitride.
Up until 1900, all abrasives were from natural sources. Abrasives from natural sources are still available today. The minerals are sold in solid form - usually called stones. These natural stones are typically used with either water or oil as a cutting fluid, although some people use them dry. Naturally occurring stones are based on minerals primarily composed of either Silicon Dioxide or Aluminum Oxide.
Silicon dioxide is a component of the shells of diatoms - a kind of algae. When the diatoms die, the shells accumulate on the sea floor. Over time, a thick layer builds up, forming a sedimentary layer. These small shells must go through a metamorphic process before they become a rock. The metamorphic process involves burial under more than a few kilometres of other rock, heating (heat from the earth's molten core). The resulting mineral must then be raised again and exposed so that it can be discovered and mined. This process takes hundreds of millions of years. Silicon dioxide based sharpening stones include Washita, Arkansas, Turkey and many other natural stones that have been used for honing from the earliest uses of metal tools and weapons. If the sediment has never been metamorphosed, but just formed a sedimentary layer that has then been raised up and exposed, the material can still be used as an abrasive. It will be in a loose form, a powder, called siliceous earth (because it is mostly composed of silicon dioxide), diatonamceous earth (because it came from diatoms) or infusorial earth (because the diatoms are also called infusorians). In paste form it is often used as a stropping compound.
Synthetic silicon dioxide is made in several ways, some leading to uses in synthetic abrasives. Very fine (sub-micron) abrasives called colloidal silica can be useful in specialized applications. Not particularly useful in the workshop though.
Corundum, the naturally occurring mineral form of Aluminum Oxide, is another metamorphic rock. In this case, magma and aluminum mix and the aluminum oxide precipitates out of the liquid. Heats required only occur at much greater depths than those required to produce the silicon dioxide based minerals.
Silicon carbide occurs in nature - a rare mineral moissanite. It also appears in meteorite impact craters. The Ries Crater in Germany was formed 35 million years by the impact of a large meteorite. The melt-rock contains diamonds and silicon carbide crystals. It is believed that these silicon carbide crystals "crystallized in midair from the white-hot impact fireball" (Night Comes to the Cretaceous, a very interesting book). Silicon carbide is manufactured today in high temperature electric furnaces. Silicon carbide was first made in this way before it was discovered in nature - in a crater in Arizona. Carborundum is the original name given to the man-made mineral.
Abrasives used in sheets or grinding wheels are almost all synthetic - there is an industrial process that makes the crystals from their component elements, or a combination of those elements.
| Mineral | Found in | Hardness (Vickers) | Mohs |
|---|---|---|---|
| Diamond | Diamond hones | 10 | |
| Silicon Carbide (SiC)
carborundum |
SiC abrasive sheets
Norton Crystolon stones | 4880 | 9.5 |
| Chrome/Chromium oxide (CrO) |
CrO abrasive sheets
Green stropping compound abrasive powder used on oiled strops | 2995 | |
| Aluminum Oxide (AlO)
corundum |
AlO abrasive sheets
Norton India Stones Japanese water stones white stropping compound | 2085 | 9 |
| Silicon Dioxide
(Novaculite) |
Some naturally occurring oil stones
natural Arkansas stones Tripoli rouge | 7 | |
| Ferric Oxide | Red rouge | 6 | |
| Steel | 5 |
Images of many different abrasives at 450 times magnification.
You can see from these images (micrograph is a photograph taken through a microscope) that sheet abrasives really are one abrasive grit thick. Abrasive grit particles or more or less uniform size are bonded one layer thick to a backing sheet. In some cases the abrasive grits are pulled up to the abrasive by putting opposite electrical charges on the sheet and the grits. Complex methods are used to ensure uniform coating at the desired particle density.
Early versions of sharpening using abrasives on glass (see Scary Sharp) use a single honing angle. With each abrasive they smoothed the entire honing bevel. When you have to work an entire bevel it is important to work through closely spaced grits to reduce work at the finer grit levels.
With the jig and slips, it is possible to use precise honing angles. At each step, the honing angle is slightly larger than at the previous step. This means that at each step, honing begins just at the edge itself. The newly formed micro bevel starts very narrow. Even though these very fine abrasives remove metal slowly, when concentrated at the edge there is very little metal to remove. The angles are such that each abrasive quickly hones through the scratches made by the previous abrasive.
In spite of the simplicity of the jig, it is extremely precise. The use of the slips ensures that the second and third microbevels are precisely positioned. If you hone on the 5 micron sheet until the bevel is 0.01" wide, you have actually removed metal to a depth of 0.00035" right at the edge. This accounts for all the scratches made by the 15 micron sheet. If your 0.5 micron microbevel is half that wide, 0.005", then you have removed metal to a depth of 0.00018" right at the edge. Again, all scratches left by the 5 micron sheet are gone. There really is no advantage to using more grits.
It is an interesting side effect of using these very fine grits that as the micro bevel widens, the rate of widening slows rapidly. As the area of the microbevel increases, the force on each grit particle falls, reducing the cutting power of the abrasive.
This is what I know about 3M microfinishing abrasives.
The microns used to define the grit size on the 3M Micro-abrasives are millionths of a metre. I should stick to one system or the other, but often mix in inches when describing the width of a microbevel or the size of a jig. Unfortunately, all my measuring tools are older so measure in inches.
So, 1 micron is 0.00003937". The wavelength of visible light is between 0.000016" (purple) and 0.00007 cm or 0.000028" (red).
Abrasive grading systems general specify a method of measurement, a range for the average grit size, a range into which almost all the grits must fall, and a maximum grit size. Comparisons of ratings in the various systems usually only compare the average grit size. If the range of grit sizes allowed in one system is large (water-stone ratings) and in another very small (micron ratings) then comparison of averages between the systems is meaningless. The European P grading system is more finely controlled than the US or Japanese, and the micron grading system is more finely controlled than the P system.
A micron grading system makes no sense for natural stones - no natural stone would meet the spec because there is too much grit size variation. The US system was originally designed to grade natural stones. Now that almost all abrasives are synthetic, using abrasives sized against the tightest grading system - the micron system - gives the best results.
This table shows the various standards in the grit sizes. I obtained this information from the internet over the years and am unsure of the sources. The standards are:
The comparison is only approximate. For example, the average particle size for P1200 is 15.3, for CAMI 600 is 14.5.
Average particle sizes
Note that these are average sizes. The quality of the abrasive sheet is also determined by the variation in size, the level of impurities within the abrasive, the quality of the bond and of the backing. If you cannot find 3M Micro abrasives where you live and mail order is prohibitive, then look for very high quality abrasives.
| Source | USA CAMI | Japan JIS | Europe FEPA | Average grit size in microns |
| 60 | 250 | |||
| 80 | 180 | |||
| P100 | 141 | |||
| Coarse Crystolon | P120 | 127 | ||
| 120 | 116 | |||
| Coarse India | P150 | 97 | ||
| 150 | 93 | |||
| Medium Crystolon | 180 | P180 | 78 | |
| Norton Extra Coarse Diamond | 65 | |||
| 220 | 60 | |||
| 240 | 53.5 | |||
| P280 | 52.5 | |||
| Fine Crystolon | 45 | |||
| 280 | P320 | 43 | ||
| 40 micron SiC sheet, Fine India | 320 | P360 | 40.5 | |
| Fine India | P400 | 35 | ||
| Washita oil stone | 360 | P500 | 30.2 | |
| 400 | P600 | 25.75 | ||
| Norton Fine Diamond | P800 | 21.8 | ||
| Soft Arkansas stone | 600 | 20 | ||
| 500 | P1000 | 18.3 | ||
| 15 Micron belt, 15 micron SiC sheet | 600 | P1200 | 15.3 | |
| Hard white Arkansas, extra fine diamond, and medium ceramic | 700 | 14 | ||
| Hard black Arkansas, 9 micron belt, fine ceramic | 1000 | P2300 | 9 | |
| 2000 | P2400 | 8 | ||
| Norton 4000 | 6 | |||
| 5 micron SiC sheet | 1200+ | P4000 | 5 | |
| Extra fine white Ceramic, Norton 8000, 3 Micron belt. | 1500 | 4000 | 3 | |
| Japanese Water stone | 6000 | ? | ||
| Japanese Water stone | 10000 | 0.9 | ||
| Chrome oxide polishing compound, 0.5 micron Chrome oxide sheet | 2500 | 30000 | 0.5 |
Notes:
Range of particle sizes
 This chart (from Unified Abrasives Manufacturers' Association) gives you an idea of the range of particle sizes allowed by the various standards for grits of interest to us.
NOTE 1: The green crayon sold by Lee Valley is advertised as "primarily Chrome oxide admixed with other fine abrasives (0.5 micron particle size)". It should read "primarily Chrome oxide (0.5 micron particle size) admixed with other abrasives (44 micron average particle size)." The other abrasives have much larger average size. See my web page explaining why you don't want to strop plane irons.
| The testing I did using various stropping compounds was done in 2002. Since then, others have noticed that the Lee Valley crayon is not a fine abrasive. One person actually tracked down the company that makes the crayons and discovered that it contains both Chrome Oxide and Calcined Alumina and that the grade of the Calcined Alumina limits the particles to being not larger than 300 grit. That is about 45 microns. Read the original post for the full set of emails in which the actual composition is revealed. I also discuss this topic in more detail on the stropping page. |
NOTE 2: Some manufacturers' Grit designations fall outside these guidelines. I have seen reports that Shapton 8,000 grit water-stones have average particle size 1.84 microns, while the Norton 8,000 grit water-stones have average particle size 3 microns. Of course, the average size is not what matters. It is the largest size that determines the depth of deformed steel below the surface.
NOTE 3: The Shapton grit designation appears to be particularly irregular. Their very fine stones, designated 30,000 grit, clearly contain very large grits. While the average grit size of this stone may well be around 0.5 microns, the presence of very large grits - necessary to get the Shapton speed - means that the steel sees the stone as having much larger grits. By sees, I mean that the deformation of the sub-surface crystal structure corresponds to that which is normally associated with a much larger grit. A 3M abrasive marked 0.5 microns will have far less grit size variation. It will remove metal much more slowly and leave the crystal structure of the steel almost undeformed.
| FEPA F1200 |
| at most 3% larger than 7 microns |
| at least 50% between 2.5 and 3.5 microns |
| at least 94% larger than 1 micron |
| FEPA P1500 |
| at most 3% larger than 25.8 microns |
| median size 12.6 +- 1 micron |
| at least 95% larger than 8.3 microns |
NOTE 5: The European FEPA standard for coated abrasives uses a P prefix and has the following specification for P1500
Aside 1: It is not a typo that the P standard uses 95% for the lower bound and the F standard used 94%. I have no idea why the bounds are different.
Aside 2: The P standard contains a third limit - the maximum size of any grit. For all grits finer than P1200, the maximum size is 58 microns. Thus, P2500 which has a median value of 8.4 microns, can still have grits with diameter up to (but not including) 58 microns. Since there will be few of these large grits, your first pass along a new abrasive sheet will hit these relative mountains. The force of the first contact with the single huge grit will almost certainly fracture that grit particle, improving the quality of the abrasive sheet!
NOTE 6: I have gathered these specifications over the years from many sites on the net, most of which I do not recall.
Aside from grit size, the most important factor in an abrasive is its hardness.
| MOHS | ||
| Hardness | Material | Source |
| 10 | diamond | Diamond stone, diamond paste |
| 9.5 | silicon carbide | carborundum, 3M 15, 5 micron abrasive sheet |
| 9 | aluminum oxide | corundum, Ruby, Sapphire, AlO abrasive sheet, India Stone |
| 8.5 | chrome oxide Cr2o3 3M 0.5 micron abrasive sheet | |
| 8 | aluminum silicate | Topaz |
| 7.5 | beryllium-aluminum silicate | Emerald |
| 7 | silicon dioxide | Quartz, Arkansas sharpening stones |
| 7+ | hardened steel | files, plane blades, tool steel |
| 6 | cerium oxide | lapidary abrasive, not for metals |
The MOHS scale is not linear or logarithmic. Rather, the originator of the scale selected 10 common minerals, ranked them for hardness, and assigned numbers to each. The change in hardness from one level to the next is tells you almost nothing. For example, the minerals from quartz at 7 to sapphire at 9 will scratch each other.
Diamond is much harder than everything else. Even though Diamond has value 10 and Silicon Carbide has value 9.5, Diamond is "5 times harder" than Silicon Carbide.
Most water stones (natural/synthetic) are aluminum oxide based. Natural oil stones (Arkansas) are silicon dioxide (silica, SiO2) and are also known by the name of the mineral -- Novaculite.
Some of the harder/tougher steels appear to require harder abrasives (at least silicon carbide, possibly diamond).
The Wikipedia entry on the MOHS scale is informative. It contains another measure, called absolute hardness. On this scale, talc is at 1, corundum at 400, and diamond at 1500. This small table does not list Silicon carbide or Chrome oxide. The Wikipedia page contains entries on all the minerals in the above table, plus lots more.
| Extended MOHS | |
| Mineral | Extended scale hardness |
| Fused Zirconia | 11 |
| Fused Alumina (Al2O3) | 12 |
| Silicon Carbide (SiC, carborundum) | 13 |
| Boron Nitride (BN) (hexagonal) | 14 |
| Diamond | 15 |
Again, unfortunately, these numbers rank the minerals without indicating relative hardness.
| Vickers | |
| silicon carbide | 4483 |
| chrome oxide Cr2o3 | 2955 |
| alumina Al2O3 | 2085 |
| vanadium carbide | 2950 |
| titanium carbide | 3200 |
| tungsten carbide | 2400 |
These numbers compare the hardness of the various types of carbide particles in steels (see below for the composition of tool steels) to the hardness of the abrasives. Silicon Carbide is harder than all the carbides you might find in steel. Chrome Oxide is also pretty hard. Alumina unfortunately is not as hard as some carbides.
| Mohs | Vickers | Rockwell C |
|---|---|---|
| 1 | 47 | < 0 |
| 2 | 60 | < 0 |
| 3 | 105 - 145 | < 0 |
| 4 | 175 - 200 | < 20 |
| 5 | 650 | 56 |
| 6 | 710 | 59 |
| 7 | 1100 - 1260 | 71 |
| 8 | 1650 | 77 |
| 9 | 2085 - 2700 | > 80 |
Different minerals in the same rough class have a variety of different Vickers hardnesses. Even for a given mineral, the Vickers hardness depends on which face of the crystal you test.
A 1949 paper, gives rough numbers comparing Mohs and Vickers.
The Rockwell C test (one of 15 Rockwell hardness tests) uses a spherical indenter.
| AlO |
|
| SiC |
|
Another factor in abrasive grinding power is the shape of the grit. All grinding compounds we use are minerals - they all have a crystalline structure. Some shapes are sharper than others though. This link connects you to an article which discusses the shape of the abrasives. Some points it makes are shown in the table at the right.
An open coat sheet abrasive has lots of space between the abrasive particles. These abrasives are particularly useful when you will be removing a lot of material - the removed material will not clog the abrasive, but will settle between the grits.
I tested "open-coat" 60 grit AlO for grinding the primary bevel. I got many edge fractures (pictures on that page). I never get edge fractures when grinding the primary with a coarse SiC benchstone. It may well be that "open-coat" abrasives should not be used on edge tools. Or, it may be that SiC brittleness is a benefit, not a drawback. Perhaps the SiC abrasive shatters before the edge!
In addition to grit size, hardness, and shape, the performance of an abrasive depends on: the uniformity of the particles, the strength of the bond and the strength of the backing material.
The 3M microfinishing abrasives show uniform scratching patterns in the pictures I have taken. On the other hand, the honing compounds I have tested show a wide range of scratch sizes.
Plane blade sharpening is a low pressure, low heat application -- you would not expect a reasonably good abrasive to have pieces of grit pop off. This can happen with cheap abrasives though. If you are using an abrasive sheet which sheds grits it is time to look for another brand.
The backing material need not be able to handle really large forces. The only real problem is that the wire edge can rip the sheet. If you push the blade rather than pull it when you first go to the next lower grit, or when you flip from one side to the other, you could rip the sheet. The 5 micron 3M sheet without the PSA backing is actually susceptible to ripping. I think the non-PSA sheets have thinner backing - 1mil rather than 3mil. For sharpening, try to get the 3mil backing.
There are a number of sharpening stones and grinding wheels available which are composed of a number of different abrasives. For example, the Material Safety Data Sheet for Norton Crystolon Sharpening Stones reports:
  SUBSTANCE DESCRIPTION                PERCENT     CAS#
  --------------------------------------------------------------------------------
 Amorphous Silica, Fused          10.000- 20.000  60676-86-0
 Silicon Carbide                  80.000- 90.000  409-21-2
As well, "The variation in Silicon Carbide to Amorphous Silica is due to the different combinations with the different grits." You can see the Materials Data Sheet for their Aluminum Oxide and Silicon Carbide bench stones here. The sheet is confusing because it lists the composition of the two very different types of stones in a single sheet. John Carmona at Sharpening Supplies provided this link.
Both of these sharpening products advertise themselves as approximately equivalent to the 0.5 micron 3M micropolishing abrasive. In fact, both include abrasive particles at least 10 times this big. You can see the scratches left the the Lee Valley stick on my stropping page. There are several sites around the internet that show micrographs of the scratches left by the Shapton 30,000 stone. If the Shapton stone was truly a 0.5 micron stone the scratches it leaves would not show using any visible light microscope.
While both these products may contain some grits around 0.5 micron, they also include much larger grits. Advertising an abrasive by the smallest grit it contains when it is known to contain grits at least 100 times larger is misleading. The Lee Valley green crayon is almost 50% grit that is over 40 micron!
In both cases, if the abrasive actually met the advertising, it would be useless if you followed the seller's directions. They would both be far too fine to remove enough material when honing anything other than a microbevel. That either works at all on other than microbevels is only because of the much larger grits each contains.
Using either on the edge gives you the durability associated with a final 40 micron abrasive, not a 0.5 micron abrasive.
Why do these good companies continue to mislabel their abrasives? If I took a 1200 grit sheet and threw some 0.5 micron Chrome Oxide powdered abrasive on it, it would still be a 1200 grit sheet. It is hard to believe they don't know what is in their own products.
Update Jan 2010 The description of the Lee Valley green stick now says: "The average size of scratch pattern it leaves behind is 0.5 microns". Changed words, same abrasive content since a 0.5 micron grit cannot leave 0.5 micron scratches. This is the only abrasive they sell that they market by the size of the scratch it leaves. Why would they do that?
Update April 2012 See my Stropping page for the actual abrasives in the Lee Valley Honing Compound.
Update July 2015 The Green Micro-fine Honing Compound sold by Tools for Working Wood is the same as Lee Valley's. As reported in a blog post on the site: Lee Valley sells the same stuff under their own Veritas brand. I will not link to the blog post since it contains many errors in its discussion of stropping, including errors in describing the grit sizes used in the green crayon. It does admit that everyone is using the same product, a product manufactured by Formax. See my Stropping page for the actual abrasives in the Lee Valley Honing Compound. [Thanks to Jer�me for the link.]
Hand American sells Chrome Oxide abrasive in both a powder and paste form. There are some health concerns about having such a fine power around, but the paste form should be ok. They say: "Our liquid/semi paste is guaranteed to be a minimum of 75% chromium oxide, however we do push it higher. Our chromium oxide particle size is guaranteed to be 0.3 - 0.5 micron which is an acceptable range in the industry." Again, if you try this product consider sending me a bit so I can test it out.
The mislabelling of the Lee Valley green stick is very confusing to many people. For example, Leonard Lee shows in his sharpening book (pages 32, 33) a chisel that was honed on a 8000x water stone then with chromium oxide. This could well have been honed on a chrome oxide abrasive sheet, or a chrome oxide paste like that from Hand America, but it could not have been honed using the green Lee Valley "Veritas� Honing Compound".
Users of water-stones, particularly freehand honers, actually try to build up a slurry of filings and dislodged abrasive on the stone in the area in which they are honing.
Proponents of water-stones claim as an advantage of those stones a weak resin bond holding the abrasive grits. The bonds readily break, releasing worn grit, exposing fresh sharp grit.
The dislodged abrasive along with metal filings form the slurry. In some cases, people use a second special stone on the first stone with the sole purpose of building up this slurry. In this case, the slurry contains only dislodged grits.
It is important to keep the slurry wet enough that it does not glaze the stone. The slurry is thought to contain a finer grit (small bits of the original grit) and thus produce a finer surface. The stone with slurry is then a finishing step.
In fact, it is a well known result from the science called Metallography that loose abrasive particles cannot actually remove any metal. The rolling particles may dent the metal here and there, but they cannot actually remove any metal. Thus, the slurry cannot actually change the shape of the honed bevel. It can change the appearance of the bevel - all those dents will scatter light in a way that straight scratch grooves cannot. In spite of a change in the reflective properties of the surface, the surface will have the same shape it had before honing on a slurry. I am preparing [Jan '10] a page with results from metallography. This science has many results that are important in sharpening hand tools.
If you use 3M abrasives and baby oil, the slurry of broken abrasive and metal filings floats in the oil and is swept away by the blade, collecting outside the area you are using for honing. The baby oil is also swept away and should be refreshed.
I suspect the water-stone people are selling a fault of their process - the rapid buildup of broken abrasive particles which actually interferes with the microbevel formation process - as a feature. If you use water-stones, do not let a slurry form.
In this page of 200X micrographs of honed bevels, Tim Zowada, shows several examples of bevels honed with and without a slurry. You can see in the first three examples the difference in the appearance of the bevel resulting from the use of a slurry. In the first case, the edge appears to have been serrated by the slurry. I am unfamiliar with some of his abrasives, but the Chinese 12K appears to produce the best bevel surface. Stones in the survey include natural water stones (Coticule, Escher, Chinese 12k), artificial water stones (Shapton30k, Shapton15k, Spyderco - Ultra Fine, Norton 8000), and natural oil stones (Translucent Arkansas, Hard Arkansas). Other pages on the site include images of edges honed with other artificial abrasives.
Naturally occurring minerals are not pure - often the named mineral will be only 20% of the actual stone. Grit particles within the stone vary considerably in size. When quoting a grit size, you see the average, with no indication of the distribution of grit sizes within the stone. Often the named mineral is only an approximation - some nearly equivalent form of the mineral may be present.
| Name | Mineral | Microns | Hardness M | Link |
|---|---|---|---|---|
| Coticule | spessartine | 5 .. 20 | 6.5 .. 7.5 | Wikipedia 1, 2 |
| Turkey | Novaculite (SiO2) | various | 7 | |
| Washita | Novaculite (SiO2) | various | 7 | |
| Arkansas | Novaculite (SiO2) | various | 7 | |
| Tripoli | Novaculite (SiO2) | various | 7 | |
| Emery | Corundum (Al2O3) and Iron Oxide | various | 9 | |
| Crocus | Iron Oxide | various | n/a |
Silicon Dioxide is the sediment formed from the bodies of diatoms. A diatom is a single celled alga, with the mineral in the cell walls. Sediments build up over very long periods. The uniformity of the stone depends on the uniformity of the diatoms that lived in the marine environment. The diatoms are generally between 10 and 50 micrometers. The silicon dioxide particles are small compared to the diatom.
Crocus was the name for a mineral form of Iron Oxide in the past, but may now well be a name for any abrasive that has the colour of Iron Oxide. The paper 3M now sells as Crocus paper uses Aluminum Oxide!
Over the last 10 to 15 years, various manufacturers are introducing much more exotic steels for use with hand tools. This section considers the differences between the old steels and the new steels.
The bottom line for woodworkers comes down to two questions:
The best way to test the durability of woodworking tools is to use them and measure what happens during use. I have done a large number of tests using planes. Planes are good candidates for testing because the tool is used in a well understood way - you push the plane along the wood. The plane holds the blade so there is very little user to user variability.
The same can not be said for chisels or knives. In these cases there is a lot of user control of the tool that can affect what angles are best and how durable the tool is.
To see all you need to know about steel and durability, look through my plane blade testing pages.

This is a very tricky question to answer and I may have not been nuanced enough in the past. The problem is that the answer depends on the sharpening geometry. There are two very different situations. First, tools with included angles about the same as or larger than plane irons. Second, tools with smaller included angles.
Plane Irons
First, initial sharpness and plane blades. For the basic bevel down plane iron there is a small range of useful sharpening geometries. That is, a small number of useful final front and back bevel angles. For this range of angles, all tool steels that I have tested can be brought to the same sharpness - that is, they can all be sharpened to the required geometry. I have tested 13 different blades for initial sharpness and have found no differences.
That is, for a given blade geometry (front and back final bevel angles) all the blades appear to be just as sharp. [There is a small exception for A2 type steel - see below.]
Remember though there are three conditions for sharp tools: geometry, abrasive and technique. If you use the wrong abrasives or the wrong technique, you cannot get some steels sharp.
To make the point as clearly as possible. Sharpness is a function of
For a given geometry, sharpness is not a function of which tool steel you choose. No matter what blade you own, the first few cuts can have a blade as sharp as any blade sold by any manufacturer at any price.
However, you don't do most of your planing with a freshly sharpened blade. For the bulk of your work you want a blade that is durable and that does not fracture at the edge during use. Look at my blade testing results to decide whether you need to get a replacement blade, and if so which blade you should buy.
Small included angles
Tools other than plane irons - in particular knives and chisels - are often used with smaller included angles. Some steels have problems at smaller included angles. An example of this arises even with plane irons - A2 blades often had fracturing at the edge during my tests. Manufacturers recommend higher included angles for these blades. At higher angles fracturing is not a problem. The blades is not as sharp (as the blade with a smaller included angle) either.
While A2 blades seem to require larger included angles than the standard high carbon steel blades, M2 and CPM blades work well even with lower included angles. This is important for plane blades used with stringy woods, and for chisels and knives. The lower the included angle the sharper the blade and the better result with softwoods and stringy hardwoods. The lower the included angle the less force required to push (or hammer) a chisel through harder woods.
Everyone who owns some of the finer older chisels, all simple high carbon tool steel, knows that these tools will work most woods even with very small included angles. I have many very old chisels (100 years old, some older) that I use with a final included angle around 20 degrees. These tools work well in normal use in North American soft and hard woods.
If you have a piece of wood that is best finished with a blade with a final included angle of 25 degrees, then you are probably better off using an O1 or W1 steel blade than one made with A2 steel, but M2 is still a much better steel.
I am not aware of anyone making knives out of A2 steel. Many people want their knife to have a smaller included angle than A2 can handle. Some people are very demanding knife users - using twisting motions and prying. For these people, the high carbon steel or stainless steel knives that are just fine for most people are just not tough enough. Knife makers are making some very tough knives out of D2 steel, as well as CPM and M2.
In this case, the final decision on edge geometry is not based on final sharpness. It is based on final toughness. If, for some steel, you need a larger included angle to get the desired toughness, you have to settle for a knife that is not as sharp.
Steel, an alloy of iron and at the very least carbon, has been produced in commercial quantities for use in tools for 250 years. Early steel composition was often a proprietary secret, with companies advertising the advantages of their particular alloy recipe, but not the recipe itself. Today, tool makers rarely make their own steel. Instead, they make use of the steels readily available in suitable shapes and sizes. All steels now conform to fairly rigorous specifications on the percentage of various alloys. New recipes are being developed all the time, as well as new manufacturing techniques. The grades of steel in this table are representative of those in use in hand tools today.
The percentages of the various elements are average values. Different web sites given slightly different values, or ranges, for some of the constituents.
| Class | Code | Carbon | Manganese | Silicon | Chrome | Vanadium | Tungsten | Molybdenum | Wear Index (0-6)* |
|---|---|---|---|---|---|---|---|---|---|
| High Carbon | 01 | 0.95 | 1.20 | 0.3 | 0.5 | 0.2 | 0.5 | 4 | |
| W1 | 1.0 | 0.35 | 0.35 | ||||||
| L6 | 0.75 | 0.70 | 0.25 | 0.80 | 0.30 | 2 | |||
| Blue | 1.15 | 0.25 | 0.15 | 0.35 | 1.25 | ||||
| A2 | 1.0 | 0.6 | 0.3 | 5.2 | 0.3 | 1.1 | 4 | ||
| D2 | 1.5 | 0.4 | 0.4 | 12.0 | 0.95 | 0.9 | 6 | ||
| Stainless | F2 | 1.3 | 0.25 | 0.25 | 0.3 | 0.25 | 3.5 | 0.3 | |
| Sandvik 12C27 | 0.60 | 0.40 | 0.40 | 13.5 | |||||
| 440A | 0.75 | 0.50 | 0.50 | 17.0 | 0.75 | ||||
| 440B | 0.90 | 0.50 | 0.50 | 17.0 | 0.75 | 5 | |||
| 440C | 1.10 | 0.50 | 0.50 | 17.0 | 0.75 | ||||
| High Speed | M2 | 0.83 | 0.275 | 0.325 | 4.125 | 1.85 | 6.4 | 5.0 | 6 |
| S390 | 1.60 | 4.80 | 5.0 | 10.5 | 2.0 | ||||
| CPM3V | 0.8 | 7.5 | 2.75 | 1.3 | |||||
| T15 | 1.55 | 0.4 | 0.3 | 4.5 | 4.75 | 12.5 | 1. |
[* The wear index numbers were obtained from the Abrams Steel charts, 13-09-02. This is a very interesting page if you are interested in composition and properties of the various steels. Unfortunately, the company does not sell all the tool steels.]
[L6 -- used in band saw blades and user made carving knives -- includes 1.5% Nickel. Very low wear resistance though.]
[Blue - the steel in the Tsunesaburo blades, which it turns out is made by Hitachi specifically to be "forge-welded to a wrought iron base to make high-quality tool blades and knives".]
[A2 - when A2 was first introduced for edge tools, it was advertised as being much more durable than O1. The Abrams wear index for both is 4.]
[Sandvik 12C27 - standard Swedish stainless knife steel.]
[440A - commonly used Stainless Steel for knives.]
[440B - commonly used Stainless Steel for knives, higher carbon.]
[S390 - powered metallurgy, includes 8% Cobalt.]
[T15 is a microfine powder super high speed steel and includes 5% Cobalt. It would probably not be used for hand tools.]
Different alloying elements provide different properties to the steel. Some of those properties are important in how the steel behaves in use, some how it behaves during the manufacturing process (how consistent the result is).
When cast steel was first produced it was expensive compared to other metals. Although it produced superior edge tools, it was too expensive to use for the whole tool. People tried to reduce the cost of the tool by combining a small bit of cast steel with a less expensive steel or even to iron.
Early attempts (before 1825) involved soldering the bit to the blade. It was not unusual for the bit to snap off in use. There were also problems tempering the tool because it was made of two different types of metal.
 By the late 1800s, techniques to weld cast steel bits to iron or softer steel tools had been perfected. Laminated plane irons were standard by then. Most of these blades were wedge shaped - much thicker near the working edge that at the other end.
The location of the laminated cast steel bit in this Marples plane iron is indicated by the difference in colour of the back. It is possible the makers wanted to highlight the presence of the laminated bit - they make quite a point of it in this drawing from an old catalogue.
Note the thickness of the blade near the edge. The welding process involved high heats. The subsequent tempering, involving two kinds of metal, would have been complicated as well.
The laminated blades made by Stanley, and subsequently other tool makers, were not tapered. I have read about the Stanley process but have no good current source. Apparently they were able to pour molten high carbon steel into an ingot of the softer metal (iron/steel). The welding took place in this form. The ingot, with the tool steel a solid part of it, was then rolled and formed into blades using more or less standard methods. The tool steel bit would not separate from the rest of the blade.
Aside from saving money on expensive tool steel, the lamination process yielded a tool that was easier to sharpen than one made entirely of tool steel. Old books recommended filing a primary - working the soft steel but not the tool steel which cannot be filed. The tool steel was then sharpened using an oil stone. In effect, a microbevel.
Sharpness is a key property of a woodworking tool. If you can't get it sharp it does not matter if it is tough or durable.
This question is best asked and answered in two parts. First, for a given set of sharpening angles, is there one steel alloy that can be brought to a keener edge than any other? The short answer is no: the correct sequence of commonly available (but not all) abrasives can bring all of these tool steels to the same sharpness. If you want the long answer, go back a bit in the FAQ. [To elaborate slightly, you can achieve the same edge bevel angles and bevel surface quality independent of the abrasive type (silicon carbide, aluminum oxide, ...) if you use the same sequence of grit sizes for each abrasive.]
Second, can some tool steels be used with smaller included angles? In other words, can some tool steel be used in a sharper state. The answer is yes. Most of my tests use a standard sharpening geometry and all these tool steels work well with those angles. One steel, A2, seems to chip out at these angles, but not at slightly higher angles. One steel, M2, seems to work well with a smaller included angle (about 5 degrees smaller seems to work, testing is incomplete). Most other steels have poor durability when used with these smaller included angles. So, because M2 is tougher and more durable it can be used in a sharper state.
The next sections discuss these issues in a bit more detail.
Once you have a sharp edge, the next problem is how well that edge resists wear.
This is exactly the question I set out to answer with my blade testing series of experiments. In increasing order of wear resistance: O1, A2, D2, CPM3V, M2. Variations within a group depending on the manufacturer are small compared to the variations between steel types.
Greater wear resistance during use means greater effort during sharpening. This is a trade off that I am generally willing to make.
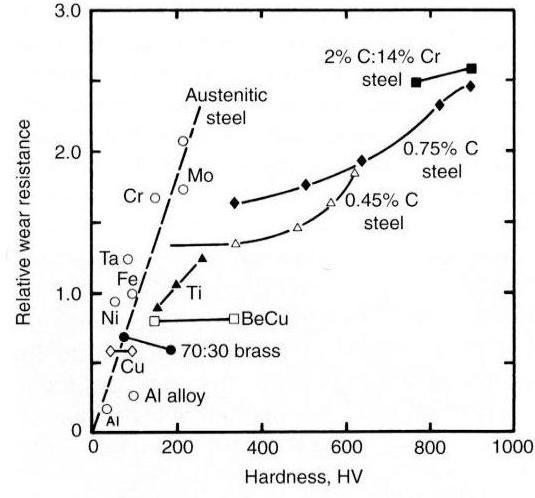
There is very little published material about the relationsh between steel hardness and wear resistance. This may be because most steels are used at the most appropriate hardness for the application, with wear resistance at other hardness not therefore considered important.
This chart is Fig 03.19 from Samuels, 4th edition.
The chart contains values for a number of different metals. The data for steel appears in th 0.45%C, 0.75%C and 2%C:14:CR lines.
In general, steels with more carbon can be made harder and harder steel wears more slowly.
The final key characteristic of steels is their toughness - their ability to resist fracturing. While edge tools do not seem to have high toughness requirements - a plane working knot free wood - it turns out that some steels appear to chip at the edge more than others. The edge does not fold. Tool steel is too hard to fold, it can only chip. A chip can occur in two ways. First, the tool may meet a hard object which breaks off the edge of the tool - say a paint can lid. The second mechanism is more complicated.
Steel is an alloy of iron and other elements. The hardening process creates a solution of those elements. As the steel cools, crystals form. Some of the crystals are hard carbides - combinations of the alloying materials and iron. The hard carbides are surrounded by a softer steel. To wear the tool down you have to wear the hard carbides as well as the softer steel. In some cases, the carbides simply pop out, leaving a small chip at the edge. The larger the carbide particles, the more likely they are to break away. Different alloying elements, lower levels of impurities, along with better heat treatment procedures, attempt to reduce the size of the carbide particles, reducing the danger of chips popping off the edge.
For chip prone steels, larger included angles (lower initial sharpness) usually reduce the number of chips.
Cryogenic treatments involves lowering the temperature of the hardened steel to very low temperatures (-300 F), holding it there for a specified period of time (24 hours), then raising it slowly, often reheating it (+300 F). The treatment is said to change the crystal structure of the steel, possibly producing smaller or harder carbide particles.
Some tool makers have found no gains from cryogenic treatment -- no greater wear, and presumably no reduction in the incidence of chipping. Others (must) have (or why would they bother to treat the blade?). Some claim that the cryogenic treatment can help, if the original heat treatment was bad. I have not been able to find the specifics of actual tests, just the conclusions of the blade makers.
In my testing, the cryogenic A2 blade did perform slightly better than the untreated blades (different manufacturers).
I have found one research report that uses various techniques to look at the fine structure of cryogenically treated M2 steel. The researchers show that cryogenic treatment changes the size and distribution of carbides. These changes may account for improved wear resistance noted by many researchers. Most M2 used in hand tools does not get cryogenic treatment.

This chart comes from the Unified Abrasives Manufacturers' Association and shows the grindability of various steels. Low grindability means it is hard to grind, high grindability means it is easy to grind. This chart was generated for Cubic Boron Nitride grinding wheels, but reflects my experience with Aluminum Oxide and Silicon Carbide abrasives.
In my experience harder blades -- A2, D2, M2 -- wear SiC and CrO abrasive sheets faster. With fresh 3M microfinishing abrasive sheet, all blades appear to sharpen very quickly. However, once the sheet is worn, these harder blades sharpen much more slowly. For example, a worn sheet that still sharpens an older Stanley blade reasonably quickly, might be very slow on an M2 blade.
With my jig I use about the front 3" of piece of abrasive sheet. After 10 or 15 harder irons on the 15 micron sheet I will remove the front 1-1/2" of the sheet. In this way I get 4 or 5 sets of 10 to 15 blade sharpenings in a half abrasive sheet, or between 80 and 150 blades sharpened per sheet. This works out to a penny or two per sharpening.
The 5 micron and 0.5 micron sheets are used up much more slowly.
However, if you use other abrasives, specifically AlO type abrasives (oil stones, water stones) your experience may be quite different. As long as you hone only a small area near the edge of the blade, these abrasives may do a pretty good job. If you try to work a larger area you may not actually get a fine finish on the edge even after quite a bit of time -- these abrasives are softer, not as sharp, so do take more time. There are stories of Japanese woodworkers spending a long time on their edges. This has two benefits. First, it gives the stone time to remove all the required metal. This could be true. I have not seen any microscope pictures of such edges. (I am looking into this effect - a background project.)
I have done some work with Silicon Carbide bench stones. This page discusses the increased effort required to form the primary bevel on harder blades.
I (and others) measure sharpness by pushing the blade into a piece of thread. Seems silly, but this is actually what you are doing when you are planing, except that the thread is replaced by wood cells.
When you are planing into rising grain (the wood cells angle up in the direction of planing) then the pressure you put on the wood cell is resisted by the wood cells behind. A duller blade means more pressure which means more work but makes only a very slight difference in final appearance (a slightly greater tendency to crush rather than cut the wood fibres).
When you are planing into falling grain (the wood cells angle down in the direction of planing) then the pressure you put on the wood cell to cut it is resisted mainly by the adhesion between wood cells. A duller blade means more pressure which can result in this adhesion failing and tearout.
A finisher blade of M2 sharpened to a final front bevel angle of 26 degrees rather than 31 degrees, used only in tricky situations, might give you the durability you want with the sharpness you have to have in final finishing.
Before you decide to go this route, you should first convince yourself that you can get an M2 (or other tougher steel) blade as sharp as you can get a high carbon steel blade. Properly testing your sharpening technique will mean: buying a blade, sharpening it, planing until it is dull, sharpening it again, ..., repeat.
Why bother? Your blades last long enough and are sharp enough already. Well, you are right, since you are the decider. It is up to you.
In my opinion, it is possible to bring all these tool steels to virtually the same sharpness.
In use, the harder steels degrade more slowly than the old high carbon steels in the original blades made by Stanley and others in the good old days. For most use -- that is, for other than the final most important passes -- a blade with a lower wear bevel up to 0.0005" wide works pretty well. Most high carbon steel blades have reached this point after 400 linear feet of Douglas-fir. The harder steels -- A2, D2 -- may last twice as long. The hardest -- M2 -- twice as long again.
| Update - May 2014 |
|---|
|
My attitude toward blade durability has changed over time.
When I was testing blades, my goal was to find the most durable blade. At that time, since I could sharpen all the blades to the same sharpness, having the most durable blade made sense. As one myth after another fell to testing, I came to realize that durability was a function of the steel in the blade. All the maker hype - our blade is better than their blade - amounted to nothing. Marketing. Blah. When I was testing blades, I could wear out a blade in a few hours. Any blade. In general use, unless I am working some very abrasive wood, it takes a lot longer than that. In general use I never plane for hours at a time. Since sharpening is quick and easy and produces the same very sharp tool every time, durability is not as big a factor for me as it once was. Now, I prefer to use the blade that came with the tool. If I am using an old Stanley and still have the blade I got with the tool, then I will use that blade. I may sharpen it twice as often as I would a replacement M2 High Speed Steel replacement, but that means a couple of minutes every couple of weeks rather than a couple of minutes every month. If I undertook a project that would have me at the planing bench several hours a day, I might use a replacement blade. Even then it might mean 3 minutes of sharpening a day instead of 5 or 6. If it comes down to that, perhaps the extra break would be welcome. I don't think I would be up to that much planing without a long getting-back-into-shape period. |
Returning to the original content of this section, written in May 2009 ... (I know because these pages still get the occasional hit from an article Mr Sauer wrote then.)
One justifiably famous plane builder and woodworker, Konrad Sauer, has moved back to high carbon steel blades because this trade off - longer sharpen time but longer sharp time - does not work for him. His reasoning, paraphrased: Suppose I was finishing a large piece. Suppose as well that my M2 steel blade was just a little dull. Suppose further that because it is harder to sharpen M2 I continued using this slightly dull tool. Imagine tearout in this final step. All the sharpening time I had saved would be small compared to the effort to repair this surface. (I can no longer find the blog item on his site, sorry. Perhaps he has changed his mind and gone back to other tool steels.)
This is a decision you will have to make.
You might also think of having a finisher blade - a super sharp blade used only for the last stages of a project and always sharpened immediately after use. Using a very sharp finisher blade will not only reduce the chances of tearout, it will change the appearance of the surface.
I use the word fracture in three different contexts in these pages. Perhaps I should not use it at all!
Fracturing during sharpening. If you use coarse abrasives and sharpen through the edge so that you raise a burr, you could actually get chips out of the edge. See chipping at the edge during sharpening.
Fracturing during use. Some steels will have chips pop out of the edge during use.
Both of the above types of fracturing are obvious. When you use the plane you can see and feel ridges along the wood corresponding to the chips. You can also feel the chips in the edge. Be very careful.
Subsurface fracturing during abrasion (grinding/honing). Scratching steel with abrasive grits alters the crystal structure of the steel, well below the surface. There is no obvious test for this type of fracture. You cannot see it with any microscope that uses visible light. The only way you would be able to detect the difference is by carefully testing blades sharpened in different ways. The linked page discusses this type of fracturing.
Early analysis of durability related to sharpening with abrasives [before 1990] attributed the difference to fractures, hair line fractures, in the steel. Perhaps using crevices in ice as a model. Or perhaps assuming the scratch lines produced actual splits in the steel along their bases. In fact there is no physical gap produced. As discussed at the above link, the abrasive actually alters the fine structure of the metal well below the surface. The resulting edge is not as hard as the steel before abrasion - it can be quite a lot softer and a lot less durable. It is this softening through abrasion that reduces the durability.
Peter L Berglund has a lot more information about steel, why steel is hard, heat treating O1 and W1 steel here.
Previous page of the FAQ - The sharpening station
Next page of the FAQ - Grinding wheels
Return to the Sharpening page.
Return to the Sharpening and testing home page.
Lost? Try looking around the site map. You can also reach the site map from the little map at the top of each page.
Questions? Comments?
You can email me here.
Back to the top.