|
| Sharpening System |
|
| Finest abrasives. | ||
| Microbevels front and back. | ||
| Use a jig. | ||
| Copyright (c) 2002-15, Brent Beach |
Scary Sharp This page discusses a simple shop-made jig for use with abrasive papers on glass-- what some call the Scary-Sharp system.
Video If you are new to this, you might benefit from watching a video of me honing a plane iron to get an idea of how it works and how long it takes.
Before developing this simple shop made jig I used the almost as simple Eclipse jig. This is a metal jig with a threaded rod though the middle. There is a roller on the threaded rod that rolls on the abrasive surface. You place the blade between the jaws and tighten them onto the edges. The angle you get on the iron is determined by the amount the iron extends beyond the front of the jig.
For use with sheet abrasive paper on glass, the eclipse jig had a couple of failings. First, I found that for wider plane irons, tightening the jig onto the sides of the iron actually bent the iron upward in the middle. This meant that sharpening the blade always produced a blade with camber from side to side. Second, the roller was gradually scratching up the glass. The glass needs to be smooth, especially for the very fine abrasive papers. Even a small bit of dust under the paper will transfer through so that pushing an iron across the bump planes off the paper.
So, I wanted a jig that would not bend the iron and would not scratch the glass: side grip and rollers were out.
The Veritas jig grips the iron from top and bottom rather than the sides. This jig forces the iron to be flat, but also has a roller, so it was out.
About this time I ran across mention of back bevels on rec.woodworking. In order to experiment with a basic back bevel I noticed I could simply flip the eclipse jig up side down - let the jaws slide on the glass rather than the roller. This produced about the right back bevel angle, but scratched up the glass even more.
Combining these requirements, I ended up with a very simple design that meets all these needs.
|
This is Version 2 of the jig - easier to make, prettier as well. The dimensions are crucial to correct operation. Those dimensions are height, width, thickness.
The jig width refers to the width as seen here. The jig is about 1" wider than the widest plane iron it can handle. In this case, about 3 1/4" wide. The jig height refers to the height as seen here. The tall jaw is 1.5 inches tall, the short 1/8" tall. The jig thickness refers thickness of the stock. This jig is just under 3/4" thick, but I have others that are about 1" thick. Thickness is not an important factor except with short chisels, where a thicker jig can be a problem because it limits the extension, which in turn limits the range of possible angles. |

|
| Top View The machine screws are countersunk quite a bit, so the heads will not scratch the glass. Notice the radical use of Robertson screws. |

|
| Bottom View The machine screws are captured by T-nuts, countersunk into the short jaw. The thinness of the short jaw limits the range of irons the jig can handle. If the jig is a lot wider than the irons this jaw bends quite a bit (changing the geometry of the jig). |

|
|
The plane iron slips between the two pieces of wood, the nuts are tightened slightly, the extension of the iron from the front of the jig is set, the nuts tightened a bit more, and you are ready to go.
Since this does not look like most sharpening jigs, here is a picture of the jig in use. First, the jig ready to work the first microbevel. |

|
| Now, the jig flipped over ready to do the back bevel. |

|
I have gone through several generations of this jig and built jigs for other types of irons and other sharpening mediums. Pictures of some of those jigs have been saved for posterity in the Jig Hall of Fame.
|

|
When you flip the whole thing over, the angle the jig puts on the back of the iron is determined by
|

|
In recent trials with oil and water stones, I built a 2-1/2" tall jig (see water/oil stone vice). I wanted to use as much of the stones a possible, so made the tallest jig that would work. And work it did. So well that it convinced me that larger jigs are possible and perhaps even better.
The taller jigs have two advantages. First, because the distance from the blade edge to the jig is greater you can slide the jig back and forth a larger distance. You use more abrasive so get the same results a little faster. Second, the jig seems to have better balance in use. An iron for a #8 in a small jig has most of the iron extending out the back, tipping the jig away from the cutting edge.
Increasing the jig height means increasing the blade extension to obtain the same angle, so there are limits. What range of jig heights is practical? Most 2" irons are up to 7" long - 2" below the bottom of the slot. Most irons for #8s start at 8" long. Since the jig is up to 1" thick, this means we can have as much as 6" of extension on a new 2" iron, at least 4" on an almost worn out 2" iron; a maximum of 7" and a minimum of 5" on 2-5/8" irons.
The extreme jig height that could be used for a 25 (29) degree bevel angle:
If you are using larger angles (some makers of A2 blades suggest larger angles) you could use an even larger jig.
If you use the jig only for honing, then you can use the larger jig heights corresponding to a 29 degree bevel angle. If you also intend to use a jig to grind the 25 degree primary bevel, you should consider making a stone vice and slanted jig, especially if you have short irons to grind. This page tells you all about grinding using a coarse silicon carbide bench stone.
See Sharpening a new blade for details of the grinding and honing steps in a full sharpening session.
This table shows the differences in blade extension for a 1-1/2" versus a 2-1/2" tall jig (for a more or less standard iron that is 0.09" thick). The back angle assumes short jaw is 1/8".
| Jig Height | 1-1/2" | 2-1/2" | ||
|---|---|---|---|---|
| Front angle | Extension | Back angle | Extension | Back angle |
| 25 | 3-13/32" | 1.8 | 5-18/32" | 1.3 |
| 26 | 3-8/32" | 1.9 | 5-10/32" | 1.3 |
| 27 | 3-4/32" | 2 | 5-3/32" | 1.4 |
| 28 | 3-0/32" | 2.1 | 4-28/32" | 1.5 |
| 29 | 2-28/32" | 2.2 | 4-22/32" | 1.5 |
| 30 | 2-24/32" | 2.2 | 4-16/32" | 1.6 |
| 31 | 2-21/32" | 2.3 | 4-10/32" | 1.7 |
Rethinking the height of the jig has a second consequence. As can be seen from the above table, the back bevel angles with the large jig are smaller. This suggests that for a taller jig you can also make the short side of the jig a little taller.
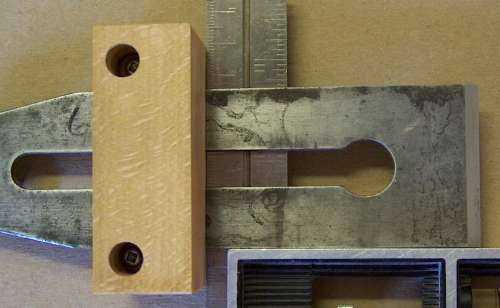
| With the iron in the jig, I tighten the screws until I just feel resistance. The iron should be able to move in the jig, but not slip out. With the blade of the combination square against the jig and the iron against the square, the extension is set reliably. |

|
|
Flip the square over and make sure the side of the iron is square to the front of the jig.
A little bit more tightening of both screws and I'm ready to sharpen. Perhaps surprisingly, the iron rarely slips inside the jig once the nuts are tightened. This wide beech jig has excellent grip. As well, even after hundreds sharpenings, the jig shows little wear from sliding on the glass and the glass in scratch free. |
|
Aside from this jig, what do you need? Here is my sharpening station.
Also visible at the top, the t-shirt that is stapled to the back and flipped over the abrasives to keep things clean when not in use. On the right, the yellow sheet has the blade extensions for my standard primary and microbevel angles. Below, two other irons ready for sharpening. The reasoning behind the sizes of the abrasives and the slips is covered below. |

|
I use and recommend 3M micro abrasive papers with the Pressure Sensitive Adhesive backing. I have used many other brands and none cut as quickly or last as long as the 3M. The Museum of Woodworking Tools sells this paper at a good price. Search for 3M PSA.
The PSA backing adds to the cost, but the papers are actually more durable. Being able to stick the paper to the glass without spray adhesives reduces problems, especially for the 0.5 micron paper - it can tear during use if you get lumps of glue under it. [Be very careful attaching both the 5 and 0.5 micron papers. Clean the glass first, remove the backing, attach carefully.]
Lee Valley recommends wetting the glass with a bit of slightly soapy water before attaching the adhesive. This allows you to smooth out any air bubbles and does not reduce adhesion. This is a big advantage of the PSA papers. It seems dumb to put soapy water on the glass before gluing something down, but it does work. I have not had the paper lift.
The paper comes in 8-1/2 by 11" sheets. This is big to put 3 full sheets on a reasonable size piece of glass, so I use partial sheets.
Since most of the work is done using the 15 micron paper, I put a wider piece of that grit on the glass. I cut the 15 micron in half along the long side, getting two pieces 8-1/2 by 5-1/2".
I cut even smaller pieces of the 5 micron and 0.5 micron - they do less work and wear much more slowly.
Given the size of the jig and a typical extension of 3", you can move the jig back and forth about 3 to 4". This means you only actually use the front bit of the abrasive. When this front part wears out, I slice off 2" at the front and have a fresh section of abrasive. It usually takes about 50 sharpenings to wear out a section of abrasive.
My sheet is 17" by 12" and could be a little wider and a little deeper - 19" by 14" would be a little better.
I use 6 mm (1/4") glass. Getting heavier glass is probably unnecessary for two reasons. First, it is best to back the glass with a piece of plywood, to prevent problems during storage. The plywood helps slightly to reduce flex during use. Second, you should be sharpening on a flat surface anyway, probably your bench, so flex should not be a problem.
I then stapled an old t-shirt to the back of the plywood board, which I flip over the glass and abrasives to keep them clean when not in use.
When you use a series of abrasives, it makes sense to use microbevels as well. If you use the same bevel angle with each abrasive, you must smooth the entire bevel. Since finer abrasives cut more slowly, the amount of work required increases with each finer abrasive. If you increase the angle slightly, you smooth only the edge.
When I first made this jig and wanted to try out microbevels, I reset the extension on the combination square for each microbevel angle. A few 32nds shorter for the first microbevel, a bit shorter again for the second microbevel.
I quickly found that this was very error prone. I would forget, or set it wrong.
Eventually I realized that it was easier to change the jig height than the blade extension. This is where the slips came in.
The little bits of wood, or slips, labelled 0.10" and 0.06" are actually that thick. In order to slightly increase the bevel angle when changing from 15 micron to 5 micron abrasive, I just put the jig on the 0.06" slip. This increases the angle by a couple of degrees. I use the slip for both the front and back bevel.
The slip for the 0.5 micron abrasive is just a little thicker, getting a slightly larger angle.
When you rest a worn blade on the 15 micron paper, assuming you use exactly the same extension, the previous 15 micron bevel is in contact with the abrasive. The 5 micron and 0.5 micron microbevels and the wear bevel are not in contact with the abrasive. As you grind, metal behind the edge is removed until eventually enough is worn away that the edge makes contact with the paper. Only when you finish with the 15 micron paper are you working the edge itself.
If you flip it over now and work the back, exactly the same thing happens. At first it is the previous 15 micron back bevel that rests on the abrasive. After grinding away some metal, the edge itself comes in contact with the abrasive.
With the jig on the slip and the blade on the next abrasive, the blade meets the abrasive only at the edge. As you grind, you are always working with the edge in contact with the abrasive, gradually widening this microbevel. So, no matter how much you hone you always hone the edge itself. It seems impossible to screw up!
But you can. If there is any wire edge left from the 15 micron paper and you start on the 5 micron paper with a push, you might tear the paper. Be careful to start with a pull stroke, to remove any wire edge, whenever you work on the 5 micron paper. This does not seem to be a problem with either the 15 or the 0.5 micron paper.
It is worthwhile spending about 30 seconds (on each side) with each finer abrasive to ensure that enough metal is removed to get all the scratches produced by the previous grit.
Lubricate with a few drops of baby oil. How many drops is a few? Well, actually, more than a few. You want the full width of the blade to be pushing oil around, so squirt a line of baby oil across the paper about 2" from the lower edge.
Rest the blade on the abrasive, in the baby oil and check that the blade is making contact with the paper across the width of the blade. As you push forward with light pressure on the blade, the trail of baby oil behind the blade will not be uniform if one side of the blade is high. Check the blade for being square in the jig if you notice this. [Note: If the existing edge is not square to the sides, then the blade will not lie flat on the abrasive. If there is a very small problem, you can put a little extra pressure on the high side to bring the entire edge in contact with the abrasive.]
In addition to moving forward and back, move from side to side so that you use the entire width of the abrasive sheet. You can even let the blade move off the edge of the abrasive now than then, particularly on the back stroke. You want even wear across the abrasive sheet.
When you finish there will be three distinct regions of the abrasive.
When are you done? When you start, the old 15 micron microbevel is resting on the abrasive, with the 5 micron, 0.5 micron and wear bevels actually up from the abrasive. As you work on the 15 micron abrasive, you wear metal away gradually working through the 5 micron bevel, then the 0.5 micron bevel, and finally reaching and removing the wear bevel. The old wear bevel will still be visible as a bright line along the edge right up until you are finished this step. Continue working on the 15 micron abrasive until the scratches reach the edge, across the full width of the blade.
The new 15 micron scratch bevel should look the same from side to side. If the bevel is wider on one side than the other, check the blade position in the jig. Do this early on in this step and each time you flip the blade over to do the back bevel.
Flip and work the back on 15 micron paper for a few seconds. The visual check is inspection of the back bevel to verify the scratches reach the edge, across the width of the blade (the wear bevel is no longer visible).
There is probably a significant wire edge at this point. It was created when you worked the front side, then weakened when you did the back side. You should remove most of it on the 15 micron abrasive, but not worry about getting all of it.
Flip back to the front side and work the blade back and forth (or middle to left to right to middle) using the full width of the sheet, with light pressure. Flip to the back side and repeat. It is at this point you should see the small shiny bits breaking off and floating forward in the baby oil.
I put the slips in front of the appropriate abrasive before I start sharpening so I won't forget to use them.
Since the honing on the 15 micron abrasive may have left a wire edge, always begin on the finer abrasives with a pull stroke. It will avoid ripping the abrasive. One pull seems to be enough, then you can use push pull strokes, moving from side to side on the abrasive to use the full width.
Again, I use baby oil to help me see the contact line of the iron and the abrasive. Two kinds of grindings float away in the baby oil. First, dark powder produced as the abrasive scratches metal from the blade. Second, small shiny bits produced as the wire edge is ground off.
When are you done? The visual check is the presence of a narrow shiny bevel right at the edge, across the full width of the blade. This microbevel is very narrow, perhaps only 1/100" wide. The 5 micron abrasive produces very fine scratches that reflect light better than the scratches produced by the 15 micron abrasive. The quality of the surface is not like the wear bevel though - rather than a bright line, the 5 micron microbevel is a smooth even strip at the edge.
The slip increases the angle enough that the blade is resting entirely on the edge, and on any remaining wire edge, when you start a new abrasive. If there is a wire edge, you can easily rip this new abrasive with the first push. Experience has taught me to always begin on a finer abrasive with at least one pulling motion. If I see wire edge breaking off and floating in the baby oil, I repeat the pulling motion.
Flip and work the back bevel on the 5 micron paper with the jig on the first slip for a few seconds. The visual check for done is the presence of a narrow microbevel at the edge, across the full width of the back bevel.
As in the first stroke on the front bevel, the first stroke on the back bevel should be a pull rather than a push. The slip has increased the angle, so the blade is resting on the edge alone. Any wire edge will cut the abrasive if you push first.
It is at this point that the wire edge usually starts to break away - you will see short silver bits in the oil.
I usually flip back and spend a few seconds on the front, then again on the back to complete removal of the wire edge.
When are you done? The visual check is the presence of an even narrower microbevel at the edge, across the full width of the blade. This microbevel should be about half as wide as the previous, and a little brighter.
Remember to pull first, to avoid having the wire edge rip the abrasive.
Flip and work the back bevel on the 0.5 micron paper with the jig on the second slip for a few seconds. Again, check for the new microbevel across the full width of the iron.
Remember to pull first, to avoid having the wire edge rip the abrasive.
Wipe the baby oil and iron filings off the three abrasives. I also wipe the baby oil and grit off the iron for each visual inspection. This helps keep the abrasives clean (especially the 15 micron, which produces most of the filings). I flip the cloth cover (an old t-shirt stapled to the back of the board) over the abrasives and store my sharpening station under my bench.
The time taken on the 15 micron paper increases as the first microbevel gradually widens across the main front bevel. When this first bevel gets too wide I regrind the primary bevel. I am very careful when regrinding the primary bevel to not actually grind down to the edge. Rather I grind away most but not all of the existing 15 micron microbevel.
The time taken on the 5 micron and 0.5 micron papers does not change, since they always start from the same complete bevel produced by the previous grit. These second two microbevels are quick because they are very narrow.
As the iron works back and forth in the baby oil, you can see the iron filings being pushed forward on the abrasive. The baby oil pools on the abrasive in front of the farthest point the blade reaches. You can see the iron filings building up in that area. This movement of the iron filings out of the abrasive in use is an important function of the baby oil.
As well, as you move the iron forward on the abrasive, you should be able to see that the edge is making contact with the abrasive across its full width. The oil rises up around the blade making this easy to see. This is an important check on original iron set-up within the jig. It also checks that the iron has not moved since it was set.
The finer abrasives need less baby oil. The 15 micron paper can take a lot of oil into the larger grit particles before it starts to pool around the blade. The 0.5 micron paper requires less.
I bought my current bottle of baby oil a couple of years ago and I do a lot of sharpening for blade testing and general woodworking. [Update: March '05 and I have started only my second bottle of baby oil.]
If you have never seen pictures taken by the QX3 microscope, you should read the short introduction to the QX3 microscope and the pictures it takes.
Here is a picture of a front bevel with all three microbevels showing. In order to make it easy to see the three different bevels, I deliberately held the iron at different angles to the abrasive while sharpening. On the 15 micron abrasive, I angled the jig and plane iron abut 30 degrees to the right. On the 5 micron abrasive, I angled the jig and plane iron about 30 degrees to the left. On the 0.5 micron abrasive, I used no angle.
|
The blue line shows the direction of the scratches produced by the 15 micron abrasive. Before working the second and third bevels, these scratches went right to the edge.
The green line shows the direction of the scratches produced by the 5 micron abrasive. This second microbevel looks wide but is actually 0.01". It does not take much time to form a bevel this wide. Before starting work on the third bevel, the second bevel scratches also go right to the edge. In fact, because the jig is resting on the slip, the 5 micron microbevel BEGINS at the edge and widens backward. The yellow line shows the direction of the scratches produced by the 0.5 micron abrasive. This microbevel is only 0.005" wide. Again, an extremely small amount of metal to remove, so quickly done. As with the 5 micron abrasive, because the jig is resting on a slightly thicker slip, the 0.5 micron microbevel starts at the edge and widens with time. [What, you can't see any scratches in this area? That is because the scratches are so narrow they do not reflect light well - the width of the scratches is about the same as the wavelength of visible light. The wavelength of light is discussed in the QX3#light page.] |

|
In some cases, specifically with very tough steels like High Speed Steel, you can use a smaller primary angle and get a smaller final included angle. A smaller final included angle can reduce effort and could improve the quality of the result. (I have done very little testing with smaller included angles. What I have done suggests that with steels other than HSS durability was severely reduced when the final included angle was 5 degrees smaller.)
So, almost always you will start with a 25 degree primary bevel angle. See my pages on powered and hand grinding for how to do this.
The long answer: it depends on the steel and the use. Some irons, especially those made of A2 steel, seem to require a large included angle or the edge chips in use. See the tests of A2 blades for lots of examples of chipping. The old Stanley and Sargent blades can be used at a slightly smaller included angle because they don't seem to chip under normal use. HSS blades can be used with even smaller included angles - they are by far the most durable blades and don't chip at all.
Most of the time you will want to use the smallest possible included angle consistent with edge durability. However, for work with difficult grain on highly figured wood that is prone to tearout, you may want to use a larger back microbevel angle. Increasing the back microbevel angle by 5 or 10 degrees is somewhat like bedding the blade at a 5 or 10 degree higher angle. The cutting action becomes more like scraping, reducing tearout.
You can increase the size of the back bevel angle by using a larger slip. To increase the back bevel angle to 5 degrees you should use slips 0.17 and 0.21" thick when honing the back (continue to use 0.06 and 0.10" when honing the front). (Try various second slip thicknesses in the extension calculator until you get the back bevel you want, with the first slip about 0.04" thinner than the second slip.)
As discussed in detail in the bevels pages, a plane seems dull when the lower wear bevel reaches a certain width. A wider lower wear bevel means that the downward force required to push the blade into the wood (resist the tendency of the blade to rise up like a water skier) is greater. There is a limit to how much force a plane can apply before deflection within the plane exceeds the blade set. This limit depends on the construction of the plane, with more strongly built planes able to apply considerable force.
The rate at which the lower wear bevel widens is dependent on a number of factors, one of which is the clearance angle: the angle between the lower face of the blade at the edge and the wood. If the blade is bedded at 12 degrees (low angle block planes, Stanley #164, Lie Nielsen and Stanley #62, new Lee Valley bevel up planes) then the problem requires very close attention.
The issue is that the attention must be paid to what you do to the back of the blade, more than the front of the blade.
First, when you use the plane you are honing a wear bevel on the back of the blade at 12 degrees. You must restore the back each time you sharpen. You can do this by grinding the iron (grind the primary on the front of the blade) until you have ground past the wear bevel. The wear bevel on the back of a worn bevel up blade can be up to 0.001" wide - this blade would be very dull. So, you can just grind the last 0.001" off the blade and then sharpen as usual.
It is also possible to hone very shallow microbevels on the back of the blade (less than 4 degrees). So, you hone the front and back in the usual way (no grind required until the microbevels get too wide), making sure that the final microbevels reach the new edge. You will have restored a clearance angle of at least 8 degrees - enough for good plane performance and blade durability.
However, since most people pay insufficient attention to the back wear bevel, I suspect that even though they think they have a smaller included angle, when you add in the angle of the back wear bevel which they have failed to remove you get a much higher total included angle.
I experimented with a starting 22 degrees primary bevel on the belt sander, then using a 26 degree angle on the 15 micron paper, 28 degrees on the 5 micron and 29 degrees on the 0.5 micron abrasive. My thinking was that a smaller included angle -- a sharper edge -- might require less effort and produce a finer surface. I thought these gains might be worth the loss of edge durability. I was wrong - there was no noticeable gains and the edge wore faster. I am back starting from a primary of 25 degrees.
If you try different angles, I would be interested in your results.
Still have questions? You can email me here.